Cover Zebra® ZXP Series 8™ Card Printer Wireless Reference Manual Working Draft March 31, 2011 P1035089-001 Rev A
© 2010 ZIH Corp. The copyrights in this manual and the software and/or firmware in the printer described therein are owned by ZIH Corp. and Zebra’s licensors. Unauthorized reproduction of this manual or the software and/or firmware in the printer may result in imprisonment of up to one year and fines of up to $10,000 (17 U.S.C.506). Copyright violators may be subject to civil liability. Proprietary Statement This manual contains proprietary information of Zebra Technologies Corporation and its subsidiaries.
Table of Contents 1 Introduction .......................................................................................................................................... 5 2 Networking Basics ................................................................................................................................. 6 Channels and communication modes....................................................................................................... 6 Security ...................................
6 Troubleshooting .................................................................................................................................. 49 Wireless Troubleshooting Checklist ........................................................................................................ 49 Cannot Print Over Wireless Network...................................................................................................... 50 Improve Wireless Signal Strength ...........................................
1 Introduction This manual is a supplementary document to the Zebra ZXP Series 8 Printer User Guide. This manual provides the following information about installing and connecting the printer to a wireless network: 1. The Networking basics chapter contains overview information about wireless networking and the wireless features of the Zebra ZXP Series 8 printer. 2.
2 Networking Basics The Zebra ZXP Series 8 printer has an internal print server that supports both wired and wireless Ethernet connectivity. The wired Ethernet capability is standard with the printer while the wireless capability is an option that can be ordered through the factory.
be used (channel 14 – 802.11b only). In Europe, channels 1 through 13 are allowed. Because existing standards change frequently, you should check with your local regulatory agencies for authorized channel use. In most countries/regions channels 10 and 11 may be used without restriction. Channel selection depends on the communication mode of the network. The communication mode defines how devices, such as computers and printers, communicate on a wireless network.
encodes the data being sent across the network, making the data unintelligible to unauthorized users. Both of these security methods are common on wireless networks. Authentication The Zebra ZXP Series 8 printer supports Open System authentication. A network with Open System authentication does not screen network users based on their identities and usually involves supplying the correct SSID.
Extensible Authentication Protocols (EAP). Currently, the ZXP Series 8 printer only supports Personal mode. For WPA or WPA2 Personal, a single, 8 – 63 character passphrase is entered into the access point. The same passphrase must be entered into the printer. The access point and printer each derive the same 32 byte PSK from the passphrase using the password-based key derivation function 2 (PBKDF2) from RFC 2898. The importance of picking a secure passphrase cannot be overstressed.
3 Installing Printer The printer with the wireless option ships with the wireless radio pre-installed in the printer. An antenna is shipped in the box with the printer. The antenna must be connected to the rear of the printer before using the wireless interface. Lightly push the antenna onto the printer antenna connector and rotate the knurled antenna connector until finger tight. The antenna orientation is important to maximize the wireless signal strength.
4 Configuring the Printer To set up the printer for wireless printing, you need to know: • • • • The name of your wireless network. This is also known as the Service Set Identifier (SSID). If encryption was used to secure your network. The security key (either a WEP key or WPA passphrase) that allows other devices to communicate on the network if encryption was used to secure your network.
Network Settings Every device connected to an Ethernet network must be assigned an IP Address, Subnet Mask and Default Gateway Address. An IPv4 Address consists of a 32-bit binary number, which is typically presented as four decimal numbers (one for each 8-bit byte) separated by decimal points (for example: 192.168.0.100). The subnet mask determines what subnet an IP address belongs to. A typical subnet would be 255.255.255.0.
RETURN > PRINT TEST CARDS > NETWORK SETTINGS > LAMINATOR SETTINGS > ADVANCED SETTINGS > WIRELESS SETTINGS UP DOWN SELECT Press the DOWN soft-key until “WIRELESS SETTINGS” is highlighted in reverse video then press SELECT and the display changes to: RETURN WITHOUT SAVE SAVE SETTINGS > RADIO CONTROL > SETUP WIZARD > DHCP MODE > SET IP ADDRESS UP DOWN SELECT There are several selections hidden. These can be seen by pressing the DOWN soft-key.
Step 1: Determine whether you plan to enable DHCP to automatically obtain the IP Address, Subnet Mask and Gateway Address. Enter the DHCP Mode menu by pressing the DOWN soft-key until “DHCP MODE” is highlighted then press SELECT and the display changes to: RETURN DHCP ENABLE DHCP DISABLE UP DOWN SELECT Use the UP and DOWN soft-keys to highlight “DHCP ENABLE” or “DHCP DISABLE” then press the SELECT soft-key. Note: if you enabled DHCP, you don’t need to enter an IP Address, Subnet Mask and Default Gateway.
IP: 000.000.000.000 CHANGE NEXT EXIT Use the CHANGE soft-key to change the selected digit. Each press of CHANGE increases the digit value by 1 with a roll-over to zero when necessary. The selected digit will flash. Use the NEXT soft-key to select the next digit in the sequence. Pressing NEXT when the last digit is selected will result in the first digit being selected. Press EXIT to save the current IP Address and exit the menu.
GW: 000.000.000.000 CHANGE NEXT EXIT Use the CHANGE soft-key to change the selected digit. Each press of CHANGE increases the digit value by 1 with a roll-over to zero when necessary. The selected digit will flash. Use the NEXT soft-key to select the next digit in the sequence. Pressing NEXT when the last digit is selected will result in the first digit being selected. Press EXIT to save the current Default Gateway Address and exit the menu.
WAIT WHILE SCAN COMPLETES. USE NEXT TO SCROLL THROUGH AP'S AND SELECT ONE. CANCEL The printer will conduct active scans on all the channels allowed for your regulatory domain. The scanning process is repeated multiple times over all the channels to insure that all AP’s are identified. This can take over a minute to complete.
display again. The CANCEL soft-key can be pressed at any time to abort the Setup Wizard and return to the main Wireless menu. By knowing the SSID and/or BSSID, the access point you wish to connect to can be found in the scan list. There may be occasions where the access point of interest is not displayed. This can happen due to noise or interference during the scanning. If you can’t find the access point, press the CANCEL soft-key and retry the Setup Wizard until the access point is found.
If the access point security is set to WEP, the display changes to: SELECT WEP KEY SIZE. WEP40 WEP104 CANCEL -ORIf the access point security supports both WPA and WPA2, the display changes to: SELECT SECURITY MODE. IF YOU ARE UNSURE, PICK WPA2. WPA WPA2 CANCEL When selecting the WEP key size, you must know the key size that the access point is configured with.
character position that is selected. When the display exactly matches the WEP key of the access point, press the EXIT soft-key. For WPA and WPA2, you may need to select the encryption mode if more than one is available. If this is the case, the display changes to: SELECT ENCRYPTION MODE. IF YOU ARE UNSURE, PICK CCMP. CCMP TKIP CANCEL Press either the CCMP or TKIP soft-key to select the encryption mode. Remember that CCMP is the stronger encryption.
THE PRINTER IS READY TO CONNECT TO THE AP. PRESS CONNECT TO PROCEED. CONNECT CANCEL The CANCEL soft-key can be used to exit the Setup Wizard without connecting. Press the CONNECT soft-key to connect to the access point. The printer will conduct a wireless association and proceed with security key handshaking with the access point if necessary. The display changes to: WAIT FOR THE AP CONNECTION TO COMPLETE.
Configuring Wireless through the Printer Web Page This requires that the printer be connected to a computer through wired Ethernet. Set the DHCP mode, IP Address Subnet Mask and Default Gateway as needed for the wired interface. If DHCP is enabled, use the OCP INFO soft-key to determine the IP Address for the wired Ethernet. Open a browser window on a computer connected to the same network as the printer and enter the printer IP address, like: http://10.14.4.
Step 1: Make any changes needed to DHCP Enable, IP Address, Subnet Mask and Gateway then press Submit. Step 2: Click the “Available Networks” entry from the list of the left of the web page. Click the Scan for Wireless Networks button. Wait for the scan to complete.
If the access point you want to connect to isn’t shown, Click Scan for Wireless Networks again until it is shown. Pick the desired access point using the radio button on the left of the list. Click Connect To Selected Wireless Network to proceed.
Step 3: Enter any information required, like: SSID, Security, Encryption and Passphrase. Click Connect. Wait for connection to complete or for an error message. If connection was successful, the wireless parameters were automatically saved so that the printer will automatically connect the next time the printer is powered on. The wired Ethernet connection can now be disconnected if desired.
Under the Configuration section, click on Wireless Settings.
There are two approaches that can be used to configure the printer’s wireless settings. If all the necessary information is known (SSID, BSSID, Channel, Security, Encryption and Passphrase) these parameters can be directly entered into the Wireless Configuration. The alternate approach is to request that the printer scan for wireless access points and select one. This automatically fills in most of the Wireless Configuration parameters.
Step 2: Press the Scan button to initiate a scan. Once the scan is complete, scroll through the wireless access points and select the one you want to connect to using the associated checkbox. The display should look like: Step 3: If the SSID is not displayed (access point configured to not broadcast SSID), enter the SSID. Select the desired Security and Encryption. The choices will be limited to what the access point can accept.
Step 4: Enter the SSID, BSSID (format xx:xx:xx:xx:xx:xx), Channel, Security and Encryption. The Channel setting is a hint to the printer about which channel the access point will located on. Providing the correct channel will result in a faster connection to the access point when powering up the printer. If you enter the wrong channel it will not cause the connection to fail. The printer will first scan for the access point on the indicated channel and if not found will widen the search to all channels.
Check the Status section. If the connection succeeded, the State parameter should be “connected”. If the State is “inactive”, then the connection failed, probably due to the WPA/WPA2 passphrase being incorrect. If the State is “scanning”, then the access point wasn’t found and periodic scans are underway to find the access point. This may mean that the SSID or BSSID was entered incorrectly.
provides a means to quickly restore connection to a particular access point or select connection to one of several access points available using different profiles. It might also be useful to setup a group of printers to all connect to the same access point. Warning! When using the Save button, the WEP key or WPA passphrase can be saved in the XML file.
THE WIRELESS SETUP IS INCOMPLETE AND THE RADIO CAN'T BE TURNED ON. SET DHCP, IP ADDR AND NETMASK. RUN THE SETUP WIZARD. CANCEL In this case, the Setup Wizard should be run again to establish valid wireless parameters. If the wireless parameters are valid, but the connection still fails, the display changes to: AP CONNECTION FAILED. TRY RUNNING SETUP WIZARD INSTEAD. CANCEL This could happen if the access point itself has been modified and the wireless parameters stored in the printer are incorrect.
2. Scan for the configured access point (using both SSID and BSSID) on all channels. If no access point found, proceed to step 3. If found, connection is attempted. If connection successful, proceed to step 6 (done). If connection fails, proceed to step 3. 3. Scan for all access points with the correct SSID (BSSID ignored) that have the identical security settings as the configured access point on all channels. If no access point found, proceed to step 5.
The security hole provided by ad-hoc networking is not the ad-hoc network itself but the bridge it provides into other networks, usually in the corporate environment. If a computer using an ad-hoc connection is also using a wired or wireless infrastructure network at the same time, it is providing a bridge to the secured organizational network through the unsecured Ad-hoc connection. Bridging is in two forms.
computers are powered on doesn’t matter. The printer will only look for the ad-hoc network or establish an ad-hoc network on the same channel as the ad-hoc network that the printer was first connected to. Before establishing an ad-hoc network, you may need to establish IP Addresses and Subnet Mask for the computers and printer. It is likely that a DHCP server may be unavailable. The computers may power up and assign themselves Automatic Private IP Addresses in the range of 169.254.0.0 to 169.254.255.
4. You should now enter a dialog for Security and Channel selection. The security choices are: None or WEP. It is highly recommended that you choose WEP. While WEP security is poor, it is significantly better than none. Try to pick a channel that is quiet or not heavily used. Your Setup Utility may offer Site Management and Congestion analysis that will help you pick the best channel. Once the selections have been made click Next. 5. If you selected WEP security, you will now need to enter the WEP key.
WIRELESS INFO SSID: Ed2 CHAN = 5 SIG = 100% NOISE FLOOR =-90 dBm AD-HOC WEP RC4 54 Mbps PREV NEXT EXIT Multi-homing Considerations The printer has both wired and wireless Ethernet interfaces that can be used at the same time. This capability is referred to as multi-homing, where a device has multiple interfaces with a different IP address assigned to each interface.
There may be occasions where it is desirable to connect the printer to two entirely separate networks. In this scenario, the hosts on one network are not reachable through the other network. To make this work correctly, the two networks must be on different subnets. The IP Address and Subnet Mask settings must be properly set to achieve this. For example, if both interfaces are configured with a Subnet Mask of 255.255.0, the wired interface IP Address is set to 192.168.0.
5 Monitor Wireless Performance Once you have connected your printer to a wireless access point there are several ways that you can monitor the performance. Performance monitor is important to insure that the wireless connection is working reliably. Wireless Info Pages Wireless information is available through the OCP using the INFO button. Press the INFO softkey and the display changes to: PRINTER INFO MCB FZ8ME.02.05.00 HCB FZ8ME.01.05.00 MAB FZ8RE.01.00.
The “RADIO OFF” status location may be populated with one of several strings as shown in the following table: Radio Status RADIO OFF RADIO DISCONNECTED RADIO INACTIVE RADIO CONNECTING Description The radio is turned off. The radio has not yet started the process of connecting to an access point or the link with the access point has been lost. The radio will shortly attempt to reconnect. The radio is inactive because the association with an access point failed.
It is very important to recognize that good signal strength is absolutely necessary for reliable operation. Signal strength below 25% is likely to cause problems. Signal strength above 50% will provide robust operation. Signal strength is not merely a factor of the distance between the printer antenna and the access point antenna. Other factors such as ambient noise, intervening walls and other nearby wireless equipment can result in poor signal strength.
WIRELESS INFO DHCP Enabled IP: 192.168.0.100 Mask: 255.255.255.0 GW: 192.168.0.1 MAC:00:19:88:06:4f:87 PREV NEXT EXIT This screen shows the DHCP state, which can be Enabled or Disabled. If enabled, the screen can show one of the states shown in the following table: State DHCP WAIT DHCP INITIALIZING DHCP: Request Sent DHCP Timeout Description Waiting for DHCP to be ready. DHCP initializing. Request sent to DHCP server. Timeout due to no response to request.
Wireless Statistics Success and Failure Rates Pressing the NEXT soft-key again will display the Wireless Statistics Success and Failure Rates screen, as follows: WIRELESS STATISTICS TX SUCCESS = 100% TX RETRY = 6% RX SUCCESS = 96% RX DUPLICATE = 0% RTS SUCCESS = 67% PREV NEXT EXIT The meaning of these values is described in the following table: Statistic Name TX SUCCESS TX RETRY RX SUCCESS RX DUPLICATE RTS SUCCESS Description The percentage of packets successfully transmitted by the printer’s radio.
READY MENU INFO If the wireless interface is experiencing hard errors, an indication of this will be added to the normal status display, such as the following: READY WIFI LINK LOST ERROR CODE = 19003 MENU INFO A wireless error is not considered an alarm condition, such as “Out of Cards”, so the display does not change to ALARM. The wireless error display is simply informative. In most cases communications with the printer will have been lost, so the wireless error condition will not be seen by a host.
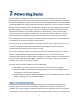
Viewing Wireless Information through Printer Web Page From the home web page, click Wireless Parameters, the following page is displayed: Note that the same information available from OCP Wireless Info pages is available in this web page.
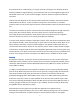
Viewing Wireless Information through Windows Printer Driver Toolbox Open the ZXP Toolbox and under the Information section, click on Wireless Network.
This screen provides some additional information not available through the OCP or printer web page: RSSI – received signal strength indicator. The strength of the received signal in dBm. SNR – the signal to noise ratio in dB for the received signal. Link lost – the number of times the connection to the access point has been lost. Unicast packets – the number of unicast packets that have been sent or received. Non unicast packets – the number of non unicast packets that have been sent or received.
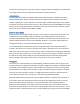
Failed - Increments when an MSDU is not transmitted successfully. Retry - Increments when an MSDU is successfully transmitted after one or more retransmissions. Multiretry - Increments when an MSDU is successfully transmitted after more than one retransmission. Framedup - Increments when a frame is received that the Sequence Control field is indicating a duplicate count. Happens if the AP failed to receive an ACK from the STA for the original frame.
6 Troubleshooting Wireless Troubleshooting Checklist Before beginning to troubleshoot the wireless printer, verify the following: • • • • • • • • • • • The power cord is connected to the printer, and the printer is on. The antenna is attached to the printer. Your SSID is correct. If you are not sure if your SSID is correct, run the wireless setup wizard again. Your WEP key or WPA passphrase is correct. Log into the wireless access point (wireless router) and check the security settings.
Cannot Print Over Wireless Network If you encountered problems while installing, or if your printer does not appear in the printers folder or as a printer option when sending a print job, you can try uninstalling and reinstalling the software. These are possible solutions. Try one or more of the following: 1. Make Sure Your Computer Is Connected To Your Wireless Access Point • • See if you have access to the Internet by opening your Web browser and accessing any site.
f. Type the router IP address into your browser. Type your user name and password for the wireless access point (wireless router) when prompted and Click OK. g. On the main page, click Wireless or another selection where settings are stored. The SSID appears. Write down the SSID, security type, and the security keys if they are shown. Note: Make sure you copy them down exactly, including any capital letters. Store the SSID and the security keys in a safe place for future reference. 5.
b. Click All Programs or Programs ->Accessories->Command Prompt. c. Type ping followed by a space and the IP address of the wireless access point. For example: ping 192.168.0.100 d. Press Enter. e. Check to see whether the access point responds: • If the access point responds, you will see several lines appear that start with “Reply from.” It is possible that the printer did not connect to the wireless network. Turn off and then restart the printer to try to connect again.
2. Remove Obstacles between the Access Point and the Printer The wireless signal from your access point will pass through most objects. Most walls, floors, furniture and other objects will not block the wireless signal. However, there are materials that are too dense for the signal to pass through.
4. Arrange the Network to Reduce Signal Absorption Even when the wireless signal is able to pass through an object, it is slightly weakened. If it passes through too many objects, it can be significantly weakened. All objects absorb part of the wireless signal when it passes through them, but certain types of objects absorb enough to cause communications problems.
7 Technical Specifications The wireless interface complies with IEEE 802.11-2007 with exceptions noted below: Standard 802.11a 802.11b 802.11d 802.11e 802.11g 802.11h 802.11i 802.11j Supported N Y N N Y N Partial N IEEE 802.11 Standards Description 54 Mbps, 5 GHz standard Enhancements to 802.11 to support 5.5 and 11 Mbps International (country-to-country) roaming extensions Enhancements: QoS, including packet bursting 54 Mbps maximum rate, 2.4 GHz standard Spectrum Managed 802.
Protocol IPv4 IPv6 Raw TCP Port 9100 Raw UDP Port 9100 FTP Client ICMP FTP Server DHCP Client DHCP Options DHCP Address Retention BOOTP Client ARP Client RARP Client Gleaning (PING) Static IP DNS WINS ESI Discovery ESI Multicast address Auto IP LPR/LPD IPP v1 IPP v2 SSH SSL IP Access Control IP Filtering IPSec Fast IPSec IKE Open Crypto SNMP v1 SNMP v2 SNMP – Traps HTTP Server Network Stack Protocols Description Internet Protocol Internet Protocol Transmission Control Protocol User Datagram Protocol File
HTTP static pages HTTP HTML NTP Client Telnet Configuration POP3 Client POP3 attachments SMTP Client SMTP Alerts TFTP Sever Feature Roaming Fast Re-association CCX v3 CCX v4 CCX v5 Ad-Hoc Network (IBBS) Data Rates Frequency Range Receive Sensitivity Transmit Output Power External Antenna Type Network Time Protocol Post Office Protocol Simple Mail Transfer Protocol Trivial File Transfer Protocol Y Y N N N N N N N Other Features Specification Not Supported Not Supported Not Supported Not Supported Not Su
Region USA Channels 1 – 11 EUROPE 1 – 13 JAPAN 1- 13 Countries Canada, Colombia, Dominican Republic, Grenada, Guatemala, Guam, Mexico, Panama, Puerto Rico, Taiwan, United States, Uzbekistan United Arab Emirates, Armenia, Netherlands Antilles, Austria, Australia, Aruba, Azerbaijan, Bosnia & Herzegovina, Barbados, Belgium, Bulgaria, Bahrain, Saint Barthelme, Brunei, Darussalam, Belarus, Switzerland, Chile, China, Costa Rica, Cyprus, Czech Republic, Germany, Denmark, Ecuador, Estonia, Egypt, Spain, Finla
8 Glossary 10/100 Base-T A technical term for Ethernet. 10/100 refers to the speed at which the Ethernet network functions. 10 indicates 10 megabits per second (Mb/s) for normal Ethernet, and 100 indicates 100 Mb/s for Fast Ethernet. 802.11a A type of wireless networking that provides up to 54 Mbps transmission in the 5 GHz band. 802.11b A type of wireless networking that provides up to 11 Mbps transmission (with a fallback to 5.5, 2 and 1 Mb/s) in the 2.4 GHz band. 802.
dBm The power ratio in decibels (dB) of the power referenced to one milliwatt (mW). Examples: 0 dBm = 1 milliwatt, 10 dBm = 10 milliwatt and 20 dBm = 100 milliwatt. DHCP (Dynamic Host Configuration Protocol) A protocol used to automatically assign an IP address to each device on a network. DHCP IP address An IP address automatically assigned by a DHCP server. DHCP server A computer or router that gives a unique IP address to each device on the network from a dynamically manages a pool of IP addresses.
IP address (Internet Protocol address) Each computer that connects to a network or the Internet, must have a unique address. IP address numbers are in the form x.x.x.x—for example, 169.254.100.2. Most networks use DHCP or AutoIP to dynamically assign IP addresses. However, a device can be manually assigned a static IP address. LAN (Local Area Network) A high-speed type of computer network that connects devices that are a relatively short distance from one another. An Ethernet network is one type of LAN.
Server A computer on a network that manages network resources. A network might have a number of different server types. For example, a print server manages one or more printers, a file server stores and manages files, and a network server manages network traffic. Signal strength Measure of how strongly a transmitted signal is being received. SSID (Service Set Identifier) A unique identifier (up to 32 characters) attached to the header of packets sent over a wireless LAN.
WEP Wired Equivalent Privacy (WEP) provides security by encrypting data sent over radio waves from one wireless device to another wireless device. WEP encodes the data sent across the network making the data unintelligible to unauthorized users. Only devices that share the same WEP settings as the printer will be able to communicate with the printer. WEP depends on encryption keys that are static and provides less security than WPA (TKIP).
9 Compliance Information Proprietary Statements FCC Compliance Statement This device complies with FCC Part 15 Subpart C Rules. Operation is subject to the following two conditions: (1) This device may not cause harmful interference, and (2) this device must accept any interference received, including interference that may cause undesired operation. Note: This equipment has been tested and found to comply with the limits for a Class A digital device, pursuant to part 15 of the FCC Rules.
Radio Regulatory Information European Regulatory Information for this Radio This device is intended for use in all EU and EFTA member states. Europe – EU Declaration of Conformity This device complies with the essential requirements of the R&TTE Directive 1999/5/EC.
01 Ain 36 Indre 69 Rhone 02 Aisne 37 Indre et Loire 70 Haute Saone 03 Allier 39 Jura 71 Saone et Loire 05 Hautes Alpes 41 Loir et Cher 72 Sarthe 08 Ardennes 42 Loire 75 Paris 09 Ariege 45 Loiret 77 Seine et Marne 10 Aube 50 Manche 78 Yvelines 11 Aude 54 Meurthe et Moselle 79 Deux Sievres 12 Aveyron 55 Meuse 82 Tarn et Garonne 16 Charente 57 Moselle 84 Vaucluse 19 Correze 58 Nievre 86 Vienne 2A Corse Sud 59 Nord 88 Vosges 2B Haute Corse