
User's Manual

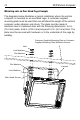


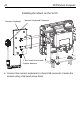
Table Of Contents
- Warranty
- Introduction
- About This Guide
- Features
- Unpacking
- Optional Accessories
- Installation
- Installing the VC70 on a Forklift
- Mounting the Vehicle Computer
- U Mount Installation
- Mounting onto an Over-Head Cross-Beam Example
- Mounting onto an Over-Head Cage Example
- Mounting on a Dashboard or Horizontal Surface Example
- Installing the Optional QWERTY/AZERTY Keyboard
- Installing an Optional VC5090 Keyboard on VC70
- Installing a Numeric Keyboard
- Installing a Keyboard Protection Grill
- Installing a Scanner Mount
- Installing the VC70 on a Cart, a Wall, or a Desktop
- RAM Mount Installation
- Installing an External Antenna
- Installing the External Roof-mounted Antenna
- Connecting an External Speaker to VC70
- Installing an External Microphone Mount
- Installing a Micro SD Card
- Installing the VC70 on a Forklift
- Electrical Power Wiring
- Powering the VC70 On/Off
- Connecting Accessories
- Maintenance
- Troubleshooting
- Regulatory Information
- Radio Modules
- Bluetooth® Wireless Technology
- Wireless Device Country Approvals
- Country Roaming
- Ad-Hoc Operation (2.4 GHz band)
- Frequency of Operation - IC
- Health and Safety Recommendations
- RF Exposure Guidelines
- Power Supply
- Batteries
- Radio Frequency Interference Requirements - FCC
- Radio Frequency Interference Requirements - Canada
- Marking and European Economic Area (EEA)
- Japan (VCCI) - Voluntary Control Council for Interference
- Other Countries
- Waste Electrical and Electronic Equipment (WEEE)

Quick Reference Guide 19
3. Attach the numeric keyboard mount to the VC70, using four
M5x14mm Torx head screws with captive washers.Tighten the
screws.
4. Torque the numeric keyboard Torx head screws to 20 + 10% kgf-cm
(17 + 10% lbs-in).
6 Torx Head Screws
with captive washers
Numeric Keyboard
Numeric Keyboard Mount