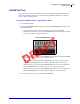
Diagnostics and Troubleshooting PAUSE Self Test PAUSE Self Test This self test can be used to provide the test labels required when making adjustments to the printer’s mechanical assemblies or to determine if any printhead elements are not working. Figure 5 shows a sample printout. To perform a PAUSE self test, complete these steps: 1. Turn off (O) the printer. 2. Press and hold PAUSE while turning on (I) the printer. Hold PAUSE until the first control panel light turns off.
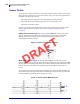
122 Diagnostics and Troubleshooting Sensor Profile—Sensor Profile Sensor Profile Tap Diagnostics > Printer Information > Print Sensor Profile to Label to print a sensor profile image (which will extend across several actual labels or tags). Use the sensor profile image to troubleshoot the following situations: • The printer experiences difficulty in determining gaps (web) between labels. • The printer incorrectly identifies preprinted areas on a label as gaps (web). • The printer cannot detect ribbon.
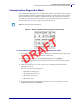
Diagnostics and Troubleshooting Communication Diagnostics Mode—Communication Diagnostics Test Communication Diagnostics Mode The communication diagnostics test is a troubleshooting tool for checking the interconnection between the printer and the host computer. When the printer is in diagnostics mode, it prints all data received from the host computer as straight ASCII characters with the hex values below the ASCII text.
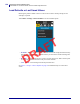
124 Diagnostics and Troubleshooting Load Defaults or Last Saved Values—Communication Diagnostics Test Load Defaults or Last Saved Values Restoring the printer to default values or to the last saved values can help if things are not working as expected. Touch Menu > Settings > Restore Defaults to see the available options. T F A R D • PRINTER—Restores all printer settings other than the network settings back to the factory defaults.
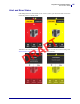
Diagnostics and Troubleshooting Alert and Error States Alert and Error States If the background color of the Home screen is red or yellow, you will need to take an action to restore the printer to a Ready status. T F A R D Touch the icons in the bar at the top of the Home screen to view the error or alert message. See Alerts and Error Messages on page 126 for recommended actions.
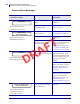
126 Diagnostics and Troubleshooting Alert and Error States—Alerts and Error Messages Alerts and Error Messages Display/ Indicator Lights Possible Causes Head Open STATUS light steady red PAUSE light steady yellow Media is Out Please Load Media STATUS light steady red SUPPLIES light steady red Ribbon In The printhead is not fully closed. Close the printhead completely. The printhead open sensor is not working properly. Call a service technician to replace the sensor.
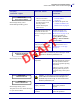
Diagnostics and Troubleshooting Alert and Error States—Alerts and Error Messages Display/ Indicator Lights Possible Causes In thermal transfer mode: 1. Load ribbon correctly. See Load the Ribbon ribbon is not loaded on page 43. ribbon is loaded incorrectly 2. Calibrate the printer. See the ribbon sensor is not Calibrate the Ribbon and detecting ribbon Media Sensors on page 92.
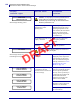
128 Diagnostics and Troubleshooting Alert and Error States—Alerts and Error Messages Display/ Indicator Lights Possible Causes HEAD COLD PRINTING HALTED STATUS light flashing yellow Caution • An improperly connected printhead data or power cable can cause this error message. The printhead may be hot enough to cause severe burns. Allow the printhead to cool. The printhead temperature is approaching its lower operating limit.
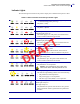
Diagnostics and Troubleshooting Alert and Error States—Alerts and Error Messages Indicator Lights The indicator lights located above the printer’s display also communicate the printer’s status. Table 5 • Status of Printer As Shown by Indicator Lights STATUS light steady green (other lights steady yellow for 2 seconds during printer power-up) The printer is ready. PAUSE light steady yellow. The printer is paused. STATUS light steady red SUPPLIES light steady red The media supply is out.
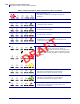
130 Diagnostics and Troubleshooting Alert and Error States—Alerts and Error Messages Table 5 • Status of Printer As Shown by Indicator Lights (Continued) STATUS light flashing red The printer is unable to read the dpi setting of the printhead. Printers with a ZebraNet wired Ethernet option NETWORK light off No Ethernet link is available. NETWORK light steady green A 100 Base link was found. NETWORK light steady yellow A 10 Base link was found.
Diagnostics and Troubleshooting TroubleshootingTroubleshooting—Printing Issues Troubleshooting Printing or Print Quality Issues Barcode Does Not Scan Issue Possible Cause Recommended Solution The barcode printed on a label does not scan. The barcode is not within specifications because the printer is set at an incorrect darkness level. 1. Perform the steps in Run the Print Wizard and Print a Test Label on page 49. 2. If necessary, manually adjust the darkness or print speed settings.
132 Diagnostics and Troubleshooting TroubleshootingTroubleshooting—Printing Issues Print Consistently Too Light or Too Dark Issue Possible Cause Recommended Solution Printing is too light or too dark over the entire label The media or ribbon is not designed for high-speed operation. Replace supplies with those recommended for high-speed operation. For more information, see http://www.zebra.com/supplies. The printer is set at an incorrect darkness level.
Diagnostics and Troubleshooting TroubleshootingTroubleshooting—Printing Issues Issue Possible Cause Recommended Solution General print quality issues The printer is set at an incorrect print speed or darkness level. Keep in mind that printer settings may be affected by the driver or software being used. For optimal print quality, set the print speed and the darkness to the lowest possible settings for your application. 1. Perform the steps in Run the Print Wizard and Print a Test Label on page 49. 2.
134 Diagnostics and Troubleshooting TroubleshootingTroubleshooting—Printing Issues Missing Print Issue Possible Cause Recommended Solution Long tracks of missing print on several labels Print element damaged. Call a service technician. Wrinkled ribbon. See wrinkled ribbon causes and solutions in Ribbon Issues on page 136. Loss of Registration Issue Possible Cause Recommended Solution Loss of printing registration on labels. The platen roller is dirty. Clean the printhead and platen roller.
Diagnostics and Troubleshooting TroubleshootingTroubleshooting—Printing Issues Issue Possible Cause Recommended Solution Vertical image or label drift The printer is using Set the printer for the correct media type non-continuous labels but is (gap/notch, continuous, or mark) and calibrate configured in continuous mode. the printer, if necessary (see Calibrate the Ribbon and Media Sensors on page 92). The media sensor is calibrated improperly. Calibrate the printer.
136 Diagnostics and Troubleshooting Troubleshooting—Ribbon Issues Ribbon Issues For videos of some common procedures, go to http://www.zebra.com/zt600-info. Broken Ribbon Issue Possible Cause Recommended Solution Broken or melted ribbon Darkness setting too high. 1. Perform the steps in Run the Print Wizard and Print a Test Label on page 49. 2. If necessary, manually adjust the darkness or print speed settings. T F A R D The ribbon is coated on the wrong side and cannot be used in this printer.
Diagnostics and Troubleshooting Troubleshooting—Ribbon Issues Wrinkled Ribbon Issue Possible Cause Recommended Solution Wrinkled ribbon Ribbon was loaded incorrectly. Load the ribbon correctly. See Load the Ribbon on page 43. Incorrect burn temperature. 1. Perform the steps in Run the Print Wizard and Print a Test Label on page 49. 2. If necessary, manually adjust the darkness or print speed settings. • Set the print darkness to the lowest setting that provides good print quality.
138 Diagnostics and Troubleshooting Troubleshooting—RFID Issues RFID Issues Printer Stops at RFID Inlay Issue Possible Cause Recommended Solution The printer stops at the RFID inlay. The printer calibrated the label length only to the RFID inlay instead of to the interlabel gap. 1. Tap the Advanced icon and then select FEED for the Power Up and Head Close actions. 2. Manually calibrate the printer (see Calibrate the Ribbon and Media Sensors on page 92).
Diagnostics and Troubleshooting Troubleshooting—RFID Issues Voided Labels (Continued) Issue Possible Cause Recommended Solution The printer voids every label. The printer is not calibrated for the media being used. Manually calibrate the printer (see Calibrate the Ribbon and Media Sensors on page 92). You are using an RFID label with a tag type that is not supported by your printer. These printers support only Gen 2 RFID labels.
140 Diagnostics and Troubleshooting Troubleshooting—RFID Issues Other RFID Issues Issue Possible Cause Recommended Solution RFID parameters do not appear in Setup mode, and RFID information does not appear on the printer configuration label. The printer was powered off (O) and then back on (I) too quickly for the RFID reader to initialize properly. Wait at least 10 seconds after turning the printer power off before turning it back on. 1. Turn off (O) the printer. 2. Wait 10 seconds. 3.
Diagnostics and Troubleshooting Troubleshooting—Communications Issues Communications Issues Label Formats Not Recognized Issue Possible Cause Recommended Solution A label format was sent to the printer but was not recognized. The DATA light does not flash. The communication parameters are incorrect. Check the printer driver or software communications settings (if applicable) for your connection.
142 Diagnostics and Troubleshooting Troubleshooting—Miscellaneous Issues Miscellaneous Issues Issues with the Display Issue Possible Cause Recommended Solution The control panel display shows a language that I cannot read The language parameter was changed through the control panel or a firmware command. 1. On the Home screen, touch Menu, which is the icon on the bottom-left. Touch the top selection on the screen. 3. Scroll through the language selections under this menu option.
Diagnostics and Troubleshooting Troubleshooting—Miscellaneous Issues Printer Parameters Are Not Set As Expected Issue Possible Cause Recommended Solution Changes in parameter settings did not take effect. OR Some parameters changed unexpectedly. A firmware setting or command prevented the ability to change the parameter. Check your label formats or the settings of the software that you use to send formats to the printer.
144 Diagnostics and Troubleshooting Troubleshooting—Miscellaneous Issues Cannot Connect through Wired or Wireless Connections Issue Possible Cause Recommended Solution I manually entered a wireless IP address, subnet, and gateway on my printer, but it won’t connect to my wired or wireless network. The printer’s network must be reset after values are changed. Reset the network by touching Menu > Connections > Networks > Reset Network and then touching the check mark to save the changes.
Diagnostics and Troubleshooting Troubleshooting—Miscellaneous Issues Calibration Issues Issue Possible Cause Recommended Solution Auto Calibrate failed. The media or ribbon is loaded incorrectly. Ensure that the media and ribbon are loaded correctly. See Load the Ribbon on page 43 and Load the Media on page 17. The sensors could not detect the media or ribbon. Calibrate the printer manually. See Calibrate the Ribbon and Media Sensors on page 92. The sensors are dirty or positioned improperly.
146 Diagnostics and Troubleshooting Service the Printer Service the Printer If you have a problem using the printer, contact your facility's technical or systems support. If there is a problem with the printer, they will contact the Zebra Global Customer Support Center at: http://www.zebra.com/support.
5 Install the Printer Driver and Connect to a Computer T F A In this section, you are shown how to use the Zebra Setup Utilities program to prepare a computer running Microsoft Windows® for the printer driver before connecting the printer to any of the computer’s data communication interfaces. Use this section for directions to install this program if you have not already done so. You may connect your printer to your computer using any of the connections that you have available.
148 Install the Printer Driver and Connect to a Computer Install Zebra Setup Utilities Important • You must use the Zebra Setup Utilities program or the Zebra Printer Setup Utility app for Android devices (available for free from Google Play™ at https://play.google.com/store/apps/details?id=com.zebra.printersetup) before connecting the printer to your computer.
Install the Printer Driver and Connect to a Computer Install Zebra Setup Utilities 3. If you agree with the terms of the EULA, click ACCEPT AND BEGIN DOWNLOAD NOW Depending on your browser, you are given options to run or save the executable file. T F A Run the Zebra Setup Utilities Installer 4. Save the program to your computer. (Optional if your browser gave you the option to run the program instead of saving it.) 5. Run the executable file.
150 Install the Printer Driver and Connect to a Computer Install Zebra Setup Utilities If your computer... Then... Did previously have the Zebra Setup Utilities installed a. The Zebra Setup Utilities - InstallAware Wizard displays the following. b. Go to Updating Existing Installations of Zebra Setup Utilities on page 152. T F A New Installations of Zebra Setup Utilities 6. Click Next. R D You are prompted again to read and accept the End User License Agreement (EULA). 7.
Install the Printer Driver and Connect to a Computer Install Zebra Setup Utilities 8. Click Next. You are prompted to select where the files will be installed. T F A 9. Change the destination folder, if necessary, and then click Next. You are prompted to select a location for program shortcuts.
152 Install the Printer Driver and Connect to a Computer Install Zebra Setup Utilities 10. Change the location, if desired, and then click Next. You are prompted to complete the InstallAware wizard. T F A 11. Skip to Continuing with New or Updated Installations on page 153. Updating Existing Installations of Zebra Setup Utilities 12. Click Next. R D You are prompted to choose the features that you would like to install.
Install the Printer Driver and Connect to a Computer Install Zebra Setup Utilities 13. Click Next. You are prompted to complete the InstallAware wizard. T F A Continuing with New or Updated Installations 14. Click Next. Installation begins.
154 Install the Printer Driver and Connect to a Computer Install Zebra Setup Utilities During installation, you are presented with information about drivers. T F A 15. Read the information, and then check the box that says “I have read the information above”. 16. Click Next. You are shown options that can take place when the wizard exits the installation. R D 17. Check the box that says “Run Zebra Setup Utilities now.
Install the Printer Driver and Connect to a Computer Install Zebra Setup Utilities 18. Click Finish. What the computer displays next depends on whether any Zebra printer drivers are already installed on your computer. Follow the instructions based on what your computer displays. If your computer... Then... Did not previously have any Zebra printer drivers installed The System Prepare Wizard displays. T F A To connect by... Then...
156 Install the Printer Driver and Connect to a Computer Install Zebra Setup Utilities If your computer... Then... Did previously have any Zebra printer drivers installed The Zebra Setup Utilities screen displays. To connect by the... T F A Then... R D P1106464-001 USB port Continue with Connecting the printer to a USB port on your computer on page 158. Serial or optional parallel port Continue with Adding a Printer from the Zebra Setup Utilities Screen on page 164.
Install the Printer Driver and Connect to a Computer Connect a Computer to the Printer’s USB Port Connect a Computer to the Printer’s USB Port Complete the steps in this section only after you have installed the Zebra Setup Utilities program. If necessary, complete the steps in Install Zebra Setup Utilities on page 148 before continuing. Important • You must install the Zebra Setup Utilities program before connecting the printer to your computer.
158 Install the Printer Driver and Connect to a Computer Connect a Computer to the Printer’s USB Port 1. Click Next. The System Prepare Wizard prompts you to connect the printer to the USB port on your computer. T F A 2. Click Finish. The Zebra Setup Utilities screen displays. Connecting the printer to a USB port on your computer R D Complete the steps in this section only after the System Prepare Wizard prompts you to do so or after you have opened the Zebra Setup Utilities program.
Install the Printer Driver and Connect to a Computer Connect a Computer to the Printer’s USB Port 3. Connect one end of the USB cord to the USB port on your printer and the other end to your computer. T F A 4. Plug the female end of the A/C power cord into the A/C power connector on the back of the printer. R D 5. Plug the male end of the A/C power cord into an appropriate power outlet.
160 Install the Printer Driver and Connect to a Computer Connect a Computer to the Printer’s USB Port 6. Turn on (I) the printer. T F A As the printer boots up, your computer completes the driver installation and recognizes your printer. The installation for the USB connection is complete.
Install the Printer Driver and Connect to a Computer Connect a Computer to the Printer’s Serial or Parallel Port Connect a Computer to the Printer’s Serial or Parallel Port Complete the steps in this section only after you have installed the Zebra Setup Utilities program. If necessary, complete the steps in Install Zebra Setup Utilities on page 148 before continuing. Important • You must install the Zebra Setup Utilities program before connecting the printer to your computer.
162 Install the Printer Driver and Connect to a Computer Connect a Computer to the Printer’s Serial or Parallel Port 1. Select “Other computer ports (Parallel Port, Serial Port, TCP-IP Port, ...), and then click Next. The new printer wizard prompts you to begin the installation procedure. T F A 2. Click Finish. The printer driver wizard displays.
Install the Printer Driver and Connect to a Computer Connect a Computer to the Printer’s Serial or Parallel Port 3. Click Next. You are prompted to select an installation option. T F A 4. Continue with step 6 on page 165.
164 Install the Printer Driver and Connect to a Computer Connect a Computer to the Printer’s Serial or Parallel Port Adding a Printer from the Zebra Setup Utilities Screen Figure 12 • Zebra Setup Utilities Screen T F A R D 5. On the Zebra Setup Utilities screen, click Install New Printer. You are prompted to select an installation option.
Install the Printer Driver and Connect to a Computer Connect a Computer to the Printer’s Serial or Parallel Port 6. Click Install Printer. You are prompted to select a printer type. T F A 7. Select your printer model and resolution. The model and resolution are on a part number sticker on the printer, usually located below the media spindle.
166 Install the Printer Driver and Connect to a Computer Connect a Computer to the Printer’s Serial or Parallel Port 10. Click Next. You are prompted to launch other setup wizards. T F A 11. Check the desired options, and then click Finish. The printer driver is installed. If you are prompted that other programs might be affected, click Next.
Install the Printer Driver and Connect to a Computer Connect a Computer to the Printer’s Serial or Parallel Port Connecting the printer to a serial or parallel port on your computer 12. Connect one or both cords to the appropriate ports on your printer. T F A Serial Connector Parallel Connector 13. Connect the other end of the cord to the appropriate port on your computer. 14. Plug the female end of the A/C power cord into the A/C power connector on the back of the printer. R D 15.
168 Install the Printer Driver and Connect to a Computer Connect a Computer to the Printer’s Serial or Parallel Port 16. Turn on (I) the printer. The printer boots up. T F A Configuring the printer (if necessary) 17. If necessary, adjust the printer’s port settings to match those of your computer. See the Zebra Programming Guide at http://www.zebra.com/manuals for more information. The installation for serial or parallel connections is complete.
Install the Printer Driver and Connect to a Computer Connect to Your Network through the Printer’s Ethernet Port Connect to Your Network through the Printer’s Ethernet Port If you wish to use a wired print server (Ethernet) connection, you may need to connect the printer to your computer using one of the other available connections.
170 Install the Printer Driver and Connect to a Computer Connect to Your Network through the Printer’s Ethernet Port 4. Turn on (I) the printer. T F A The printer boots up. 5. Connect the printer to an Ethernet cable that is connected to your network. R D The printer attempts to communicate with your network. If it is successful, it fills in your LAN’s gateway and subnet values and gets an IP address. The printer display will alternate between the printer’s firmware version and its IP address. 6.
Install the Printer Driver and Connect to a Computer Connect to Your Network through the Printer’s Ethernet Port Configuring the printer with your LAN information (if necessary) If your printer connected to your network automatically, you do not need to complete this section. Continue with Adding a Printer from the Zebra Setup Utilities Screen on page 172. 7.
172 Install the Printer Driver and Connect to a Computer Connect to Your Network through the Printer’s Ethernet Port Adding a Printer from the Zebra Setup Utilities Screen 10. If necessary, open the Zebra Setup Utilities program. The Zebra Setup Utilities screen displays. Figure 13 • Zebra Setup Utilities Screen T F A R D 11. Click Install New Printer. The printer driver wizard displays.
Install the Printer Driver and Connect to a Computer Connect to Your Network through the Printer’s Ethernet Port 12. Click Next. You are prompted to select an installation option. T F A 13. Click Install Printer. You are prompted to select a printer type. R D 14. Select your printer model and resolution. The model and resolution are on a part number sticker on the printer, usually located below the media spindle.
174 Install the Printer Driver and Connect to a Computer Connect to Your Network through the Printer’s Ethernet Port 15. Click Next. You are notified that the printer is already installed. 16. Click Add new printer. You are prompted for a printer name, the port to which the printer will be connected, and the language for the printer display. T F A R D 17. Click Add Port. The wizard prompts you for a name for the port and the IP address of your printer.
Install the Printer Driver and Connect to a Computer Connect to Your Network through the Printer’s Ethernet Port 18. Give the port a name that you can recognize when it appears in the list of available ports. 19. Enter the printer’s IP address. This could be one that was assigned automatically or one that you specified manually in the previous section. 20. Click OK. A printer driver is created with the port name that you assigned. The new printer port appears in the list of available ports.
176 Install the Printer Driver and Connect to a Computer Connect to Your Network through the Printer’s Ethernet Port 22. Check the desired options, and then click Finish. The printer driver is installed. If you are prompted that other programs might be affected, click the appropriate option to continue. T F A R D The installation for wired (Ethernet) connections is complete.
Install the Printer Driver and Connect to a Computer Connect the Printer to Your Wireless Network Connect the Printer to Your Wireless Network If you wish to use the printer’s optional wireless print server, you must first connect the printer to your computer using one of the other available connections. While the printer is connected via one of those connections, you configure the printer to communicate with your Wireless Local Area Network (WLAN) through the wireless print server.
178 Install the Printer Driver and Connect to a Computer Connect the Printer to Your Wireless Network Adding a Printer from the Zebra Setup Utilities Screen 5. If necessary, open the Zebra Setup Utilities program. The Zebra Setup Utilities screen displays. Figure 14 • Zebra Setup Utilities Screen T F A R D 6. Click Install New Printer. The printer driver wizard displays.
Install the Printer Driver and Connect to a Computer Connect the Printer to Your Wireless Network 7. Click Next. You are prompted to select an installation option. T F A 8. Click Install Printer. You are prompted to select a printer type. R D 9. Select your printer model and resolution. The model and resolution are on a part number sticker on the printer, usually located below the media spindle.
180 Install the Printer Driver and Connect to a Computer Connect the Printer to Your Wireless Network 10. Click Next. You are notified that the printer is already installed. 11. Click Add new printer. You are prompted for a printer name, the port to which the printer will be connected, and the language for the printer display. T F A R D 12. Click Add Port. The wizard prompts you for a name for the port and the IP address of your printer.
Install the Printer Driver and Connect to a Computer Connect the Printer to Your Wireless Network 13. Give the port a name that you can recognize when it appears in the list of available ports. 14. Enter the printer’s IP address. This could be one that was assigned automatically or one that you specified manually in the previous section. 15. Click OK. A printer driver is created with the port name that you assigned. The new printer port appears in the list of available ports. T F A R D 16.
182 Install the Printer Driver and Connect to a Computer Connect the Printer to Your Wireless Network 17. Check the desired options, and then click Finish. The printer driver is installed. If you are prompted that other programs might be affected, click the appropriate option to continue. T F A R D The installation for wireless communication is complete.
6 Specifications T F A This section lists general printer specifications, printing specifications, ribbon specifications, and media specifications. Contents R D General Specifications . . . . . . . . . . . . . . . . . . . . . . . . . . . . . . . . . . . . . . . . . . . . . . . . . . Power Cord Specifications. . . . . . . . . . . . . . . . . . . . . . . . . . . . . . . . . . . . . . . . . . . . . Printing Specifications . . . . . . . . . . . . . . . . . . . . . . . . . . . . . . . . . . . . . . . . . .
184 Specifications General Specifications General Specifications Model ZT410 ZT420 Height 12.8 in.(325 mm) 12.8 in. (325 mm) Width 10.7 in. (272 mm) 13.2 in. (335 mm) Depth 19.7 in. (500 mm) 19.7 in. (500 mm) Weight 36 lb (16 kg) 40 lb (18 kg) Electrical 90–265 VAC, 48-62 Hz 90–265 VAC, 48-62 Hz Power consumption Printing PAUSE test at slowest speed 118.7 W 220.
Specifications General Specifications Model Communication Interface Specifications ZT410 Standard ZT420 ® Bluetooth Bluetooth Classic + Low Energy (LE) (standard with all printers that do not have the ac wireless print server option) • 2.4GHz • FHSS (BDR/EDR), DSSS (Bluetooth LE) • RF power 9.22 dBm (EIRP) • FHSS (BDR/EDR), DSSS (Bluetooth LE) • RF power 9.22 dBm (EIRP) Bluetooth 4.1 + Low Energy (LE) (part of the 802.11 a/b/g/n/ac wireless print server option) • 2.
186 Specifications General Specifications Model Communication Interfaces (continued) ZT410 Standard (continued) ZT420 Zebra PrintTouch/Near Field Communication (NFC) Limitations and Requirements NFC communication must be initiated by touching your device to the appropriate location on the printer. Connections and Configuration Some devices may not support NFC communication with the printer until you alter their settings. USB 1.
Specifications General Specifications Model Communication Interfaces (continued) ZT410 Optional ZT420 Wireless Print Server An 802.11 a/b/g/n and an 802.11 a/b/g/n/ac version are available. The 802.11 a/b/g/n/ac version includes Bluetooth 4.1. 802.11 b • 2.4 GHz • DSSS (DBPSK, DQPSK and CCK) • RF power 17.77 dBm (EIRP) 802.11 g • 2.4 GHz • OFDM (16-QAM and 64-QAM with BPSK and QPSK) • RF power 18.61 dBm (EIRP) 802.11 n • 2.4 GHz • OFDM (16-QAM and 64-QAM with BPSK and QPSK) • RF power 18.
188 Specifications General Specifications Power Cord Specifications Caution • For personnel and equipment safety, always use an approved three-conductor power cord specific to the region or country intended for installation. This cord must use an IEC 320 female connector and the appropriate region-specific, three-conductor grounded plug configuration. Depending on how your printer was ordered, a power cord may or may not be included.
Specifications General Specifications Figure 16 • International Safety Organization Certification Symbols T F A R D 5/9/19 ZT411/ZT421 Color Touch User Guide P1106464-001 189
190 Specifications Printing Specifications Printing Specifications Model ZT410 Print resolution 203 dpi (dots/in.)/8 dots/mm 203 dpi (dots/in.)/8 dots/mm Dot size (nominal) (width x length) Maximum print width 300 dpi/12 dots/mm 300 dpi/12 dots/mm 600 dpi/24 dots/mm N/A 203 dpi 0.0049 in. x 0.0049 in. (0.125 mm x 0.125 mm) 0.0049 in. x 0.0049 in. (0.125 mm x 0.125 mm) 300 dpi 0.0033 in. x 0.0039 in. (0.084 mm x 0.099 mm) 0.0033 in. x 0.0039 in. (0.084 mm x 0.099 mm) 600 dpi 0.0016 in.
Specifications Media Specifications Media Specifications Model Label length Minimum Maximum Maximum continuous media print length ZT410 ZT420 Tear-off 0.5 in. (12.7 mm) 0.5 in. (12.7 mm) Peel-off 0.5 in (12.7 mm) 0.5 in (12.7 mm) Rewind 0.5 in. (12.7 mm) 0.5 in. (12.7 mm) Cutter 1.0 in. (25.4 mm) 1.0 in. (25.4 mm) Non-RFID RFID Varies for each transponder type 200 or 300 dpi 39 in. (991 mm) 39 in. (991 mm) 600 dpi 20 in. (508 mm) N/A 200 dpi 157 in. (3988 mm) 102 in.
192 Specifications Ribbon Specifications Ribbon Specifications Model Ribbon width* ZT410 ZT420 Minimum 2 in.** (51 mm**) Maximum 4.33 in. (110 mm) 6.85 in. (174 mm) Maximum ribbon length 1476 ft (450 m) 1476 ft (450 m) Ribbon core inside diameter 1 in. (25 mm) * Zebra recommends using ribbon that is at least as wide as the media to protect the printhead from wear. ** Depending on your application, you may be able to use ribbon narrower than 2 in.
Glossary T F A alphanumeric Indicating letters, numerals, and characters such as punctuation marks. backfeed When the printer pulls the media and ribbon (if used) backward into the printer so that the beginning of the label to be printed is properly positioned behind the printhead. Backfeed occurs when operating the printer in Tear-Off and Applicator modes. R D barcode A code by which alphanumeric characters can be represented by a series of adjacent stripes of different widths.
194 Glossary continuous media Label or tag-stock media that does not have gaps, holes, notches, or black marks to indicate label separations. The media is one long piece of material wound into a roll. This allows the image to be printed anywhere on the label. Sometimes a cutter is used to cut apart individual labels or receipts. Contrast this with black mark media or gap/notch media. core diameter The inside diameter of the cardboard core at the center of a roll of media or ribbon.
Glossary Font A complete set of alphanumeric characters in one style of type. Examples include CG Times™, CG Triumvirate Bold Condensed™. gap/notch media Media that contains a separation, notch, or hole, indicating where one label/printed format ends and the next one begins. Contrast this with black mark media or continuous media. ips (inches-per-second) The speed at which the label or tag is printed. Many Zebra printers can print from 1 ips to 14 ips.
196 Glossary linerless media Linerless media does not use backing to keep the layers of labels on a roll from sticking to one another. It is wound like a roll of tape, with the sticky side of one layer in contact with the non-sticky surface of the one below it. Individual labels may be separated by perforations, or they can be cut apart. Because there is no liner, more labels can potentially fit on a roll, cutting down the need to change media as often.
Glossary printhead wear The degradation of the surface of the printhead and/or the print elements over time. Heat and abrasion can cause printhead wear. Therefore, to maximize the life of the printhead, use the lowest print darkness setting (sometimes called burn temperature or head temperature) and the lowest printhead pressure necessary to produce good print quality.
198 Glossary tag stock A type of media having no adhesive backing but featuring a hole or notch by which the tag can be hung on something. Tags are usually made of cardboard or other durable material and are typically perforated between tags. Tag stock can come on rolls or in a fanfold stack. See gap/notch media. tear-off A mode of operation in which the user tears the label or tag stock away from the remaining media by hand.
Index T F A A adhesive test for ribbon coating, 43 adjust print quality, 49 adjustments printhead pressure, 93 alternate TCP port number, 65 antenna element, 86 B R D barcodes barcode does not scan, 131 determining "in-spec" barcodes, 118 battery disposal, 115 Bluetooth characteristics and limitations, 185 discovery on/off, 73 broken ribbon, 136 C calibration Auto Calibrate failed, 145 how to set as head-close action, 60 how to set as power-up action, 60 procedure, 92 SHORT CAL how to set for power-up
200 Index I diagnostic mode how to initiate, 57 overview, 123 display display language, 57 how to change from unfamiliar language, 142 missing characters, 142 printing from the display, 82 disposal of printer parts, 115 driver installation, 147 E idle display how to change what displays, 59 images distorted on labels, 141 indicator lights combined with error message, 126 troubleshooting, 129 initiate manual calibration, 81 inspect for shipping damage, 12 IP resolution (IP protocol) wired, 67, 69 L en
Index network settings load defaults, 62 reset network, 64 NO MOTION how to set as head-close action, 60 how to set as power-up action, 60 non-continuous media problem with labels, 145 printhead adjust printhead pressure, 93 HEAD COLD message cycling with other messages, 127 displaying alone, 128 how to clean, 102 PH NOT AUTHENTICATED message, 126 PRINT HEAD OVERTEMP message, 127 THERMISTOR PREPLACE PRINTHEAD message, 127 programming position, 88 O operating conditions, 10 ordering replacement parts, 115
202 Index RIBBON OUT message, 127 ribbon sensor calibration procedure, 92 ways to initiate, 81 roll media loading, 18 routine cleaning schedule, 98 run a ZBI program, 58 S scanner input, 82 scratch test ribbon coated side, 43 self tests communication diagnostics, 123 PAUSE, 121 sensor type selection, 81 sensors interpreting sensor profile, 122 transmissive sensor selection, 81 serial port characteristics of serial connection, 186 connecting the printer to a computer, 161 servicing the printer, 146 setup
Index Z Zebra Global Customer Support, 146 Zebra Setup Utilities installation, 148 ZebraDesigner, 13 Zebra Basic Interpreter (ZBI) enable, 58 run a ZBI program, 58 T F A R D 5/9/19 ZT411/ZT421 Color Touch User Guide P1106464-001 203
Corporate Headquarters Zebra Technologies Corporation 3 Overlook Point Lincolnshire, IL 60069 USA T: +1 847 634 6700 Toll-free +1 866 230 9494 F: +1 847 913 8766 T F A http://www.zebra.
Zebra ZT411 / ZT421 Regulatory Guide - DRAFT P1089907-002 Worldwide European Union (EU) Regulatory Information All Zebra devices are designed to be compliant with the rules and regulations in locations they are sold and will be labeled as required. For more information about Zebra’s compliance with national and international mandates, go to: www.zebra.com/ compliance For the latest version of this guide, go to: www.zebra.
Waste Electrical and Electronic Equipment (WEEE) ελληνικά (el): Μην απορρίψετε αυτό το προϊόν σε μη ταξινομημένα δημοτικά απόβλητα. Αυτό το προϊόν είναι ανακυκλώσιμο και πρέπει να ανακυκλώνεται σύμφωνα με τα τοπικά πρότυπα της περιοχής σας. Για περισσότερες πληροφορίες δείτε την ιστοσελίδα μας στη διεύθυνση: www.zebra.com/environment English (en): Do not dispose of this product in unsorted municipal waste. This product is recyclable, and should be recycled according to your local standards.