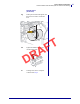
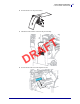
Printer Setup and Operation Load the Media—Peel-Off Mode (with our without Liner Take-Up) Rewind Option (Continued) 5-g. Fold up the rewind media guide, and then slide it in until it touches the liner. 5-h. Tighten the thumbscrew on the rewind media guide. 5-i. 5/9/19 T F A R D Loading of the liner is complete. Continue with step 6.
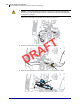
32 Printer Setup and Operation Load the Media—Peel-Off Mode (with our without Liner Take-Up) 6. Caution • Use the peel release lever and your right hand to close the peel assembly. Do not use your left hand to assist in closing. The top edge of the peel roller/assembly could pinch your fingers. Close the peel assembly using the peel-off mechanism release lever. T F A 7. Slide in the media guide until it just touches the edge of the media. R D 8.
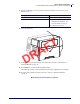
Printer Setup and Operation Load the Media—Peel-Off Mode (with our without Liner Take-Up) 9. Does the media that you are using require ribbon for printing? If you are not sure, see Ribbon on page 11. If using… Then… Direct Thermal media (no ribbon needed) Continue with step 10. Thermal Transfer media (ribbon needed) a. If you have not already done so, load ribbon in the printer. See Load the Ribbon on page 43. b. Continue with step 10. 10. Close the media door. T F A R D 11.
34 Printer Setup and Operation Load the Media—Rewind Mode Final Steps for Rewind Mode 1. Extend the media approximately 18 in. (500 mm) out of the printer.
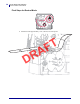
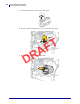
Printer Setup and Operation Load the Media—Rewind Mode 2. Feed the media over the peel assembly. 3. Thread the media into the slot below the peel assembly. T F A R D 4. Feed the media under the media alignment roller.
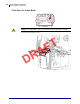
36 Printer Setup and Operation Load the Media—Rewind Mode 5. Loosen the thumbscrew on the rewind media guide. 6. Slide the rewind media guide all the way out, and then fold it down. T F A R D 7. Slide an empty core onto the rewind spindle.
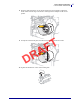
Printer Setup and Operation Load the Media—Rewind Mode 8. Wrap the media around the core as shown and turn the rewind spindle to tighten the media. Ensure that the edge of the media is flush against the backplate of the rewind spindle. T F A 9. Fold up the rewind media guide, and then slide it in until it touches the media. R D 10. Tighten the thumbscrew on the rewind media guide.
38 Printer Setup and Operation Load the Media—Rewind Mode 11. Slide in the outer media guide until it just touches the edge of the media. 12. Rotate the printhead-open lever downward until it locks the printhead in place. T F A R D 13. Does the media that you are using require ribbon for printing? If you are not sure, see Ribbon on page 11. If using… Then… Direct Thermal media (no ribbon needed) Continue with step 14. Thermal Transfer media (ribbon needed) a.
Printer Setup and Operation Load the Media—Rewind Mode 14. Close the media door. T F A 15. Set the printer to Rewind mode (for more information, see Print > Label Position > Collection Method on page 78). R D 16. Press PAUSE to exit pause mode and enable printing. The printer may perform a label calibration or feed a label, depending on your settings. 17. For best results, calibrate the printer. See Print > Sensors > Manual Calibration on page 81. Media loading in Rewind mode is complete.
40 Printer Setup and Operation Load the Media—Cutter Mode Final Steps for Cutter Mode 1. Caution • The cutter blade is sharp. Do not touch or rub the blade with your fingers. Feed the media through the cutter.
Printer Setup and Operation Load the Media—Cutter Mode 2. Slide in the outer media guide until it just touches the edge of the media. 3. Rotate the printhead-open lever downward until it locks the printhead in place. T F A R D 4. Does the media that you are using require ribbon for printing? If you are not sure, see Ribbon on page 11. 5/9/19 If using… Then… Direct Thermal media (no ribbon needed) Continue with step 5. Thermal Transfer media (ribbon needed) a.
42 Printer Setup and Operation Load the Media—Cutter Mode 5. Close the media door. T F A 6. Set the printer to Cutter mode (for more information, see Print > Label Position > Collection Method on page 78). 7. Press PAUSE to exit pause mode and enable printing. R D The printer may perform a label calibration or feed a label, depending on your settings. 8. For best results, calibrate the printer. See Print > Sensors > Manual Calibration on page 81. Media loading in Cutter mode is complete.
Printer Setup and Operation Load the Ribbon Load the Ribbon Note • This section applies only to printers that have the Thermal Transfer option installed. What kind of ribbon can I use? If you are unsure which side of a particular roll of ribbon is coated, perform an adhesive test or a ribbon scratch test to determine which side is coated. Adhesive Test If you have labels available, perform the adhesive test to determine which side of a ribbon is coated.
44 Printer Setup and Operation Load the Ribbon 5. Observe the results. Did the ribbon leave a mark on the paper? If the ribbon... Then... Left a mark on the paper The ribbon is coated on the outside and can be used in this printer. Did not leave a mark on the paper The ribbon is coated on the inside and cannot be used in the standard printer. An optional ribbon spindle is available to use ribbon that is coated on the inside. Contact your authorized Zebra reseller for ordering information.
Printer Setup and Operation Load the Ribbon How to Load Ribbon Note • This section applies only to printers that have the Thermal Transfer option installed. Caution • While performing any tasks near an open printhead, remove all rings, watches, hanging necklaces, identification badges, or other metallic objects that could touch the printhead. You are not required to turn off the printer power when working near an open printhead, but Zebra recommends it as a precaution.
46 Printer Setup and Operation Load the Ribbon 2. Caution • The printhead may be hot and could cause severe burns. Allow the printhead to cool. Open the printhead assembly by rotating the printhead-open lever. T F A 3. Place the roll of ribbon on the ribbon supply spindle with the loose end of the ribbon unrolling as shown. Push the roll back as far as it will go.
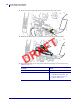
Printer Setup and Operation Load the Ribbon 4. Bring the ribbon under the printhead assembly and around its left side, as shown. T F A R D 5. With the ribbon tracking as far back as it can under the printhead assembly, wrap the ribbon around the ribbon take-up spindle. Rotate the spindle several turns in the direction shown to tighten and align the ribbon.
48 Printer Setup and Operation Load the Ribbon 6. Is media already loaded in the printer? If... Then... No Continue with Insert the Media into the Printer on page 17 to load media in the printer. Yes a. Rotate the printhead-open lever downward until it locks the printhead in place. T F A b. Close the media door. R D c. If necessary, press PAUSE to enable printing.
Printer Setup and Operation Run the Print Wizard and Print a Test Label Run the Print Wizard and Print a Test Label The Print Wizard configures the printer, prints test labels, and adjusts print quality based on the results of the test labels. Important • When using the Wizards, do not send data to the printer from the host. For best results, use full-width media running the Print Wuzard or Set All Wizard.
50 Printer Setup and Operation Run the Print Wizard and Print a Test Label 6. When asked to print a test label, touch the check mark. A test label similar to this one prints. If your labels are smaller than the image, only a portion of the test label will print. T F A 7. Examine the position of the label over the tear bar. If necessary, shift the position of the media over the tear-off bar after printing. R D • If the space between labels falls on the tear bar, continue with the next step.
Printer Setup and Operation Run the Print Wizard and Print a Test Label Print Quality Assistance Wizard 9. Touch Print Quality Assistance. The printer prompts for the number of test labels to print. The more labels you choose to print, the more choices that you will have available to decide on label quality. In general, if your test label from the previous wizard was acceptable, a lower number of test labels in this step will probably suffice. 10. Select a number of test labels to print.
52 Printer Setup and Operation Run the Print Wizard and Print a Test Label T F A R D P1106464-001 ZT411/ZT421 Color Touch User Guide 5/9/19
2 Printer Configuration and Adjustment T F A This section assists you with configuration of and adjustments to the printer. Contents R D Calibrate the Ribbon and Media Sensors . . . . . . . . . . . . . . . . . . . . . . . . . . . . . . . . . . . 192 Adjust the Printhead Pressure and Toggle Position . . . . . . . . . . . . . . . . . . . . . . . . . . . . 202 Adjust the Sensor Position . . . . . . . . . . . . . . . . . . . . . . . . . . . . . . . . . . . . . . . . . . . . . . .
54 Printer Configuration and Adjustment Home Screen Home Screen The printer’s Home screen shows you the printer’s current status and allows you to access the printer’s menus. You can rotate the image of the printer 360 degrees to view it from all angles. T F A R D If the background color of the Home screen is yellow or red, the printer is in an alert or error state. For more information, see Alert and Error States on page 125.
Printer Configuration and Adjustment Printer Wizards Printer Wizards The printer Wizards can assist you by walking you through the setup process for various printer settings and features. The following wizards are available: • Set All Wizard—runs all the Wizards in sequence. • System Wizard—sets up non-print related operating system settings. • Connection Wizard—configures the printer’s connectivity options. • Print Wizard—configures key printing parameters and features.
56 Printer Configuration and Adjustment User Menus User Menus The printer’s user menus can be used to configure the printer. T F A R D See the following sections: • System Menu on page 57 • Connection Menu on page 64 • Print Menu on page 76 • RFID Menu on page 84 • Storage Menu on page 90 The user menu descriptions include the following other ways to change the same settings, when other options exist. You can also use the printer’s wizards to change some of the settings.
Printer Configuration and Adjustment User Menus System Menu System > Language If necessary, change the language that the printer displays.
58 Printer Configuration and Adjustment User Menus System > Program Language > Virtual Device If any Virtual Device apps are installed on your printer, you may view or enable/disable them from this user menu. For more information about Virtual Devices, go to the User Guide for the appropriate Virtual Device, or contact your local reseller. System > Program Language > ZBI T F A Zebra Basic Interpreter (ZBI 2.0™) is a programming option that may be purchased for your printer.
Printer Configuration and Adjustment User Menus System > Settings > Display Time Format Select the time format shown on the printer’s display when the printer is idle. Accepted values: • • SGD command used: device.idle_display_value 12-Hour 24-Hour System > Settings > Password Level T F A Select the level of password protection for user menu items.
60 Printer Configuration and Adjustment User Menus System > Settings > Power Up Action Set the action for the printer to take during the power-up sequence. • Accepted values: • • • • CALIBRATE—Adjusts sensor levels and thresholds, determines the label length, and feeds the media to the next web. FEED—Feeds the labels to the first registration point. LENGTH—Determines the label length using current sensor values, and feeds the media to the next web. NO MOTION—Tells the printer not to move the media.