ZT411/ZT421 Industrial Printer T F A R D Color Touch User Guide P1106464-001
© 2017 ZIH Corp. and/or its affiliates. All rights reserved. ZEBRA and the stylized Zebra head are trademarks of ZIH Corp., registered in many jurisdictions worldwide. All other trademarks are the property of their respective owners. Information in this document is subject to change without notice. For further information regarding legal and proprietary statements, please go to: COPYRIGHTS: www.zebra.com/copyright WARRANTY: www.zebra.com/warranty END USER LICENSE AGREEMENT: www.zebra.com/eula SOFTWARE: www.
Contents T F A Declaration of Conformity . . . . . . . . . . . . . . . . . . . . . . . . . . . . . . . . . . . . . . . . . . . 7 Compliance Information . . . . . . . . . . . . . . . . . . . . . . . . . . . . . . . . . . . . . . . . . . . . . . . . . . . 8 1 • Printer Setup . . . . . . . . . . . . . . . . . . . . . . . . . . . . . . . . . . . . . . . . . . . . . . . . . . . 9 Select a Location for the Printer . . . . . . . . . . . . . . . . . . . . . . . . . . . . . . . . . . . . . . . . . . . .
Contents User Menus . . . . . . . . . . . . . . . . . . . . . . . . . . . . . . . . . . . . . . . . . . . . . . . . . . . . . . . . . . . System Menu . . . . . . . . . . . . . . . . . . . . . . . . . . . . . . . . . . . . . . . . . . . . . . . . . . . . . . . Connection Menu . . . . . . . . . . . . . . . . . . . . . . . . . . . . . . . . . . . . . . . . . . . . . . . . . . . . Print Menu . . . . . . . . . . . . . . . . . . . . . . . . . . . . . . . . . . . . . . . . . . . . . . . . . . . . . . . . .
Contents Connect a Computer to the Printer’s USB Port . . . . . . . . . . . . . . . . . . . . . . . . . . . . . . . Connect a Computer to the Printer’s Serial or Parallel Port . . . . . . . . . . . . . . . . . . . . . . Connect to Your Network through the Printer’s Ethernet Port . . . . . . . . . . . . . . . . . . . . Connect the Printer to Your Wireless Network . . . . . . . . . . . . . . . . . . . . . . . . . . . . . . . . 157 161 169 177 6 • Specifications . . . . . . . . . . . . . . . . . . . . . . .
Contents Notes • ___________________________________________________________________ __________________________________________________________________________ __________________________________________________________________________ __________________________________________________________________________ __________________________________________________________________________ __________________________________________________________________________ _______________________________________________
Declaration of Conformity Declaration of Conformity T F A We have determined that the Zebra printers identified as the ZT411 and ZT421 manufactured by: R D Zebra Technologies Corporation 3 Overlook Point Lincolnshire, Illinois 60069 U.S.A. Have been shown to comply with the applicable technical standards of the FCC For Home, Office, Commercial, and Industrial use If no unauthorized change is made in the equipment, and if the equipment is properly maintained and operated.
Declaration of Conformity Compliance Information Compliance Information FCC Compliance Statement This device complies with Part 15 of the FCC Rules. Operation is subject to the following two conditions: 1. This device may not cause harmful interference, and 2. This device must accept any interference received, including interference that may cause undesired operation.
1 Printer Setup T F A This section assists a user with initial setup and operation of the printer. Contents R D Select a Location for the Printer. . . . . . . . . . . . . . . . . . . . . . . . . . . . . . . . . . . . . . . . . . . . Order Supplies and Accessories . . . . . . . . . . . . . . . . . . . . . . . . . . . . . . . . . . . . . . . . . . . Inspect the Contents of the Box . . . . . . . . . . . . . . . . . . . . . . . . . . . . . . . . . . . . . . . . . . . . Load the Media . . . . . . . . . . .
Printer Setup and Operation Select a Location for the Printer Select a Location for the Printer Select a location for the printer that meets these conditions: • Surface: The surface where the printer will be located must be solid, level, and of sufficient size and strength to hold the printer. 22.7– 29.4 kg 50 – 65 lb T F A • Space: The area where the printer will be located must include enough space for ventilation and for accessing the printer components and connectors.
Printer Setup and Operation Order Supplies and Accessories Order Supplies and Accessories The following things that you will need do NOT come with the printer: • Communication/network cables (such as USB, serial, parallel, wired Ethernet) • Media • Ribbon (if your printer has a thermal transfer option) Media For optimal printing quality and proper printer performance across our product line, Zebra strongly recommends the use of Zebra Certified Supplies as part of the total solution.
Printer Setup and Operation Inspect the Contents of the Box Inspect the Contents of the Box When you receive the printer, do the following: 1. Verify that the following items are included in the box with the printer: T F A R D Additional items may be included, depending on the options ordered with the printer. 2. If anything is missing, notify your authorized Zebra reseller. 3. Immediately unwrap the printer and inspect for shipping damage. • Save all packing materials.
Printer Setup and Operation Install Label Software Install Label Software Select and install the software that you will use to create label formats for your printer. One option is ZebraDesigner™, which you can download from www.zebra.com.
Printer Setup and Operation Determine the Label Collection Method Determine the Label Collection Method Use a label collection method that matches the media being used and the printer options available (see Table 2 and Figure 1 on page 16). The media path is the same for roll and fanfold media. To select the label collection method, complete these steps: 1. On the Home screen, touch Menu > Print > Label Position > Collection Method. T F A R D 2.
Printer Setup and Operation Determine the Label Collection Method Table 2 • Collection Methods and Printer Options (Continued) Collection Method Required Printer Option Description Delayed Cut Cutter option The printer waits for a delayed cut ZPL command (~JK) before it cuts the last printed label. Applicator This mode is for use with a machine that applies labels. The printer prints when it receives a signal from the applicator.
Printer Setup and Operation Determine the Label Collection Method Figure 1 • Printer Options 1 2 T F A 3 4 R D 1 2 3 4 Tear-Off (standard) Peel with Liner Take-Up option Rewind option Cutter option P1106464-001 ZT411/ZT421 Color Touch User Guide 5/9/19
Printer Setup and Operation Load the Media Load the Media Use the instructions in this section for loading roll or fanfold media in the appropriate label collection method for your needs. Caution • While performing any tasks near an open printhead, remove all rings, watches, hanging necklaces, identification badges, or other metallic objects that could touch the printhead. You are not required to turn off the printer power when working near an open printhead, but Zebra recommends it as a precaution.
Printer Setup and Operation Load the Media 3. Insert roll or fanfold media into the printer. The media loading path is the same for both roll and fanfold media, so this is the only step that will be different. Fanfold Media Roll Media 3-a. Remove and discard any tags or labels that are dirty or that are held by adhesives or tape. 3-b. Pull out the media supply guide as far as it goes. T F A R D 3-c. P1106464-001 Pull out the media supply guide as far as it goes.
Printer Setup and Operation Load the Media Roll Media (Continued) 3-d. 3-e. 5/9/19 Slide in the media supply guide, until it touches the edge of the roll. Slide in the media supply guide, until it touches the edge of the media. T F A R D Continue with step 4. Fanfold Media (Continued) ZT411/ZT421 Color Touch User Guide Continue with step 4 and the remaining steps as shown for roll media.
Printer Setup and Operation Load the Media 4. Caution • The printhead may be hot and could cause severe burns. Allow the printhead to cool. Open the printhead assembly by rotating the printhead-open lever. T F A 5. Slide the media guide all the way out.
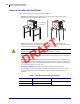
Printer Setup and Operation Load the Media 6. From the media hanger (1), feed the media under the dancer assembly (2), through the media sensor (3), and under the printhead assembly (4). Slide the media back until it touches the inside back wall of the media sensor.
Printer Setup and Operation Load the Media 7. Which label collection method will you be using? (For more information on print modes, see Determine the Label Collection Method on page 14.) If using… Then… Tear-Off mode Continue with Final Steps for Tear-Off Mode on page 23. Peel-Off mode (with or without Liner Take-Up) Continue with Final Steps for Peel-Off Mode (with or without Liner Take-Up) on page 25.
Printer Setup and Operation Load the Media—Tear-Off Mode Final Steps for Tear-Off Mode 1. Slide in the media guide until it just touches the edge of the media. T F A R D 2. Rotate the printhead-open lever downward until it locks the printhead in place. 3. Does the media that you are using require ribbon for printing? If you are not sure, see Ribbon on page 11. If using… Then… Direct Thermal media (no ribbon needed) Continue with step 4. Thermal Transfer media (ribbon needed) a.
Printer Setup and Operation Load the Media—Tear-Off Mode 4. Close the media door. T F A 5. Set the printer to Tear-Off mode (for more information, see Print > Label Position > Collection Method on page 78). 6. Press PAUSE to exit pause mode and enable printing. R D The printer may perform a label calibration or feed a label, depending on your settings. 7. For best results, calibrate the printer. See Print > Sensors > Manual Calibration on page 81. Media loading in Tear-Off mode is complete.
Printer Setup and Operation Load the Media—Peel-Off Mode (with our without Liner Take-Up) Final Steps for Peel-Off Mode (with or without Liner Take-Up) 1. Push down the peel-off mechanism release lever to open the peel assembly.
Printer Setup and Operation Load the Media—Peel-Off Mode (with our without Liner Take-Up) 2. Extend the media approximately 18 in. (500 mm) out of the printer. 3. P1106464-001 T F A R D Remove the exposed labels so that only the liner remains.
Printer Setup and Operation Load the Media—Peel-Off Mode (with our without Liner Take-Up) 4. Feed the liner behind the peel assembly. Make sure that the end of the liner falls outside of the printer.
Printer Setup and Operation Load the Media—Peel-Off Mode (with our without Liner Take-Up) 5. Complete this step only if you want to use Peel-Off mode with Liner Take-Up. Your printer must have the Liner Take-Up option or the Rewind option installed. Follow the instructions for your printer option. If you are not using Liner Take-Up, continue with step 6. 5-a. Thread the liner into the slot below the peel assembly. R D Rewind Option 5-b. T F A Feed the liner under the media alignment roller (1).
Printer Setup and Operation Load the Media—Peel-Off Mode (with our without Liner Take-Up) Rewind Option (Continued) Liner Take-Up Option (Continued) 5-c. Loosen the thumbscrew on the rewind media guide. Push the liner back until it touches the back plate of the liner take-up spindle assembly. 5-d. Slide the rewind media guide all the way out, and then fold it down.
Printer Setup and Operation Load the Media—Peel-Off Mode (with our without Liner Take-Up) Rewind Option (Continued) 5-e. Slide an empty core onto the rewind spindle. 5-f. Wrap the liner around the core as shown, and then turn the rewind spindle to tighten the media. Ensure that the edge of the media is flush against the backplate of the rewind spindle.