
User Manual
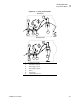


Table Of Contents
- Table of Contents
- Proprietary Statement
- Declaration of Conformity
- Warranty Information
- Preface
- Introduction
- Printer Setup
- Printer Operation
- Configuration
- RFID Guidelines
- Routine Care and Adjustments
- Troubleshooting
- Data Connections
- Specifications
- Index

Printer Operation
Adjust Printhead Pressure
R4Mplus User Guide 41
Adjust Printhead Pressure
See Figure 25. This adjustment may be necessary if printing is too light on one side or if thick
media is used.
Figure 25 • Printhead Pressure Adjustment Dials
The pressure adjustment dials for the R4Mplus each have four possible settings designated by
blocks of increasing size embossed on the print mechanism. The smallest block (fully
counterclockwise) is considered position 1 and the largest block (fully clockwise) is
considered position 4.
Set Printhead Pressure
Depending on which printer you have, use Table 6 to select the initial dial settings for your
media.
Some media types require higher pressure to print well. For these media, increase both dials
one position. If the media tends to shift to the left while printing, increase the right dial setting
one position or decrease the left dial setting one position. If the media tends to shift to the right
while printing, increase the left dial setting one position or decrease the right dial setting one
position.
Table 6 • R4Mplus Printhead Pressure
Media Width Left Dial Right Dial
1 in. (25.4 mm) 3 1
2 in. (51 mm) 4 1
3 in. (76 mm) 3 2
3.5 in. and up (89 mm and up) 3 3
Pressure Adjustment Dials
R
L