
User Manual
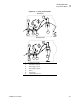


Table Of Contents
- Table of Contents
- Proprietary Statement
- Declaration of Conformity
- Warranty Information
- Preface
- Introduction
- Printer Setup
- Printer Operation
- Configuration
- RFID Guidelines
- Routine Care and Adjustments
- Troubleshooting
- Data Connections
- Specifications
- Index

36 R4Mplus User Guide
Printer Operation
Load the Ribbon
Load the Ribbon
The ribbon supply spindle in your printer is a dual-tension variety. Most applications require
the spindle to be in the normal position. The low tension position is recommended only when a
wide ribbon is used or normal tension hampers the ribbon movement.
To load ribbon, complete these steps:
1. Set the spindle for normal or low tension.
• To place the spindle in the normal position, firmly pull out the spindle end cap until it
extends and clicks in place, as shown in Figure 22.
• To place the spindle in the low tension position, firmly push in the end cap until it
retracts and clicks in place, as shown in Figure 22.
Figure 22 • Ribbon Spindle Normal and Low Tension
2. See Figure 23. Press the printhead open lever.
The printhead assembly springs up.
3. Orient the ribbon as shown. Push the ribbon roll completely onto the ribbon supply
spindle.
4. Pull the end of the ribbon over the ribbon sensor, under the printhead assembly, and out
the front of the printer.
5. Hold the ribbon snug and free of wrinkles and in line with the guide mark near the left
edge of the strip plate. Close the printhead assembly.
6. Wind the ribbon clockwise onto the ribbon take-up spindle.
Note • Always use ribbon that is wider than the media. The smooth liner of the ribbon
protects the printhead from wear. For direct thermal printing, do not load ribbon in the printer.
Caution • Ensure that the printhead is fully open and engaged in the upright
position. If you fail to latch the printhead, it could fall on your hand during the
procedure.
Spindle End Cap
Extended
Spindle End Cap
Retracted