
User Manual
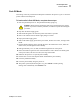
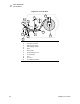
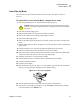
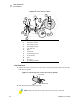

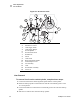


Table Of Contents
- Table of Contents
- Proprietary Statement
- Declaration of Conformity
- Warranty Information
- Preface
- Introduction
- Printer Setup
- Printer Operation
- Configuration
- RFID Guidelines
- Routine Care and Adjustments
- Troubleshooting
- Data Connections
- Specifications
- Index

Printer Operation
Load Roll Media
R4Mplus User Guide 31
Rewind Mode
The Rewind option must be installed to use this mode. The option is shown in Figure 19.
To load media in Rewind Mode, complete these steps:
1. Press the printhead open lever. The printhead assembly springs up.
2. Flip down the media supply guide.
3. Slide the media guide as far from the main frame as possible.
4. Place a roll of media on the media supply hanger as shown.
5. Flip up the media supply guide.
6. Slide in the media supply guide until it just touches, but does not restrict, the edge of the
media.
7. Feed the media under the dancer, through the slot in the transmissive sensor, and under the
ribbon sensor.
8. Pull approximately 36 in. (900 mm) of media through the front of the printer.
9. Remove the labels from the first 18 in. (450 mm) of media.
10. Ensure the media is against the back of the transmissive sensor. Slide in the media guide
until it just touches, but does not restrict, the edge of the media.
11. Feed the media over the peel assembly and through the rewind base assembly.
12. Loosen the thumbscrew and slide out the rewind media guide to the end of the take-up
spindle.
13. Slide an empty core onto the take-up spindle; wrap the media around the core and turn the
take-up spindle counterclockwise to wind up the excess material.
14. Slide the rewind media guide against the media, and tighten the thumbscrew.
15. Close the printhead assembly.
16. The printer is paused (the Pause light is on), press
PAUSE to enable printing.
Caution • Ensure that the printhead is fully open and engaged in the upright
position. If you fail to latch the printhead, it could fall on your hand during the
procedure.
Note • The liner must be attached to the take-up spindle for the printer to operate properly.
Ensure the edge of the liner is flush against the backplate of the take-up spindle.