
User Manual


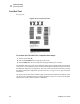
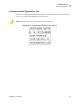


Table Of Contents
- Table of Contents
- Proprietary Statement
- Declaration of Conformity
- Warranty Information
- Preface
- Introduction
- Printer Setup
- Printer Operation
- Configuration
- RFID Guidelines
- Routine Care and Adjustments
- Troubleshooting
- Data Connections
- Specifications
- Index

Troubleshooting
Printer Diagnostics
R4Mplus User Guide 95
Printer Diagnostics
These self tests produce sample printouts and provide specific information that help determine
the operating conditions for the printer.
Each self test is enabled by pressing a specific front panel key or combination of keys while
turning the printer On (l). Press the key(s) until the DATA light turns off (approximately five
seconds). When the Power-On Self Test is complete, the selected self test starts automatically.
Power-On Self Test
A Power-On Self Test (POST) is performed automatically each time the printer is turned on.
During this test sequence, the front panel lights and liquid crystal display (LCD) monitor the
progress of the POST. If the printer fails any of these tests, the word FAILED is display. If this
occurs, notify an authorized Zebra reseller.
Note • When performing self tests, avoid sending a label format to the printer. In
the case of a remote host, disconnect all data interface cables from the printer.
• When cancelling a self test prior to its actual completion, always turn the printer
Off (O) and then back On (I) to reset the printer.
• When performing these self tests while in the Peel-Off Mode, you must remove
the labels as they become available.
• If your media is not wide enough or long enough, unexpected or undesired
results may occur. Ensure that your print width is set correctly for the media
you are using before you run any self tests, otherwise the test may print on the
platen roller. See PRINT WIDTH on page 51 for information on setting the print
width.