Operator Controls Power Switch Press up to turn ON or down to turn OFF the printer. CAUTION: The power should be turned off before connecting or disconnecting the communications and power cables. Feed Button Forces the printer to feed one blank label. Takes the printer out of a “pause” condition. (The printer is put into “pause” by either a ZPL II command or an error condition.) See “What the Status Light is Telling You” on page . Used for printer setup and status (see “Feed Button Modes” on page ).
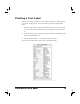
Printing a Test Label Before you connect the printer to your computer, make sure that the printer is in proper working order. You can do this by printing a configuration label 1. Make sure the media is properly loaded and the top cover of the printer is closed. Then, turn the printer power on if you have not already done so. 2. When the status light is solid green, press and hold the feed button until the status light flashes once. 3. Release the feed button. A configuration label will print.
Hooking Up the Printer and Computer This printer comes with a bidirectional parallel data interface. You must supply the required interface cable for your application. CAUTIONS:Keep the power switch in the OFF position when attaching the interface cable. The power supply barrel connector must be inserted into the power supply receptacle on the back of the printer before connecting or disconnecting the communications cables.
Communicating with the Printer When using the parallel port, typically there is no setup is required once the cable is plugged in. If you should encounter any problems, consult the user’s guide that came with your computer. Adjusting the Print Width Print width must be calibrated when: ■ You are using the printer for the first time. ■ There is a change in the width of the media.
Operation & Options This section helps you get the most from your printer. You must use programming to control many of the printer’s functions. For example, the ~JL command controls label length. For detailed information about creating labels using ZPL II, refer to the ZPL II Programming Guide or visit our web site at www.zebra.com. To improve print quality, changing both print speed and density may be required to achieve the desired results.
Replacing Supplies If labels or ribbon run out while printing, leave the printer power on while reloading (data loss results if you turn off the printer). The printer automatically restarts after you load a new label or ribbon roll. Always use high quality, approved labels, tags and ribbons.
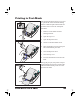
Printing in Peel-Mode ON OFF The optional dispenser allows you to print in “peel-mode” where the label backing follows a different path and the labels are presented one at a time for subsequent placement. 1. Remove several labels from the backing material. 2. Open the top cover. 3. Open the dispenser door. 4. Switch on the label-taken sensor. 5. Insert the backing in front of the peel bar and behind the peel roller. 6. Close the dispenser door. 7. Close the top cover. 8.
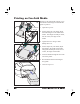
Printing on Fan-Fold Media Printing on fan-fold media requires you to set both the media hangers and the media guides in position. Lock-down Screw 1. Open the top cover. 2. With a sample of your media, adjust the media hangers to the width of the media. The hangers should just touch, but not restrict, the edges of the media. 3. Tighten the screw using a small Phillips driver #1. 4. With a sample of your media, adjust the guides to the width of the media.
RFID Guidelines RFID is an abbreviation for radio frequency identification. To use the RFID capabilities of this printer, you will need the appropriate media which have incorporated into them a transponder. These RFID transponders have coils built into them. You can write data to (encode) and read data from the transponder’s memory, and obtain certain information regarding the status of the RFID subsystem. This printer has an antenna that encodes the transponder within the media.
Each transponder has blocks that are written and read through ZPL commands. The ZPL commands allow you to adjust the number of retries to get a successful execution of the command. If a block cannot be written within the number of retries, then the media is fed out with a VOID type error message. After the printer feeds the failed media, the printer attempts to write to another transponder in the next label, tag, or ticket.
Tag-it Transponders Tag-it labels are high frequency (13.56MHz) devices. Tag-it is a read/write RFID transponder with 256 bits of storage capacity for user data. Data is addressed in eight blocks of 32 bits, each block containing four bytes.
I Code Transponders I-Code transponders are high frequency (13.56MHz) devices but have 512 bits of storage capacity. Data is addressed in sixteen blocks of 32 bits, each block containing four bytes. The first two blocks of data (block 0 and 1) are used for storage of a unique 64 bit serial number. The next two blocks (blocks 2 and 3) are used for storage of configuration information; block 4 is used for family or application identification and blocks 5 to 15 are free for user application use.
Picotag Transponders Picotag transponders use 13.56 MHz frequency. For details regarding this transponder, refer to the INSIDE TECHNOLOGIES specification. Block 0 0 1 2 3 4 5 6 7 8 9 10 11 12 13 ... 31 FFh 1 Picotag 2K Byte number within a block 2 3 4 5 Serial Number (64 bits) Application 16-bit OTP Area Block Write Lock Tuning Cap 1Fh 6 7 E.A. S.
ISO-15693 Transponders You can use up to 256 blocks or use one block size up to 256 bits (32 bytes). There is no definite memory map organization as it depends on what you might implement.
ZPL II Commands for RFID ^WT – Write Tag The format for the ^WT instruction is: ^WTb,r,m,w,s where ^WT = Write Tag command b = Block Number Default value: 0 Other values: 1 to n, where n is the maximum number of blocks for the tag This is the starting block number. If the user sends more than a block of data it will overflow into the next block. If the user overflows the block and subsequent blocks cause errors (write protects, beyond range, etc.
^RT – Read Tag The format for the ^RT instruction is: ^RT#,b,n,f,r,m,s where ^RT = Read Tag command # = Number to be assigned to the Field Default value: 0 Other Values: 1 to 9999 b = Starting Block Number Default value: 0 Other values: 1 to n, where n is the maximum number of blocks for the tag n = Number of blocks to read Default value: 1 Other values: 2 to n, where n is maximum number of blocks minus starting block number.
^RT – Read Tag (continued) Example: This reads a block from a tag, and prints it on a label: ^XA ^FO20,120^A0N,60^FN1^FS ^FO20,100^A0N,20^FN2^FS ^RT1,0,7,3,0,5,0,0^FS ^RT2,0,2,2,0,5,0,0^FS ^XZ The first ^RT command automatically detects the tag type, starting at block 7, reads three blocks of data in ASCII format. It will retry the command 5 times if necessary. A “void” label will be generated if the read is unsuccessful after ‘r’ retries.
^RS – RFID Setup The format for the ^RS instruction is: ^RSt where t = tag type Default value: 0 –NONE (No tags available) Other values: 1- Auto detect (automatically determine the tag type, by querying the tag) 2- Tag-it (Texas Instruments Tag-it tags) 3- I •Code (Philips I·Code tags) ^RI – RFID Get Tag Unique ID The format for the ^RI instruction is: ^RIn where n = field number to store the unique ID The unique ID will be read from the tag and available to print or return to the host computer.
Sample of RFID Programming TM ZPL II is Zebra Technologies Corporation’s Zebra Programming Language II label design language. ZPL II lets you create a wide variety of labels from the simple to the very complex, including text, bar codes, and graphics. This section is not intended as an introduction to ZPL II. If you are a new ZPL II user, order a copy of the ZPL II Programming Guide (part# 46530L) or go to the internet address http://support.zebra.
Line # Type this label format 1. ^XA 2. ^WT6^FDZebra^FS 3. ^FO100,100^A0n,60^FN0^FS 4. ^FO100,200^A0n,40^FN1^FS 5. ^RT0,6,2^FS 6. ^RT1,6,2,1 7. ^XZ Resulting printout ZEBRA 5A65627261000000 Line 1 Indicates start of label format. Line 2 Writes the data “Zebra” to block 6 for the tag (one byte will spill into block 7, since we have 4 bytes/block. Line 3 Print field number ‘0’ at location 100,100.^FN0 is replaced by what we read on line #5. Line 4 Print field number ‘1’ at location 100,200.
Maintenance Cleaning Use only the cleaning agents indicated. Zebra Technologies Corporation will not be responsible for damage caused by any other cleaning materials used on this printer. Printer Part Method Interval After allowing the print head to cool for approximately one minute, use 70% isopropyl alcohol on a cotton swab to clean the print elements from end to end (the print elements are located in the thin gray line on the print head). NOTE: You do not have to turn off the printer to do this.
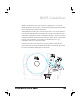
Parts List ITEM DESCRIPTION PART NUMBER 1 Latch Assembly 105910-052 2 Feed Switch/Sensor Assy (set of 3) 105910-064 3 Upper Cover Support (set of 3) 105910-066 4 Print Head Assy - 4” TLP Print Head Cable Assy.
1 15 2 14 3 13 4 5 6 12 8 7 11 9 10
Replacing the Print Head In the event you need to replace the print head, make sure your work area is prepared by protecting against static discharge. Your work area must be static-safe and include a properly grounded conductive cusioned mat to hold the printer a conductive wrist strap for yourself. Removal Before following the steps in this procedure, open the printer by pulling the release latches forward then lifting the top cover. Remove any ribbon from the carriage. 1.
REPLACING THE PRINT HEAD (Continued) Assembly The new print head comes with the clip and ground screw attached. 1. Align the print head and bracket to plug the left and right connectors into the black and white wire bundles. 2. Attach the ground wire and secure it with the screw. Use a #2 Phillips driver to tighten it. 3. Insert the bracket pegs into the left side of the carriage. 4.
Troubleshooting What the Status Light is Telling You Status LED Condition and Color Printer Status For a Resolution, Refer to: Off Off 1 Solid Green On 2 Flashing Yellow Stopped 3 Flashing Green Normal Operation 4 Flashing Red Stopped 5 Double Flashing Green Paused 6 Solid Yellow Various 7 Alternately Flashing Green and Red Needs Service 8 Resolutions 1. The printer is not receiving power.
3. The printer has failed its power on self test (POST). ■ If this error occurs right after you turn on the printer, contact an authorized reseller for assistance. There is a shortage of memory. ■ If this error occurs after you have been printing, turn the printer power off and on. Then, resume printing. 4. The printer is receiving data. ■ As soon as all of the data has been received, the status LED will turn green; then, the printer will automatically resume operation. 5. The media is out.
7. The print head is under temperature. ■ Continue printing while the print head reaches the correct operating temperature. The print head is over temperature. ■ Printing will stop until the print head cools to an acceptable printing temperature. When it does, the printer will automatically resume operation. 8. FLASH memory is not programmed. ■ Return the printer to an authorized reseller.
Print Quality Problems No print on the label. ■ ■ You must use the correct media for the method of printing you require. When printing without a ribbon, you must use direct thermal media. When using ribbon, you must use thermal transfer media. The printer's ribbon sensor detects motion of the supply spindle. Is the media loaded correctly? Follow the instructions in “Loading the Media” on page . The printed image does not look right. ■ ■ ■ ■ The print head is dirty.
The printing does not start at the top of the label, or misprinting of one to three labels. ■ ■ ■ ■ The media may not be threaded under the media guides. Refer to “Loading the Media” on page . The printer needs to be calibrated. Refer to “Auto Calibration” on page . The correct media sensor may not be activated. Manual calibration selects the media sensing method for the labels being used (refer to the ^MN command in the ZPL II Programming Guide).
RFID Symptoms RFID tags generally not programmed ■ ■ Is the printer set up correctly? Print a status page to verify RFID version. Check if supported RFID media is loaded correctly. VOID messages are printed across media. ■ ■ ■ Verify tag type is properly selected in ZPL II. Use RFID media with supported tag type. Edit ZPL II to select proper tag type or increase retries. ZPL II is attempting to write to a non-existent block. Some tags’ blocks are identified as 0-7.
Manual Calibration Manual calibration is recommended whenever you are using pre-printed labels (or label backing) or if the printer will not correctly auto calibrate. 1. Turn on the printer power. 2. Remove approximately 4" (102 mm) of labels from a section of backing material. Load the media so that only the backing material is threaded through the printer and under the print Head. 3. Press and hold the feed button until the green status LED flashes once, then twice. Release the feed button. 4.
Troubleshooting Tests Printing a Configuration Label To print out a listing of the printer’s current configuration, refer to the one-flash sequence in “Feed Button Modes” on page 50. Recalibration Recalibrate the printer if it starts to display unusual symptoms, such as skipping labels. See “Auto Calibration” on page .
Resetting the Factory Default Values Sometimes, resetting the printer to the factory defaults solves some of the problems. Follow the four-flash sequence instructions in “Feed Button Modes” on page 50. Communications Diagnostics If there is a problem transferring data between the computer and printer, try putting the printer in the communications diagnostics mode.
Feed Button Modes Power Off Mode (Communications Diagnostics Mode) With the printer power off, press and hold the feed button while you turn on the power. The printer prints out a listing of its current configuration (see Figure 22). After printing the label, the printer will automatically enter a diagnostic mode in which the printer prints out a literal representation (see Figure 23) of all data subsequently received. To exit the diagnostic mode and resume printing, turn off and then turn on the printer.
Index C Calibration Manual45 Cleaning35 Communications diagnostics47 Configuration label46 D Defaulting the printer47 F Factory defaults, resetting47 - 48 Feed button modes48 L Lubrication35 M Maintenance35 Manual calibration45 P Print darkness, adjusting48 Print width, adjusting48 R Recalibrating the printer46 Resetting the factory defaults47 - 48
S Status LED39 T Troubleshooting tests46