Closing the printer Hold the top cover and press the cover lock to release. Lower the top cover. The ribbon carriage automatically folds up into place. Press down until the cover snaps closed.
Reporting Damage If you discover damage or missing parts: ■ Immediately notify and file a damage report with the shipping company. Zebra Technologies Corporation is not responsible for any damage incurred during shipment of the printer and will not cover the repair of this damage under its warranty policy. ■ Keep the carton and all packing material for inspection.
Getting Started This section describes how to set up your printer for the first time and use the most common operating procedures for loading media in tear-off mode and loading ribbon. Modes of Printing You can operate this printer in two different modes: tear-off or peel-off. ■ ■ Standard tear-off mode allows you to tear off each label (or a strip of labels) after it is printed. In optional peel-off mode, the backing material is peeled away from the label as it is printed.
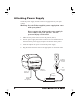
Attaching Power Supply Check the power supply to make certain it is appropriate for your input voltage. Warning: Use the Zebra-supplied power supply that came with your printer. Never operate the printer and power supply in an area where they can get wet. Serious personal injury could result! 1. Make sure the power switch is in the off position (down). 2. The DC power supply has a barrel connector on one end that must be inserted into the power supply receptacle on the back of the printer. 3.
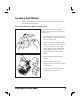
Loading Roll Media When you load media, you must place the roll on the media hangers and then adjust the media guides. Placing the Roll in the Media Compartment Whether your roll media is inside or outside wound you load it into the printer the same way. 1. Open the printer. Remember that you need to pull the release levers toward the front of the printer. 2. Remove the outside length of media. During shipment, the roll may become dirty when handled or dusty when stored.
Adjusting the Guides The adjustable guides direct the media toward the platen and print Head. 1. Open the media guides by turning the guide adjuster knob to the rear. 2. Thread the media through the guides. 3. Close the media guides by turning the guide adjuster knob to the front. They should just touch, but not restrict, the edges of the media. 4. Unless you need to load ribbon, close the top cover.
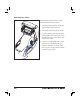
Loading Ribbon You must use thermal transfer media (accepts wax and/or resin transferred off a ribbon) when you use a ribbon. When loading ribbon, you install the supply and take-up rolls, then tighten the ribbon on the carriage. Install the Ribbon Supply Roll Before following these steps, prepare the ribbon by removing its wrapping and pulling its adhesive strip free. 1. Thread the ribbon through the carriage. 2. Press the right side onto the supply hub. 3.
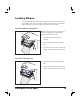
Attach and Tighten the Ribbon You must align the ribbon so that it will be taken straight onto the core. 1. Attach the ribbon to the take up core. Use the adhesive strip on new rolls; otherwise, use tape. 2. Turn the ribbon take-up gear counter-clockwise (top moves toward rear) to remove slack from the ribbon. 3. Close the top cover. Remember that you need to release the cover lock, lower the top cover, and press down until the latches snap into place.
Auto Calibration NOTE: If you are using pre-printed labels, pre-printed label backing, or continuous media, see “Manual Calibration” on page . An auto calibration is performed when the printer is turned on (if media is loaded) or after a media error is cleared. When it is auto calibrating, the printer sets the sensor levels for, and determines the length of, the label you are using. If the status light flashes red, refer to “Manual Calibration” on page .