
User's Manual
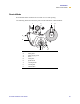
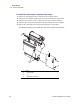

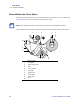


Table Of Contents
- Table of Contents
- Printer Software and Firmware License Agreement
- Warranty Information
- Preface
- Introduction
- Printer Setup
- Printer Operation
- Print Modes
- Configuration
- RFID Guidelines
- Data Ports
- Memory Cards
- Routine Maintenance
- Troubleshooting
- Specifications
- Index

Print Modes
Select a Print Mode
R110/R170XiIIIPlus User Guide 47
To set up the printer in Rewind Mode, complete these steps:
1. If you have not already done so, install the rewind plate.
2. From the front panel, select Rewind Mode.
3. Open the printhead.
4. Slide the media guide and media supply guide as far from the printer frame as possible.
Flip down the media supply guide.
5. Put the roll of media on the media hanger.
6. Push the label core toward the printer frame. The labels must be aligned with the label
core.
7. Feed the media under the media guide roller and under the printhead.
8. Adjust the media supply guide so it is just touching the edge of the media.
9. When loading labels, allow approximately 36 in. (915 mm) of labels to extend past the
printhead. Remove all labels from this portion to create a leader.
10. Remove the hook from the rewind spindle. If you are using a core, slide it onto the rewind
spindle until it is flush against the guide plate.
11. Wind the label backing around either the 3 in. (76 mm) core or the rewind spindle.
Reinstall the hook.
12. Flip up the media supply guide. Slide in the media guide and media supply guide so they
just touch the edge of the labels. The labels should lie flat.
13. Before closing the printhead, make sure that:
• The labels are positioned against the inside guides.
• The labels are taut and parallel to the pathway when wound onto the rewind
spindle or core.
14. Close the printhead.
The labels wind on the rewind spindle or core.