
User's Manual Part 2


Routine Maintenance
Power Fuse Replacement
58981L-002 Rev. 1 2/11/05 R110PAX4 User Guide 129
Power Fuse Replacement
The print engine uses a metric-style fuse (5 × 20 mm IEC) rated for 5 Amps at 250 Volts that
bears the certification mark of a known international safety organization (see Figure 13
on page 23). The power entry module comes with two approved fuses in the fuse holder: one is
in-circuit and the other is a spare.
To replace a fuse, complete these steps:
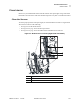
1. See Figure 50. Turn off the print engine and unplug the power cord from the back of the
print engine.
2. Using a small-blade screwdriver, remove the fuse holder from the power entry module at
the rear of the print engine.
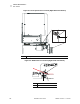
3. Carefully remove the fuse from the in-circuit location.
4. To remove the spare fuse, gently push the point of a pencil or the end of a paperclip
through one of the two holes in the fuse holder. Repeat through the other hole.
5. Insert the spare fuse in the in-circuit location.
6. Place a new fuse in the spare fuse location.
7. Reinstall the fuse holder into the power entry module at the rear of the print engine.
8. Reconnect the power cord and turn the print engine on.
The print engine should be ready for operation and the POWER light should be on. If
power is not restored, an internal component failure may have occurred, and the print
engine may require servicing. See Troubleshooting on page 131.
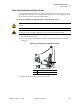
Figure 50 • Installing a Fuse