
User's Manual Part 2
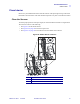
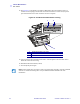
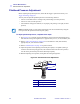
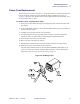
Table Of Contents

96 R110PAX3 User Guide 9/7/2004 58981L-001 Rev. 1
Routine Maintenance
Printhead Pressure Adjustment
Printhead Pressure Adjustment
Before adjusting the printhead pressure, check that the toggle is positioned correctly. See
Toggle Positioning on page 95.
You may need to adjust the printhead pressure in the following instances:
• if there is noticeable bleed or swelling in the printed image (too much pressure)
• if there are voids (too little pressure)
• if the darkness setting (burn duration) is set properly, but printing is too light (too little
pressure)
To adjust printhead pressure, complete these steps:
1. See Figure 45. As a starting point for adjustment, set the position of the adjusting nut so
that when the locking nut is tightened, it is approximately 7/16 in. (11 mm) from the yoke.
2. Refer to Adjust Print Darkness on page 55 to set the darkness value (burn duration)
appropriately for your media and ribbon.
3. Refer to PA U S E S e l f Te s t on page 112 to print test labels.
4. Adjust the position of the adjusting nut until the print quality is acceptable (turning it
clockwise increases the spring pressure, and counterclockwise decreases the pressure).
Use the lowest pressure that provides the desired print quality.
5. Hold the adjusting nut in position, and tighten the locking nut against it.
Figure 45 • Printhead Pressure Adjustment
Note • Printhead and drive system (belts and bearings) life can be maximized by using the
lowest pressure that produces the desired print quality.
1
Yok e
2
Locking nut
3
Adjusting nut
7/16inch
(11mm)
2
3
1