
User's Manual
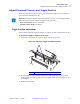


Table Of Contents
- Contents
- Preface
- Introduction
- Printer Setup
- Printer Operation
- Front Panel Controls
- RFID Guidelines
- Overview
- Getting Started with RFID
- Creating Basic RFID Label Formats
- RFID Label Format 1-Write a 96-bit Tag in Hexadecimal
- RFID Label Format 2-Write a 64-bit Tag in Hexadecimal
- RFID Label Format 3-Write a 96-bit Tag in ASCII
- RFID Label Format 4-Read Data from Tag and Print on Label
- RFID Label Format 5-Write Tag, Read Tag, and Print Data on Label
- RFID Label Format 6-Write Tag, Read Tag, and Return Results to Host
- ZPL II Commands for RFID
- Data Ports
- Memory Cards
- Routine Maintenance
- Troubleshooting
- Specifications
- Proprietary Statement
- Warranty Information
- Printer Software and Firmware License Agreement
- Index

40 R110Xi/R170Xi User Guide 23063L-003 Rev. A 6/24/05
Printer Operation
Adjust Printhead Pressure and Toggle Position
Printhead Pressure Adjustment
If positioning the toggles properly does not solve the problem, adjust printhead pressure.
Maximize printhead life by using the lowest pressure that produces the desired print quality.
To adjust printhead pressure, complete these steps:
1. Print some labels at 2.4 in. (61 mm) per second by running the PAUSE Self Test
on page 136.
2. While printing labels, use the front panel controls to lower the darkness setting until the
labels are printing gray instead of black.
3. Loosen the upper knurled nuts on the toggle assemblies (Figure 30).
Figure 30 • Adjusting Printhead Pressure
4. Some media types require higher pressure to print well. For these media types, increase or
decrease pressure using the lower knurled nuts until the left and right edges of the printed
area are equally dark.
5. Increase the darkness level using the front panel controls until the printing is clear.
6. Tighten the upper knurled nuts.
Caution • Observe proper electrostatic safety precautions when handling any static-
sensitive components such as circuit boards and printheads.
1
Upper knurled nuts
2
Lower knurled nuts
2
1