
User's Manual
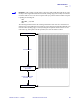


Table Of Contents
- Contents
- Preface
- Introduction
- Printer Setup
- Printer Operation
- Front Panel Controls
- RFID Guidelines
- Overview
- Getting Started with RFID
- Creating Basic RFID Label Formats
- RFID Label Format 1-Write a 96-bit Tag in Hexadecimal
- RFID Label Format 2-Write a 64-bit Tag in Hexadecimal
- RFID Label Format 3-Write a 96-bit Tag in ASCII
- RFID Label Format 4-Read Data from Tag and Print on Label
- RFID Label Format 5-Write Tag, Read Tag, and Print Data on Label
- RFID Label Format 6-Write Tag, Read Tag, and Return Results to Host
- ZPL II Commands for RFID
- Data Ports
- Memory Cards
- Routine Maintenance
- Troubleshooting
- Specifications
- Proprietary Statement
- Warranty Information
- Printer Software and Firmware License Agreement
- Index

90 R110Xi/R170Xi User Guide 6/24/05 23063L-003 Rev. A
RFID Guidelines
^RS
Example 2 • This example sets the printer to move the media to 800 dots from the top of the
media [or label length - 500 from the bottom (leading edge) of the media] and prints “VOID”
500 dots in vertical length (Y axis) in case of an error.
^XA
^RS,800,500,2,P^FS
^XZ
The following illustration shows the resulting voided label. Note where the void starts. The
media has been moved 800 dot rows from the top of the label [label length minus 800 dot rows
from the bottom (leading edge) of a label] to bring the transponder into the effective area to
read/write a tag. If the printer fails the operation, an area that is 500 dot rows of the media is
voided instead of the entire rest of the media.
Top of label
Start of RFID
operation
800 dot rows
Bottom of label
Label length minus
800 dot rows
500 dot rows