
User's Manual
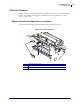
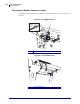


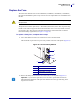
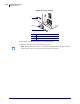
Table Of Contents

117
Routine Maintenance
Replace the Fuse
12/2/05 XiIIIPlus/R110Xi/R170Xi User Guide 13383L-002 Rev. A
Replace the Fuse
The instructions that follow are for the 90XiIIIPlus, 96XiIIIPlus, 140XiIIIPlus, 170XiIIIPlus,
R170Xi, and 220XiIIIPlus printers only. Fuses are not user-replaceable in the 110XiIIIPlus and
R110Xi.
The printer uses a metric-style fuse (5 × 20 mm IEC) rated at F5A, 250 V. The AC power entry
module comes with two approved fuses in the fuse holder: one is in-circuit, and the second is
provided as a spare. The end caps of the fuse must bear the certification mark of a known
international safety organization (see Figure 7 on page 18).
To replace a faulty fuse, complete these steps:
1. Use a small-blade screwdriver or similar tool to remove the fuse holder.
The fuse holder is part of the AC power entry module at the rear of the printer (Figure 52).
Figure 52 • AC Power Entry Module
2. Remove the faulty fuse and install a new fuse in the in-circuit position (Figure 53).
Caution • Turn the AC power switch Off (O) and remove the power cord before performing
this procedure.
1
Power switch
2
Fuse holder
3
AC power entry module
4
Small-blade screwdriver
Important • If you use the spare fuse, be sure to order a replacement fuse from an
authorized Zebra distributor. The spare fuse should be the exact type and rating as the
original in-circuit fuse.
1
2
3
4