
User Manual

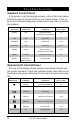


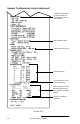


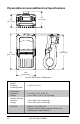
Table Of Contents
- Contents
- Introduction
- Unpacking and Inspection
- Reporting Damage
- Getting Ready to Print
- Battery
- Installing the Battery
- Charging the Battery
- Loading the Media
- Installing the Media
- Operator Controls
- Standard Keypad
- LCD Control Panel
- Verify the Printer Is Working
- Printing a Configuration Label
- Connecting the Printer
- Cable Communications
- IR Communications
- SRRF Communications
- Zebra SRRF Network Overview
- Bluetooth™ Networking Overview
- Wireless Local Area Network (WLAN) Module Using CF Radio
- Wireless Local Area Network (WLAN) Module Using PCMCIA Radio
- Setting Up the Software
- Adjustable Shoulder Strap
- Belt Clip
- Preventive Maintenance
- Extending Battery Life
- Cleaning
- Troubleshooting
- Standard Control Panel
- Optional LCD Control Panel
- Troubleshooting Topics
- Troubleshooting Tests
- Printing a Configuration Label
- Sample Configuration Label
- Communications Diagnostics
- Calling the Help Desk
- Specifications
- Printing Specifications
- Memory/Communications Specifications
- Label Specifications
- Font/Bar Code Specifications
- Physical/Environmental/Electrical Specifications
- Communications Port
- _
- Agency Approvals
- Accessories
- Appendix A
- Interface Cables
- _
- Appendix B
- Media Supplies
- Appendix C
- Maintenance Supplies
- Appendix D
- Product Support
- Index 49
- Patent Information

QL 320 User’s Guide 37
Communications Diagnostics
If there’s a problem transferring data between the computer
and the printer, try putting the printer in the Communications Di-
agnostics Mode (also referred to as the “DUMP” mode). The
printer will print the ASCII characters and their and their text rep-
resentation (or the period ‘.’, if not a printable character) for any
data received from the host computer
To enter Communications Diagnostics Mode:
1. Print a configuration label as described on pg. 34.
5. At the end of 2nd diagnostics report, the printer will print:
“Press FEED key to enter DUMP mode”.
6. Press the FEED key. The printer will print: “Entering
DUMP mode”.
Note: If the FEED key is not pressed within 3 seconds, the printer will print “DUMP mode
not entered” and will resume normal operation.
7. At this point, the printer is in DUMP mode and will print the
ASCII hex codes of any data sent to it, and their text rep-
resentation (or “.” if not a printable character).
Additionally, a file with a “.dmp” extension containing the ASCII
information will be created and stored in the printer’s memory. It
can be viewed, “cloned” or deleted using the Label Vista applica-
tion. (Refer the Label Vista documentation for more information.)
To terminate the Communications Diagnostics Mode and return
the printer to normal operations:
1. Turn the printer OFF.
2. Wait 5 seconds.
3. Turn the printer ON.
Calling the Help Desk
If the printer fails to print the configuration label, or you encoun-
ter problems not covered in the Troubleshooting Guide, contact
the Help Desk. Help Desk addresses and phone numbers for
your area can be found in Appendix D of this manual. The Help
Desk will need the following information:
•Model number/type (e.g. QL 320)
•Unit serial number (Found on the large label on the back
of the printer, also found in the configuration label printout.
Refer to Figure 17)
• Product Configuration Code (PCC) (15 digit number found
on the small label on the back of the unit)