
User Manual

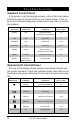


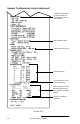


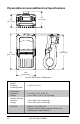
Table Of Contents
- Contents
- Introduction
- Unpacking and Inspection
- Reporting Damage
- Getting Ready to Print
- Battery
- Installing the Battery
- Charging the Battery
- Loading the Media
- Installing the Media
- Operator Controls
- Standard Keypad
- LCD Control Panel
- Verify the Printer Is Working
- Printing a Configuration Label
- Connecting the Printer
- Cable Communications
- IR Communications
- SRRF Communications
- Zebra SRRF Network Overview
- Bluetooth™ Networking Overview
- Wireless Local Area Network (WLAN) Module Using CF Radio
- Wireless Local Area Network (WLAN) Module Using PCMCIA Radio
- Setting Up the Software
- Adjustable Shoulder Strap
- Belt Clip
- Preventive Maintenance
- Extending Battery Life
- Cleaning
- Troubleshooting
- Standard Control Panel
- Optional LCD Control Panel
- Troubleshooting Topics
- Troubleshooting Tests
- Printing a Configuration Label
- Sample Configuration Label
- Communications Diagnostics
- Calling the Help Desk
- Specifications
- Printing Specifications
- Memory/Communications Specifications
- Label Specifications
- Font/Bar Code Specifications
- Physical/Environmental/Electrical Specifications
- Communications Port
- _
- Agency Approvals
- Accessories
- Appendix A
- Interface Cables
- _
- Appendix B
- Media Supplies
- Appendix C
- Maintenance Supplies
- Appendix D
- Product Support
- Index 49
- Patent Information

34 QL 320 User’s Guide
Troubleshooting Tests
Printing a Configuration Label
To print out a listing of the printer’s current configuration follow
these steps:
9. Yellow error light always on, or flashing:
• Check media is loaded and print head is closed and
securely latched.
10. Skips labels:
• Check media for top of form sense mark or label gap.
• Check that the maximum print field has not been exceeded
on label.
•Insure bar/ or gap sensor is not blocked or
malfunctioning
11. Communication Error:
• Check media is loaded, head is closed and error
light is off.
• Check baud rate.
• Replace cable to terminal.
12. Label Jam:
• Open head release latch and media cover.
• Generously apply alcohol to printer in area of
jammed label.
13. Blank LCD Screen (only for units with optional LCD
control panel)
• No application loaded or application corrupted: reload
program.
1. Turn the printer off. Load the media compartment with
journal media (media with no black bars printed on the
back)
2. Press and hold the Feed Button.
3. Press and release the Power button and keep the Feed
button pressed. When printing starts, release the Feed
button.