
User Manual

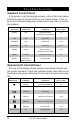


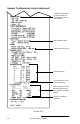
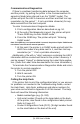


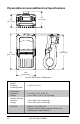
Table Of Contents
- Contents
- Introduction
- Unpacking and Inspection
- Reporting Damage
- Getting Ready to Print
- Battery
- Installing the Battery
- Charging the Battery
- Loading the Media
- Installing the Media
- Operator Controls
- Standard Keypad
- LCD Control Panel
- Verify the Printer Is Working
- Printing a Configuration Label
- Connecting the Printer
- Cable Communications
- IR Communications
- SRRF Communications
- Zebra SRRF Network Overview
- Bluetooth™ Networking Overview
- Wireless Local Area Network (WLAN) Module Using CF Radio
- Wireless Local Area Network (WLAN) Module Using PCMCIA Radio
- Setting Up the Software
- Adjustable Shoulder Strap
- Belt Clip
- Preventive Maintenance
- Extending Battery Life
- Cleaning
- Troubleshooting
- Standard Control Panel
- Optional LCD Control Panel
- Troubleshooting Topics
- Troubleshooting Tests
- Printing a Configuration Label
- Sample Configuration Label
- Communications Diagnostics
- Calling the Help Desk
- Specifications
- Printing Specifications
- Memory/Communications Specifications
- Label Specifications
- Font/Bar Code Specifications
- Physical/Environmental/Electrical Specifications
- Communications Port
- _
- Agency Approvals
- Accessories
- Appendix A
- Interface Cables
- _
- Appendix B
- Media Supplies
- Appendix C
- Maintenance Supplies
- Appendix D
- Product Support
- Index 49
- Patent Information

QL 320 User’s Guide 31
Cleaning
CAUTION.- Use only the cleaning agents indicated.
Zebra Technologies Corporation will not be responsible
for damage caused by any other cleaning materials
used on this printer.
Never use any sharp objects on the printer mechanism
as they could damage the print head and platen. Clean
the printer with either the cleaning pen supplied with the
printer or a cotton swab saturated with alcohol.
Use the supplied cleaning pen or 70%
isopropyl alcohol on a cotton swab to
clean the print elements from end to end
(the print elements are located in the thin
gray line on the printhead).
If print quality has not improved after
performing this procedure, try cleaning
the printhead with a Cleaning Pad. This
specially prepared material removes
contamination buildup without damaging
the printhead. Refer to Appendix C for
more information.
Rotate the platen roller and clean it
thoroughly with the cleaning pen or 70%
isopropyl alcohol and a cotton swab.
Units with linerless platens: Rotate platen
& clean bearing points only.
Avoid use of
alcohol on the surface of linerless
platens!
Clean thoroughly with the cleaning pen or
70% isopropyl alcohol and a cotton swab.
Clean thoroughly with the cleaning pen or
70% isopropyl alcohol and a cotton swab.
Water-dampened cloth
Printhead
(Figure 16)
Platen Roller
(Figure 16)
Peel bar
(Figure 16)
Tear bar
(Figure 16)
Exterior
Area Method Interval
As needed
Interior
(Figure 16)
Brush/air blow. Insure the Bar Sensor, Gap
Sensor and Label Present Sensor windows
are free of dust.
Units with linerless platens:
Clean inside surfaces of edge guides and
media support rollers with the supplied
cleaning pen or 70% isopropyl alcohol on a
cotton swab.
After every five
rolls of media
(or more often,
if needed)
Linerless media
requires more
frequent
cleaning.
After every five
rolls of media
(or more often,
if needed)