
User Manual

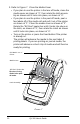

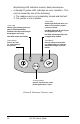
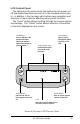
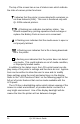


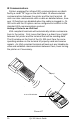
Table Of Contents
- Contents
- Introduction
- Unpacking and Inspection
- Reporting Damage
- Getting Ready to Print
- Battery
- Installing the Battery
- Charging the Battery
- Loading the Media
- Installing the Media
- Operator Controls
- Standard Keypad
- LCD Control Panel
- Verify the Printer Is Working
- Printing a Configuration Label
- Connecting the Printer
- Cable Communications
- IR Communications
- SRRF Communications
- Zebra SRRF Network Overview
- Bluetooth™ Networking Overview
- Wireless Local Area Network (WLAN) Module Using CF Radio
- Wireless Local Area Network (WLAN) Module Using PCMCIA Radio
- Setting Up the Software
- Adjustable Shoulder Strap
- Belt Clip
- Preventive Maintenance
- Extending Battery Life
- Cleaning
- Troubleshooting
- Standard Control Panel
- Optional LCD Control Panel
- Troubleshooting Topics
- Troubleshooting Tests
- Printing a Configuration Label
- Sample Configuration Label
- Communications Diagnostics
- Calling the Help Desk
- Specifications
- Printing Specifications
- Memory/Communications Specifications
- Label Specifications
- Font/Bar Code Specifications
- Physical/Environmental/Electrical Specifications
- Communications Port
- _
- Agency Approvals
- Accessories
- Appendix A
- Interface Cables
- _
- Appendix B
- Media Supplies
- Appendix C
- Maintenance Supplies
- Appendix D
- Product Support
- Index 49
- Patent Information

18 QL 320 User’s Guide
Verify the Printer Is Working
Before you connect the printer to your computer or portable
data terminal, make sure that the printer is in proper working or-
der. You can do this by printing a configuration label using the
“two key reset” method. If you can’t get this label to print, refer to
“Troubleshooting”.
Printing a Configuration Label
1. Turn the printer off. Load the media compartment with
journal media (media with no black bars printed on the
back)
2. Press and hold the Feed Button.
3. Press and release the Power button and keep the Feed
button pressed. When printing starts, release the Feed
button.
The unit will print a line of interlocking “x” characters to in-
sure all elements of the print head are working, print out the ver-
sion of software loaded in the printer and then print two reports.
The first report indicates model, ROM version, serial number,
baud rate, etc. The second report prints out more detailed in-
formation on the printer’s configuration and parameter settings.
If no second report appears, there is no application loaded. (See
the Troubleshooting Section for a sample print-out and a further
discission on how to use the configuration label as a diagnostic
tool.)
Connecting the Printer
The printer must establish communications with a host terminal
which sends the data to be printed. Communications occur in
four basic ways:
• By a cable between the printer and its host terminal
• Linking to a host terminal via Infrared (usually by means of
the industry standard IrDA protocol)
• By means of a Short Range Radio Frequency (SRRF) link.
• By means of a wireless LAN (Local Area Network). This
applies to QL 320N Network Printers only.