Zebra® P430i Card Printer User’s Manual 980470-001 Rev.
lor ed Co l-Sid Dua
Foreword This manual contains installation and operation information for the Zebra P430i Card Printers manufactured by Zebra Technologies Corporation, Camarillo, California. Return Materials Authorization Before returning any equipment to Zebra Technologies Corporation for in-warranty or out-of-warranty repair, contact Repair Administration for a Return Materials Authorization (RMA) number. Repack the equipment in the original packing material and mark the RMA number clearly on the outside.
Foreword Copyright Notice © 2006 ZIH Corp. This document contains information proprietary to Zebra Technologies Corporation. This document and the information contained within is Copyrighted by Zebra Technologies Corporation and may not be duplicated in full or in part by any person without written approval from Zebra.
Foreword EUROPE: Norway Only: This product is also designed for IT power system with phase to phase voltage 230V. Earth grounding is via the polarized, 3-wire power cord. FI: “Laite on liitettävä suojamaadoitus koskettimilla varustettuun pistorasiaan” SE: “Apparaten skall anslutas till jordat uttag” NO: “Apparatet må tilkoples jordet stikkontakt” FCC Regulations Note: This equipment has been tested and found to comply with the limits for a Class B digital device, pursuant to part 15 of the FCC Rules.
Foreword P430i Printer Model The Zebra Product Number tells a story: Here is a quick review of the Zebra Card Printer Series numbering and lettering system to help you.
Foreword Note • Indicates information that emphasizes or supplements important points of the main text. Important • Advises you of information that is essential to complete a task, or points out the importance of specific information in the text. Provides an example or scenario to demonstrate or clarify a section of text. Electrostatic Discharge Caution • Warns you of the potential for electrostatic discharge. Electric Shock Caution • Warns you of a potential electric shock situation.
Foreword lor ed Co l-Sid Dua vi P430i User’s Manual 980470-001 Rev.
Table of Contents 1 • Introduction . . . . . . . . . . . . . . . . . . . . . . . . . . . . . . . . . . . . . . . . . . . . . . . . . . . . 1 Printer Features . . . . . . . . . . . . . . . . . . . . . . . . . . . . . . . . . . . . . . . . . . . . . . . . . . . . . . . . . 1 Controls, Connectors, and Indicators . . . . . . . . . . . . . . . . . . . . . . . . . . . . . . . . . . . . . . . . . 2 LCD Panel . . . . . . . . . . . . . . . . . . . . . . . . . . . . . . . . . . . . . . . . . . . . . . . . . . . . .
Table of Contents 4 • Cleaning . . . . . . . . . . . . . . . . . . . . . . . . . . . . . . . . . . . . . . . . . . . . . . . . . . . . . . 29 Cleaning the Printer . . . . . . . . . . . . . . . . . . . . . . . . . . . . . . . . . . . . . . . . . . . . . . . . . . . . . When to Clean . . . . . . . . . . . . . . . . . . . . . . . . . . . . . . . . . . . . . . . . . . . . . . . . . . . . . . How to Clean . . . . . . . . . . . . . . . . . . . . . . . . . . . . . . . . . . . . . . . . . . . . . . . . . . . . . .
Table of Contents • Smart Card Contact Station . . . . . . . . . . . . . . . . . . . . . . . . . . . . . . . . . . . . . . . 51 Smart Card Contact Station Interface . . . . . . . . . . . . . . . . . . . . . . . . . . . . . . . . . . . . . . . . 52 Printer Sharing . . . . . . . . . . . . . . . . . . . . . . . . . . . . . . . . . . . . . . . . . . . . . . . . . . . . . . . . . 53 • Connecting to a Network . . . . . . . . . . . . . . . . . . . . . . . . . . . . . . . . . . . . . . . . .
Table of Contents lor ed Co l-Sid Dua x P430i User’s Manual 980470-001 Rev.
1 Introduction Thank you for choosing the Zebra P430i Card Printer. This manual guides you to efficient start up and operation of your new Card Printer. Printer Features The following shows the main functional features found on your P430i Printer.
Introduction Controls, Connectors, and Indicators Controls, Connectors, and Indicators Your P430i Printer has an LCD Display Panel and a Panel Button on the front and a power connector, power switch, and interface connector(s) on the rear panel.
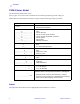
Introduction Controls, Connectors, and Indicators LCD Panel The LCD Panel can display the following messages: Message Mode Operational Initializing Scrolling SELF TEST Scrolling READY Fixed DOWNLOADING DATA Fixed PRINTING MONO Fixed MAG ENCODING Fixed CONTACT ENCODING Fixed CONTACTLESS ENCODING Scrolling PRINTING CYAN Fixed PRINTING YELLOW Fixed PRINTING MAGENTA Fixed PRINTING BLACK Fixed PRINTING OVERLAY Fixed DOWNLOADING FW Fixed Warnings (Printer will still Operate) CLEAN
Introduction Controls, Connectors, and Indicators Message Mode CLEANING PRINTER Blinking Errors (Printer will not operate) 4 BROKEN RIBBON Blinking OUT OF RIBBON Blinking MECHANICAL ERROR Blinking OUT OF CARDS Blinking PRINT HEAD OPEN Blinking CHECK RIBBON Blinking REJECT BOX FULL Blinking LID OPEN Fixed COMMAND ERROR Blinking P430i User’s Manual 980470-001 Rev.
2 Installation and Setup General Information This section will guide you through the installation and setup of your P430i Card Printer. This consists of the following procedures, which should be performed in the order presented.
Installation and Setup Unpacking the Printer Electric Shock Caution • Limit AC power supplied to the P430i Printer to 100 – 230 volts, 60 ~ 50 Hertz. Limit excess current draw to 16 amps or less, using an associated circuit breaker or other such device. Never operate the printer in a location where operator, computer, or printer can get wet. Personal injury could result.
Installation and Setup Unpacking the Printer 5. Lift the printer out of the carton by holding it with both hands. 6. Please ensure that you have a clean and nearly dust free environment for proper operation and storage of the printer. 7. Make sure the following items are included with your P430i printer: 980470-001 Rev.
Installation and Setup Unpacking the Printer Card Cleaning Cartridge CD-ROM with Driver Wizard and User’s Manual Power Cables (2) USB Cable Cleaning Kit If any items are missing, please contact your dealer. To reorder, please refer to Appendix D of this manual. 8. Remove packing tape securing the printer’s Main Cover and Card Feeder Cover. 9.
Installation and Setup Unpacking the Printer b. Locate the Print Head protection pad and the Card Cleaning Cartridge location tape (see below). Remove the tape. Remove me I Print Head P rotection Pad c. L A NST L Card Cleaning Cartridge Location Tape Release the Print Head Carriage by pushing the Print Head Carriage Latch to the left, and raise the Print Head Carriage. It will remain open at about a 45° angle. Print Head Carriage Latch Color Sided Dual- 980470-001 Rev.
Installation and Setup Installing the Print Driver Software and Setting Driver Options d. Remove the print head protection pad. Keep the pad, as well as the other packing material and the shipping carton, in case the printer is shipped or moved. If the original material is lost, a replacement Shipping Kit can be ordered from your reseller.
Installation and Setup Loading a Ribbon • Delete previous versions of the driver and clean up any necessary Registry entries. You must select “Remove” from the install options to remove any previous driver versions. Loading a Ribbon i Series Printers require the use of i Series ribbons for full color printing. The Resin Thermal Transfer and Dye Sublimination ribbons for P430i are specifically designed for your P430i Printer. 1. Place the printer power switch in the OFF (0) position. 2.
Installation and Setup Loading a Ribbon Color Sided Dual- Ribbon Take-up Spindle Ribbon Supply Spindle 3. Locate the Ribbon Supply Spindle and the Ribbon Take-up Spindle (see above). Load ribbon onto the supply spindle (under the print head carriage) flange side in, and load the empty core (with tape attached) onto the take-up spindle. Make sure the ribbon comes off the top of the supply spindle and feeds to the top of the take-up spindle.
Installation and Setup Loading a Ribbon Caution • Do not touch the print head if the printer has been in service within the last 10 minutes. It could be very hot and cause a burn. Electrostatic Discharge Caution • A static discharge is possible if you touch any exposed metal parts. Use of an anti-static wrist strap or comparable anti-static protection is required. 4. Gently press the print head carriage down until it is fully lowered, as shown below. Very little force is neccessary to perform this step.
Installation and Setup Installing the Card Cleaning Cartridge Installing the Card Cleaning Cartridge The Card Cleaning Cartridge cleans the cards entering the printer. The Card Cleaning Cartridge consists of a Cartridge Frame and an Adhesive Roller, which are packed together. 1. Remove the Cartridge Frame and the Adhesive Roller from their packaging. Insert the Adhesive Roller into the Cartridge Frame, as shown below. To avoid contamination, always hold the frame and the roller by the ends. . 2.
Installation and Setup Installing the Card Cleaning Cartridge 4. Locate the slot at the rear of the Card Cleaning Cartridge mounting location; see below. Card Cleaning Dual-Sid ed Colo r 5. Hold the Card Cleaning Cartridge by the extended “handle” (so the large arrow on the top is pointing away from you). With the cartridge at about a 30° angle (pointing downward), insert the lip of the cartridge into the slot, until the cartridge seats against the back wall.
Installation and Setup Setting the Card Thickness Control Setting the Card Thickness Control The Card Thickness Control is set by the user to adjust the gap as cards enter the printer, to prevent double-feeds (which could cause a jam) or mis-feeds. Note • Set the Card Thickness Control before loading cards. 1. Open the Card Feeder cover. The cover is hinged; lift it by the lip at the right front corner.
Installation and Setup Setting the Card Thickness Control 3. There are four detents to set the position of the Card Thickness Control. Slide the Card Thickness Control to the position corresponding to the following: Detent Position Card Thickness Highest 50 mil (1.27 mm) to 60 mil (1.52 mm) 3rd position 30 mil (0.76 mm) to 50 mil (1.27 mm) 2nd position 20 mil (0.51 mm) to 40 mil (1.02 mm) Lowest 10 mil (0.25 mm) to 20 mil (0.
Installation and Setup Loading Cards Loading Cards This section shows how to load plastic cards into the P430i Printer. The P430i can use cards with a range of thickness from 10 mil (0.25 mm) to 60 mil (1.5 mm). Note • Do not mix cards of different thicknesses! The P430i Printer can also load and print cards fed individually. Information on this is given in the next chapter. Note • DO NOT bend cards or touch print surfaces as this can reduce print quality.