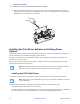
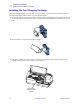
Installation and Setup Unpacking the Printer b. Locate the Print Head protection pad and the Card Cleaning Cartridge location tape (see below). Remove the tape. Remove me I Print Head P rotection Pad c. L A NST L Card Cleaning Cartridge Location Tape Release the Print Head Carriage by pushing the Print Head Carriage Latch to the left, and raise the Print Head Carriage. It will remain open at about a 45° angle. Print Head Carriage Latch Color Sided Dual- 980470-001 Rev.
Installation and Setup Installing the Print Driver Software and Setting Driver Options d. Remove the print head protection pad. Keep the pad, as well as the other packing material and the shipping carton, in case the printer is shipped or moved. If the original material is lost, a replacement Shipping Kit can be ordered from your reseller.
Installation and Setup Loading a Ribbon • Delete previous versions of the driver and clean up any necessary Registry entries. You must select “Remove” from the install options to remove any previous driver versions. Loading a Ribbon i Series Printers require the use of i Series ribbons for full color printing. The Resin Thermal Transfer and Dye Sublimination ribbons for P430i are specifically designed for your P430i Printer. 1. Place the printer power switch in the OFF (0) position. 2.
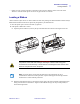
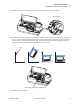
Installation and Setup Loading a Ribbon Color Sided Dual- Ribbon Take-up Spindle Ribbon Supply Spindle 3. Locate the Ribbon Supply Spindle and the Ribbon Take-up Spindle (see above). Load ribbon onto the supply spindle (under the print head carriage) flange side in, and load the empty core (with tape attached) onto the take-up spindle. Make sure the ribbon comes off the top of the supply spindle and feeds to the top of the take-up spindle.
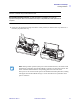
Installation and Setup Loading a Ribbon Caution • Do not touch the print head if the printer has been in service within the last 10 minutes. It could be very hot and cause a burn. Electrostatic Discharge Caution • A static discharge is possible if you touch any exposed metal parts. Use of an anti-static wrist strap or comparable anti-static protection is required. 4. Gently press the print head carriage down until it is fully lowered, as shown below. Very little force is neccessary to perform this step.
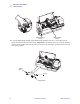
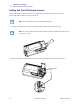
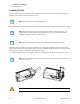
Installation and Setup Installing the Card Cleaning Cartridge Installing the Card Cleaning Cartridge The Card Cleaning Cartridge cleans the cards entering the printer. The Card Cleaning Cartridge consists of a Cartridge Frame and an Adhesive Roller, which are packed together. 1. Remove the Cartridge Frame and the Adhesive Roller from their packaging. Insert the Adhesive Roller into the Cartridge Frame, as shown below. To avoid contamination, always hold the frame and the roller by the ends. . 2.
Installation and Setup Installing the Card Cleaning Cartridge 4. Locate the slot at the rear of the Card Cleaning Cartridge mounting location; see below. Card Cleaning Dual-Sid ed Colo r 5. Hold the Card Cleaning Cartridge by the extended “handle” (so the large arrow on the top is pointing away from you). With the cartridge at about a 30° angle (pointing downward), insert the lip of the cartridge into the slot, until the cartridge seats against the back wall.
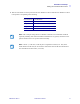
Installation and Setup Setting the Card Thickness Control Setting the Card Thickness Control The Card Thickness Control is set by the user to adjust the gap as cards enter the printer, to prevent double-feeds (which could cause a jam) or mis-feeds. Note • Set the Card Thickness Control before loading cards. 1. Open the Card Feeder cover. The cover is hinged; lift it by the lip at the right front corner.
Installation and Setup Setting the Card Thickness Control 3. There are four detents to set the position of the Card Thickness Control. Slide the Card Thickness Control to the position corresponding to the following: Detent Position Card Thickness Highest 50 mil (1.27 mm) to 60 mil (1.52 mm) 3rd position 30 mil (0.76 mm) to 50 mil (1.27 mm) 2nd position 20 mil (0.51 mm) to 40 mil (1.02 mm) Lowest 10 mil (0.25 mm) to 20 mil (0.
Installation and Setup Loading Cards Loading Cards This section shows how to load plastic cards into the P430i Printer. The P430i can use cards with a range of thickness from 10 mil (0.25 mm) to 60 mil (1.5 mm). Note • Do not mix cards of different thicknesses! The P430i Printer can also load and print cards fed individually. Information on this is given in the next chapter. Note • DO NOT bend cards or touch print surfaces as this can reduce print quality.
Installation and Setup Loading Cards 2. Remove all wrapping from the card deck. 3. Holding the card deck by the sides, hold it vertically against a flat surface such as a desktop. If the deck is too thick for your hand to hold it comfortably, use about half a deck at a time. 4. Push the stack back and forth to an angle of about 45° from vertical, so as to separate all of the cards.
Installation and Setup Card Output Hopper Card Output Hopper The card output hopper is normally extended to receive the printed cards. The printer may be operated with the card output hopper in its closed position; in this case the cards will not be collected in the output hopper. 1. Pull the card output hopper out to place it in its functional position. Note • The output hopper is a very snug fit to prevent it from moving during shipping or operation; firm force is required to change its position.
Installation and Setup Connecting the Printer to your Computer Connecting the Printer to your Computer The P430i Printer includes a standard USB interface. As an option, the printer can be ordered with a 10/100base-T Ethernet Adapter (in addition to the USB interface). The Ethernet Adapter can also be ordered as an add-on option and installed in the field by a Zebra factory certified technician. 1.
Installation and Setup Connecting Power Connecting Power The P430i Printer includes an internal AC power supply that accepts nominal input voltage in the range from 110 to 230 volts at 50 to 60 Hertz. The power source must be grounded. Depending on specific model number, your P430i Printer will include one or two power cords; use the one that is appropriate for the AC power source connection at your location.