Zebra® P100i™ Card Printer User’s Manual Review Copy Aug 10, 2007 980590-001 Rev.
P100i User’s Manual 980590-001 Rev.
Foreword This manual contains installation and operation information for the Zebra P100i card printers manufactured by Zebra Technologies Corporation. Copyright Notice © 2004 ZIH Corp. This document contains information proprietary to Zebra Technologies Corporation. This document and the information contained within is Copyrighted by Zebra Technologies Corporation and may not be duplicated in full or in part by any person without written approval from Zebra Technologies Corporation.
Foreword Product Disposal Product Disposal Product Disposal Information • Do not dispose of this product in unsorted municipal waste. This product is recyclable, and should be recycled according to your local standards. For more information, please see our web site at: http://www.zebra.
Foreword Declarations of Conformity Industry Canada Notice This device complies with Industry Canada ICES-003 class A requirements. Cet équipement est conforme à l’ICES-003 classe A de la Norm Industrielle Canadienne. EMC Directive EN 55022 (1998) RF Emissions control EMC Directive EN 301489-3 V1.4.
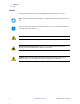
Foreword Icons Icons Throughout this manual, different icons highlight important information, as follows: Note • Indicates information that emphasizes or supplements important points of the main text. Advises you of information that is essential to complete a task, or points out the importance of specific information in the text. Electric Shock Caution • Warns you of a potential electric shock situation.
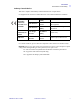
Foreword P100i Printer Model P100i Printer Model The Zebra Product Number tells a story: Here is a quick review of the Zebra Card Printer Series numbering and lettering system to help you.
viii P100i User’s Manual 980590-001 Rev.
Contents • Foreword . . . . . . . . . . . . . . . . . . . . . . . . . . . . . . . . . . . . . . . . . . . . . iii Copyright Notice. . . . . . . . . . . . . . . . . . . . . . . . . . . . . . . . . . . . . . . . . . . . . iii Trademarks . . . . . . . . . . . . . . . . . . . . . . . . . . . . . . . . . . . . . . . . . . . . . . . . iii Product Disposal . . . . . . . . . . . . . . . . . . . . . . . . . . . . . . . . . . . . . . . . . . . . iv Return Materials Authorization . . . . . . . . . . . . . . . . . . .
Contents 4 • P100i Printer Operation . . . . . . . . . . . . . . . . . . . . . . . . . . . . . . . 33 Printing . . . . . . . . . . . . . . . . . . . . . . . . . . . . . . . . . . . . . . . . . . . . . . . . . . . 33 Creating a Sample Card. . . . . . . . . . . . . . . . . . . . . . . . . . . . . . . . . . . 33 Printing a Sample Card . . . . . . . . . . . . . . . . . . . . . . . . . . . . . . . . . . . 34 5 • Cleaning. . . . . . . . . . . . . . . . . . . . . . . . . . . . . . . . . . . . . . . . . . . .
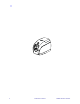
1 Getting Started Unpacking Your Card Printer Your P100i printer ships in a cardboard carton, protected by styrofoam inserts and a protective anti-static bag. Keep all packaging material in case you need to move or re-ship the printer. 1. Before opening and unpacking the printer, inspect the carton to ensure that no damage occurred during shipment. 2. Ensure that you have a clean and nearly dust free environment for proper operation and storage of the printer. 3.
Getting Started Controls and Indicators Controls and Indicators Multi-Function LCD Panel Your P100i printer is equipped with a Multi Function LCD Readout Panel to provide printer status information. The readout is controlled by the multi-function control button directly below the viewing window.
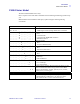
Getting Started Controls and Indicators Message Mode CLEANING Fixed FEED LONG CLEANING CARD IN EXIT Scrolling REMOVE LONG CLEANING CARD Scrolling SINGLE CARD READY-PRINT OR EJECT Scrolling INSERT CARD Fixed PUSH BUTTON TO CONTINUE Scrolling Warnings (Printer will still operate) REMOVE CARD AT EXIT Scrolling CLEAN PRINTER Fixed CHECKING RIBBON Fixed ENCODING ERROR Fixed INVALID MAGNETIC DATA Scrolling CHECK RIBBON Fixed CLOSE LID Fixed FLASH ERROR Fixed READING ERROR Fixed Er
Getting Started Controls and Indicators Rear Panel Connectors, Controls, and Indicators The figure below shows the rear of the P100i Printer. Power Socket USB Port Power Switch Power Switch The power switch is located at the rear of the printer unit, bottom right. Power Socket The power socket is located at the rear of the printer, to the left of the power switch. USB Port The USB port is located at the rear of the printer unit, bottom left. 4 P100i User’s Manual 980590-001 Rev.
Getting Started Controls and Indicators Ethernet Option If your P100i Printer includes the Ethernet option, the rear of the printer will look like the figure below. Power Socket USB Port Power Switch Network Status / Activity Indicator 980590-001 Rev.
6 P100i User’s Manual 980590-001 Rev.
2 Printer Installation Installing the P100i Printer Caution • Do not power the printer with USB attached to your computer at this time. THE DRIVER WILL PROMPT YOU WHEN IT IS TIME TO PLUG IN AND POWER UP YOUR PRINTER. Caution • Limit electrical power supplied to the P100i Printer to 24 VDC. Limit excess current draw to 16 amps or less, using an associated circuit breaker or other such device. Never operate the printer in a location where operator, computer, or printer can get wet.
Printer Installation Installing the P100i Printer 3. Ensure that the printer’s power switch is in the OFF (O) position. 4. Insert the power supply plug into the power socket, attach the power cord (120VAC or 230VAC) to the power supply, then plug the power cord in to a grounded electrical socket of the proper voltage and type. 8 P100i User’s Manual 980590-001 Rev.
Printer Installation Installing the P100i Printer 115 VAC 230 VAC Caution • Intermittent or unpredictable operation may occur from unsecured connectors. If damaged, the power cable must be replaced by an exact equivalent. The socket should always be easily accessible to power off the printer. 5. If your printer has only the USB interface, attach the included USB cable to your computer and the printer. 980590-001 Rev.
Printer Installation Installing the P100i Printer 6. If your printer has the optional Ethernet interface (as well as the USB interface), connect either the USB cable to printer and computer or the Ethernet cable to the printer and the Ethernet network. Important • Do not connect both the USB and the Ethernet interfaces at the same time! 10 P100i User’s Manual 980590-001 Rev.
Printer Installation Installing the Printer Driver Installing the Printer Driver Important • Do not power the printer with USB attached to your computer at this time. The driver will prompt you when it is time to plug in and power up your printer.
Printer Installation Installing the Printer Driver Print Driver Installation Install the P100i Printer driver as follows: 1. Insert the P100i User Documentation and Drivers CD into the CD drive of the host computer. The Select Language window will open. 2. From the Select Language window, choose the appropriate language for your system. The Main Menu will open in the selected language. 3. In the left column, select Install Printer Driver. 12 P100i User’s Manual 980590-001 Rev.
Printer Installation Installing the Printer Driver 4. The InstallShield Wizard will be installed and a progress window will be displayed. Once the InstallShield Wizard has been installed, the Welcome to InstallShield Wizard window will open. 5. On the Welcome to InstallShield Wizard window, click the Next button. 980590-001 Rev.
Printer Installation Installing the Printer Driver 6. Select USB or Ethernet, click the Next button. 7. If you agree to the License Agreement, click the Yes button. 8. Most users should select the Complete setup type; then click the Next button. 9. Specify the location to load the Driver, then click the Next button. 14 P100i User’s Manual 980590-001 Rev.
Printer Installation Installing the Printer Driver 10. The Install Wizard will show the progress of the installation. 11. Read the appropriate information. 12. If you wish, you can open the ReadMe file, which has information about the driver version you have installed. 980590-001 Rev.
Printer Installation Installing the Printer Driver 13. Driver installation is now complete. Click the Finish button. 14. After installing the Driver, restart your computer. 15. When you apply power to the printer, the Windows New Hardware Found wizard will find the printer. 16 P100i User’s Manual 980590-001 Rev.
Printer Installation Change Printer Driver Options Change Printer Driver Options You can change the default settings for the P100i printer driver. Change the options as follows: Note • The screen shots shown in this section are for the P100i Printer using the USB interface. If you are using the Ethernet interface, the screens will refer to the “Zebra P100i Network Printer.” 1. Select Start>Settings>Printers and Faxes to bring up a listing of connected printers. 2.
Printer Installation Change Printer Driver Options 4. On the Sharing tab, you can choose to share the printer over the network, and install additional drivers to accommodate different operating systems. 5. On the Ports tab, you can add, delete, and configure the printer ports, as well as choose which port the P110i printer is assigned. 18 P100i User’s Manual 980590-001 Rev.
Printer Installation Change Printer Driver Options 6. On the Color Management tab, you can add, remove, or change printer color profiles. 7. Use the Security tab to change permissions for the P100i printer. 980590-001 Rev.
Printer Installation Change Printer Driver Options 8. On the Advanced tab, you can choose various printer properties, install different printer drivers, and change default printer settings. 9. On the Device Settings tab, you can change settings for a Magnetic Encoder. (Click on Encoder Settings. A button “Properties” will open next to it. Click that button.) 20 P100i User’s Manual 980590-001 Rev.
Printer Installation Change Printer Driver Options 10. Again from the Device Settings tab, you can change various parameters and even send test commands to the printer. (Click on Tools. A button “Properties” will open next to it. Click that button.) 11. Once the P100i printer driver options are set to your satisfaction, click the OK button to save your new configuration and close the Properties window. 980590-001 Rev.
Printer Installation Change Printer Driver Options 22 P100i User’s Manual 980590-001 Rev.
3 P100i Printer Setup Printer Features The following shows an interior view of your P100i Printer. Print Head Lid Card and Cleaning Roller Storage Area Ribbon Cartridge Card Cleaning Cartridge Card Entry / Exit Slot 980590-001 Rev.
P100i Printer Setup Loading Ribbon Cartridge Loading Ribbon Cartridge The P100i Printer requires approved ribbon cartridges (see Appendix C). The Resin Thermal Transfer and Dye Sublimation ribbons are specifically designed for your P100i Printer. • i Series Printers require the use of i Series ribbons for full color printing. • Each ribbon cartridge includes an integrated adhesive cleaning roller assembly that is used to clean the cards entering the printer.
P100i Printer Setup Loading Ribbon Cartridge 3. Insert the ribbon cartridge with the cleaning roller facing down, so the gears on the ends of the rollers fit into the appropriate slots. 980590-001 Rev.
P100i Printer Setup Installing the Cleaning Cartridge Installing the Cleaning Cartridge The Cleaning Cartridge removes surface dust particles and oil from the card surface, resulting in better printing. A new printer will have a Cleaning Cartridge installed, but its Cleaning Roller will have a protective wrapper that must be removed. 1. Locate the Cleaning Cartridge. 2. The Cleaning Cartridge is held in place by two clips. 3. Gently squeeze the clips and lift the Cleaning Cartridge free of the printer.
P100i Printer Setup Installing the Cleaning Cartridge 4. Lift the lid of the Cleaning Cartridge. A new printer will have a Cleaning Roller with its protective wrapping. A dirty Cleaning Roller should be replaced. New Cleaning Roller with Protective Wrapping Dirty Cleaning Roller, Must be Replaced 5. Remove the Cleaning Roller from the Cleaning Cartridge. (Discard a dirty Cleaning Roller and replace it with a new one.) 6. Remove the protective wrapper from the Cleaning Cartridge. 7.
P100i Printer Setup Installing the Cleaning Cartridge Close the printer lid and push down until you hear an audible click. Note • After the lid is closed, the ribbon automatically synchronizes when the printer power is on. 28 P100i User’s Manual 980590-001 Rev.
P100i Printer Setup Inserting Cards Inserting Cards Cards are inserted one at a time into the slot on the front of the P100i. The card is printed (on the top surface), and ejected out through the same slot. Important • Handle the cards only by the edges. The following figure shows the usual insertion orientation for contact smart-cards and cards with a magnetic stripe.
P100i Printer Setup Printing a Test Card Printing a Test Card With Ribbon Cartridge and Card Cleaning Cartridge loaded, your P100i printer is ready to print. To check the operation of the printer, you should print a test card. 1. Place the printer power switch in the OFF (0) position. 2. While holding down the Multi Function Button, place the printer power switch in the ON ( | ) position. The LCD status window will glow blue. Power Switch MultiFunction Switch P520CEM Serial N¡ 060376 Firmware: V1.
P100i Printer Setup Printing a Test Card Storing Extra Cards and Cleaning Rollers The P100i includes a storage area where you can keep up to 100 extra cards (four groups of 25 cards) and up to three extra Cleaning Rollers. Important • Handle the cards only by the edges. 980590-001 Rev.
32 P100i User’s Manual 980590-001 Rev.
4 P100i Printer Operation Printing Printing with the P100i Printer requires the Windows Printer Driver, your card design/ issuing software or printer command level programming through the printer interface. The P100i Card Printer can be used with any Windows 2000, Windows XP, or Windows Vista software application program, using the drivers provided on CD with the printer. Reference Chapter 2 for instructions on installing the P100i printer driver.
P100i Printer Operation Printing http://www.zebracard.com Printing a Sample Card Once you completed creating your sample card, you are ready to print. Ensure your printer has a True Colours™ Card Printer Ribbon Cartridge installed and there is card stock in the card feeder. Reference Chapter 3 for instructions on installing the ribbon and loading the cards Print your sample card as follows:. 1. Select File>Print to open the Print dialogue box.
P100i Printer Operation Printing 3. The printer will feed in a card and start printing. The data download time will vary depending on the complexity of the card design and the processing speed of the computer. 4. Once the printing is completed, the card is ejected from the printer. 5. Check the card for any discrepancies. If the sample card is correct, your P100i card printer is ready to produce more cards. 980590-001 Rev.
36 P100i User’s Manual 980590-001 Rev.