
User's Manual

Beacon Hardware Specifications and Installation 2 - 23
Beacon Hardware Specifications and Installation 2 - 23
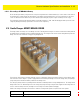
2.11 Beacon Part Number: GE-MB6000-01-WR Badge
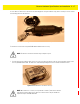
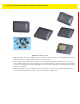
A GE-MB6000-01-WR badge is a wearable beacon that’s clipped to one’s body, typcially in the mid section or belt area.
To mount a GE-MB6000-01-WR model badge:
1. Clip an initalized badge to your midsection or belt area
2. If you encounter issues with the setup of the badge, there’s several file restoration options available.
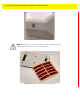
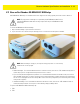
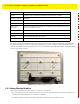
Figure 2-26 GE-MB6000-01-WR: LEDs and Buttons
• Reboot the badge - Press and hold button 2 between 10 and 20 seconds, then release. LED 1 will blink slowly twice to
confirm. Any in-process configuration activity will need to be re-started.
• Erase to factory default configuration and reboot - Press and hold button 2 between 30 and 40 seconds, then release.
LED 1 will blink slowly twice to confirm. The deletion of the initial configuration could be warranted if the configuration
was not successfully applied on the first attempt. Once reverted to factory configuration, the initial config and scanning
config can be re-applied.
• Shutdown the badge - Press and hold button 2 between 20 and 30 seconds, then release. LEDs will blink 5 times to
confirm the badge shutdown. Use this process when brining a deployed badge offline.
To replace a GE-MB6000-01-WR model badge clip:
1. TBD
2. TBD
NOTE: The clip portion of the badge is a replaceable part, GE-MB6000-01-ACC. Refer to
Part No. GE-MB6000-01-ACC when ordering a replacement clip to a GE-MB6000-01-WR
model badge.
NOTE: When the badge is facing you, the clip side facing you, button 1 is on the left top
and button 2 is on the top right.