
User's Manual

2 - 16 MPact Location & Analytics Hardware Installation Guide
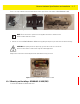
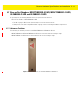
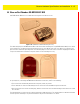
Figure 2-19 GE-MB1000-01-WR Preferred Orientation
To mount a GE-MB1000-01-WR model asset beacon:
1. Peel the tape from the adhesive pads on the rear of the asset beacon and press the unit to the mounting surface.
2. Initialize the unit per the operating instruction.
2.8.1 Preparing a Surface for Mounting with 3M VHB Double-Sided Tape
To prepare a surface before mounting the GE-MB1000-01 asset beacon style to any surface with 3M VHB double-sided tape:
Clean the surface with a 50:50 mixture of isopropyl alcohol (IPA) and water before applying the 3M™ VHB™ tape. Some
surfaces could require additional preparation, such as the following:
• Use de greasers or solvent-based cleaner to remove heavy oil or grease from a surface followed by cleaning with IPA/water
• Scrape the surface, followed by cleaning with IPA and water to remove heavy dirt or oxidation and increase the surface
area to improve adhesion
• Prime the surface to improve initial and ultimate adhesion to materials such as plastics and paints
• Seal porous and fibered materials such as wood, particleboard and concrete to provide a unified surface
Once the mounting surface is adequately prepared, the asset beacon is ready to be mounted.
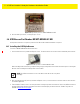
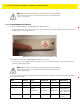
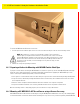
2.8.2 Mounting a GE-MB1000-01-ACC Asset Beacon using a Beacon Accessory
A GE-MB1000-01-WR can be mounted on other objects using the GE-MB1000-01-ACC beacon accessory. The following image
is a hand tool with the asset beacon attached to the mounting accessory. The accessory is ordered separately from GE-MB1000-
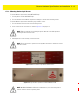
NOTE: Once adhered to a surface, its very difficult to remove. The asset beacon’s
adhesive pads need replacement if moved to a new location. If the surface is clean and
smooth, 3M VHB tape should be used to mount the asset beacon. However, if it is wood,
brick or some other surface that’s not smooth and clean, the 3M tape will not adhere to
the surface. In this situation, use the mounting accessory and a tie wrap, or other
mounting device.