
User's Manual


Beacon Hardware Specifications and Installation 2 - 3
Beacon Hardware Specifications and Installation 2 - 3
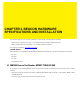
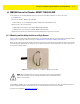
2.2 MB1000 Beacon Part Number: MPACT-T1B10-000-WR
As a prerequisite, the following hardware items are required to mount beacon brackets to a Lozier style shelf:
• Lozier® Shelves
• Beacon: Part number - MPACT-T1B10-000-WR
• When ordering, use the following part number: MPACT-T1B10-250-WR (box of 25)
• Bracket mount, one of the following:
• MPACT Metal Lozier Bracket: Part number MPACT-A1O10-004-WR
• MPACT Plastic Lozier Bracket: Part number MPACT-A1O10-001-WR
• Phillips head screw driver for mounting the bracket (metal brackets only) to the Lozier shelf
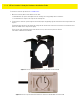
2.2.1 Mounting and Installing the Universal Style Beacon
Figure 2-2 shows a universal style beacon. While there is no up arrow on this beacon’s housing, the beacon should be oriented
similar to the tie wrap style of beacon housing, see MB1000 Beacon Part Number: MPACT-T1B20-000-WR.
Notice the up arrow located on the middle of the beacon housing. This arrow indicates the optimal orientation for the beacon
to function properly. Additionally, the smooth front of the beacon should face outward toward the aisle where client devices
are expected to engage (dwell).
Figure 2-2 Universal Style Beacon - Part Number - MPACT-T1B10-000-WR
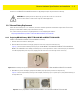
From the MPact Toolbox, select a site floor plan and an unassigned position for the beacon. Refer to the MPact Location &
Analytics Deployment Guide for information on how to install and deploy the beacon from the Toolbox.
The guides are available at www.zebra.com/support
.
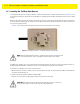
NOTE: When installing numerous beacons, group beacons by category configurations
and activate the beacons prior to scanning the barcodes and associating them with
positions in the Toolbox.