
User's Manual

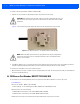
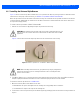
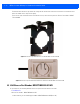
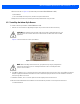
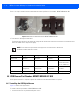
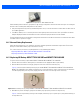
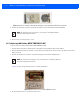
Table Of Contents

2 - 2 MPact Location & Analytics Hardware Installation Guide
To activate a beacon part number - MPACT-T1B20-000-WR:
1. Activate one or more beacons by pulling the mylar strip off the beacon housing.
Figure 2-1 shows a beacon with the mylar strip attached to the left-hand side of the housing.
Figure 2-1 Tie Wrap Style Beacon - Part Number - MPACT-T1B20-000-WR
2. From MPact Toolbox, select a site floor plan and an unassigned position for the beacon. Refer to the MPact Location &
Analytics Deployment Guide for information on how to install and deploy the beacon from the Toolbox.
To mount the tie wrap beacon to a pole or similar structure:
1. Mount the beacon to a pole or similar structure using the plastic tie wrap. Tie can be placed vertically or horizontally but
the arrow should still point up.
2.2 RB Beacon Part Number: MPACT-T1B10-000-WR
As a prerequisite, the following hardware items are required to mount beacon brackets to a Lozier style shelf:
• Lozier® Shelves
• Beacon: Part number - MPACT-T1B10-000-WR
• When ordering, use the following part number: MPACT-T1B10-250-WR (Box of 25)
• Bracket mount, one of the following:
• MPACT Metal Lozier Bracket: Part number MPACT-A1O10-004-WR
• MPACT Plastic Lozier Bracket: Part number MPACT-A1O10-001-WR
• Phillips head screw driver for mounting the bracket (metal brackets only) to the Lozier shelf
CAUTION: After pulling off the last mylar strip for the group of deployment beacons, you
have 20 seconds to associate the beacon in either offline or online mode in the Toolbox
application.
NOTE: When installing numerous beacons, group beacons by category configurations
and activate the beacons prior to scanning the barcodes and associating them with
positions in the Toolbox.