MPACT LOCATION & ANALYTICS HARDWARE INSTALLATION GUIDE VERSION 1.
TABLE OF CONTENTS Chapter 1 MPact Bluetooth® Smart beacon Overview Chapter 2 Beacon Hardware Specifications and Installation 2.1 RB Beacon Part Number: MPACT-T1B20-000-WR ........................................................................................................2-1 2.1.1 Installing the Tie-Wrap Style Beacon ..................................................................................................................2-1 2.2 RB Beacon Part Number: MPACT-T1B10-000-WR ..........................
MPact Location & Analytics Hardware Installation Guide
ABOUT THIS GUIDE This chapter is organized into the following sections: • Using the Documentation • Zebra Technologies Corporation ("Zebra") End-User Software License Agreement
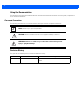
Using the Documentation The following sections provide information about the document and notational conventions used in the guides, and provides a list of related documentation. Document Conventions The following conventions are used in this manual to draw your attention to important information: NOTE: Indicates tips or special requirements. ! CAUTION: Indicates conditions that can cause equipment damage or data loss.
About this Guide Notational Conventions The following notational conventions are used in this document: • Italics are used to highlight specific items in the general text, and to identify chapters and sections in this and related documents • Bullets (•) indicate: • lists of alternatives • lists of required steps that are not necessarily sequential • action items • Sequential lists (those describing step-by-step procedures) appear as numbered lists Related Documentation MPact Location and Analytics documen
Zebra Technologies Corporation ("Zebra") End-User Software License Agreement BY INSTALLING AND/OR USING THIS PRODUCT, YOU ACKNOWLEDGE THAT YOU HAVE READ THIS AGREEMENT, UNDERSTAND IT AND AGREE TO BE BOUND ITS TERMS. IF YOU DO NOT AGREE TO THE TERMS OF THIS AGREEMENT, ZEBRA IS NOT WILLING TO LICENSE THE PRODUCT TO YOU, AND YOU MUST NOT INSTALL OR USE THIS PRODUCT.
About this Guide 9 CORRECTNESS, ACCURACY, OR RELIABILITY OF THE PRODUCTS. Some jurisdictions do not allow the exclusion of implied warranties, so the above exclusion may not apply to you. Limitation of Liability THE TOTAL LIABILITY OF ZEBRA UNDER THIS AGREEMENT FOR DAMAGES SHALL NOT EXCEED THE FAIR MARKET VALUE OF THE PRODUCTS LICENSED UNDER THIS AGREEMENT.
Governing Law This Agreement shall be governed by the laws of the United States of America to the extent that they apply and otherwise by the laws of the State of New York without regard to its conflict of laws provisions or by the internal substantive laws of the country to which the Products is shipped if end-user customer is a sovereign governmental entity. The terms of the U.N. Convention on Contracts for the International Sale of Goods do not apply.
CHAPTER 1 MPACT BLUETOOTH® SMART BEACON OVERVIEW The MPact Platform employs Bluetooth® Smart beacons deployable in various modes including Battery Save, iBeacon™ and MPact to unify Wi-Fi and Bluetooth® Smart Technology to capture more analytics, accuracy and insight into consumers purchasing preferences. Use Bluetooth® Smart beacons to learn which aisles and products customers prefer, their shopping history, and what influences their buying decisions.
1-2 MPact Location & Analytics Hardware Installation Guide
CHAPTER 2 BEACON HARDWARE SPECIFICATIONS AND INSTALLATION The following setup processes must be complete as a prerequisite to installing beacon hardware: • MPact Server Installation and Setup - see the MPact Location & Analytics Deployment Guide • MPact Toolbox and Beacon Installation - see the MPact Location & Analytics Deployment Guide Lozier® Shelves Beacon brackets for the MPACT-T1B20-000-WR and MPACT-T1B10-000-WR can be used with the following Lozier products: • TL Shelf • DL Shelf • HL Shelf • Standa
2-2 MPact Location & Analytics Hardware Installation Guide To activate a beacon part number - MPACT-T1B20-000-WR: 1. Activate one or more beacons by pulling the mylar strip off the beacon housing. CAUTION: After pulling off the last mylar strip for the group of deployment beacons, you have 20 seconds to associate the beacon in either offline or online mode in the Toolbox application. Figure 2-1 shows a beacon with the mylar strip attached to the left-hand side of the housing.
Beacon Hardware Specifications and Installation 2-3 2.2.1 Installing the Universal Style Beacon Figure 2-2 shows a universal style beacon. While there is no up arrow on this beacon’s housing, the beacon should be oriented similar to the tie wrap style of beacon housing, see RB Beacon Part Number: MPACT-T1B20-000-WR. Notice the up arrow located on the middle of the beacon housing. This arrow indicates the optimal orientation for the beacon to function properly.
2-4 MPact Location & Analytics Hardware Installation Guide The barcode label should face up toward the ceiling and the smooth front of the beacon should face out toward the aisle where the mobile client is expected to engage. There are two styles of bracket mounts from which to choose, either metal or plastic for Beacon: Part number - MPACTT1B10-000-WR.
Beacon Hardware Specifications and Installation 2-5 • Bracket mount kit see Figure 2-6 (included with part number MPACT-MB2000-01-WR): • Metal bracket • Two 1inch Phillips head tap screw, and two 1inch plastic wall inserts • Phillips head screw driver for mounting the bracket (metal brackets only) to a wall 2.3.1 Installing the Indoor Style Beacon To activate a beacon part number - MPACT-MB2000-01-WR: 1. Activate one or more beacons by pulling the mylar strip out from inside the beacon housing.
2-6 MPact Location & Analytics Hardware Installation Guide There is one styles of bracket mount included with the Indoor Style Beacon: Part number - MPACT-MB2000-01-WR. Figure 2-6 Metal Beacon Wall Mount Bracket: MPACT-MB2000-01-WR 3. Fit the beacon’s housing into the bracket. The barcode label should face up toward the ceiling and the smooth front of the beacon should face out toward the aisle where the mobile client is expected to engage.
Beacon Hardware Specifications and Installation 2-7 Figure 2-7 USB Style Beacon - MPACT-MB3000-01-WR When installing numerous beacons, group beacons by category configurations and activate the beacons prior to scanning the barcodes and associating them with positions in the Toolbox. 2. After inserting the beacon(s) into any standard USB power source, associate the beacon in either offline or online mode in the Toolbox application. 3.
2-8 MPact Location & Analytics Hardware Installation Guide Figure 2-9 Battery Tray: MPACT-T1B20-000-WR and MPACT-T1B20-000-WR and MPACT-T1B10-000-WR 4. Remove the old battery and dispose of properly and replace it with a new battery (Panasonic CR2450). NOTE: Pay attention to the position of the + on the battery. Installing the battery backwards may damage the Beacon 5. Close the tray, ensuring the latch is secure. 2.4.
APPENDIX CUSTOMER SUPPORT If you have a problem with your equipment, contact Support for your region. Support and issue resolution is provided for products under warranty or that are covered by a services agreement. Contact information and Web self-service is available by visiting www.zebra.com/support.
A-2 MPact Location & Analytics Toolbox Reference Guide
MN002236A01 Revision A June 2015