
User Manual

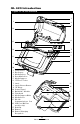


13
QL Series User Guide
charge cycles when first put into service.
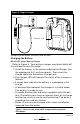
Charging the Battery
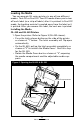
Model LI72 Single Battery Charger
Refer to Figure 3. Your battery charger may look slightly dif-
ferent from the one illustrated.
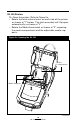
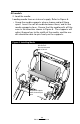
1. Install the battery in the printer and plug the Charger into
the appropriate A.C. wall receptacle. Then insert the
charge cable into the battery charger jack.
2. The charger LED will indicate the status of the charger as
follows:
• A steady light indicates the battery is undergoing a fast
charge.
• A blinking light indicates the charger is in trickle mode.
The battery is ready for use.
• A rapidly blinking light indicates a problem with the bat-
tery. The battery may have an internal short, or its charge
monitoring circuitry may be malfunctioning. The battery
should not be used any further.
• Battery Packs may be charged either when installed or
removed from the printer.
Caution • Do not use the printer while charging a battery with the
LI72 charger.
continued
LI72 Charger
Charger Jack
Figure 3: Single Charger