
User's Manual


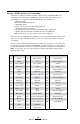
Table Of Contents
- Proprietary Statements
- Document Conventions
- Introduction to the QL Plus™ Series
- Unpacking and Inspection
- Reporting Damage
- QL 220 Plus Overview
- QL 320 Plus Overview
- QL 420 Plus Overview
- Getting Ready to Print
- Battery
- Installing the Battery
- QL 220 Plus
- QL 420 Plus
- QL 320 Plus
- Charging the Battery with the LI72 Charger
- Battery Safety
- Charger Safety
- Loading the Media
- QL 420 Plus and QL 220 Plus Printers
- QL 320 Plus Printers
- All models
- QL 420 Plus Printers Only
- Operator Controls
- Keypad Control Panel
- LCD Control Panel
- Programmable LCD Settings
- Verify the Printer Is Working
- Printing a Configuration Label
- Connecting the Printer
- Cable Communication
- IR Communications
- Wireless Communications with Bluetooth™
- Bluetooth Networking Overview
- WLAN Overview
- Setting Up the Software
- Radio Regulatory Information
- Zebra Bluetooth Radio QL+ZBR3
- Zebra Bluetooth Radio 2.0 QL+ZBR4
- WLAN Module Using 802.11b CF Radio (North America)
- WLAN Module Using 802.11b CF Radio (Asia & EU Countries)
- Zebra 802.11b WLAN Radio Module
- WLAN Module Using 802.11g Radio
- Compact Flash (802.11b) and Bluetooth Co-located Radio Modules
- Using the Accessories
- Belt Clip
- Kickstand
- Desk Stand
- Carrying Strap
- Preventive Maintenance
- Extending Battery Life
- General Cleaning Instructions
- QL 220 Plus Cleaning
- QL 320 Plus Cleaning
- QL 420 Plus Cleaning
- Troubleshooting
- Keypad Control Panel
- LCD Control Panel Indicators
- Troubleshooting Topics
- Troubleshooting Tests
- Printing a Configuration Label
- Communications Diagnostics
- Contacting Technical Support
- Specifications
- Printing Specifications
- Memory and Communications Specifications
- Label Specifications
- Font and Bar Code Specifications
- Communications Ports
- Physical, Environmental and Electrical Specifications
- QL Plus Series Accessories
- Appendix A
- Interface Cables
- RS232 Cables
- USB Cable
- More Interface Cables
- Appendix B
- Media Supplies
- Appendix C
- Maintenance Supplies
- Appendix D
- Product Support
- Appendix E
- Battery Disposal
- Product Disposal
- Appendix F
- Using zebra.com
- Index
- Patent Numbers

31
QL Plus Series User Guide
If you have a printer equipped with the Kickstand option,
you must first remove the belt clip retainer as shown in Figure
15, retaining the two screws holding the retainer to the lower
cover. Arrange the communications cable in a broad loop as
detailed above, and capture it in the strain relief feature on the
bottom of the belt clip retainer. Then re-secure the belt clip
retainer to the bottom cover of the printer.
RefertotheUsingtheAccessoriessectionformoreinformationonthe
useofthekickstandoption
Figure 15: Communications Strain Relief with Kickstand option
1. Remove Belt Clip Retainer,
along with Belt Clip and
Kickstand.
2. Press communications
cable into strain relief feature
on bottom of Belt Clip
3. Reassemble Belt Clip to
bottom cover.
Thekickstandisnotshowninthisviewforclarity