
User's Manual

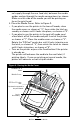


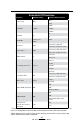


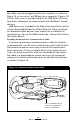
Table Of Contents
- Proprietary Statements
- Document Conventions
- Introduction to the QL Plus™ Series
- Unpacking and Inspection
- Reporting Damage
- QL 220 Plus Overview
- QL 320 Plus Overview
- QL 420 Plus Overview
- Getting Ready to Print
- Battery
- Installing the Battery
- QL 220 Plus
- QL 420 Plus
- QL 320 Plus
- Charging the Battery with the LI72 Charger
- Battery Safety
- Charger Safety
- Loading the Media
- QL 420 Plus and QL 220 Plus Printers
- QL 320 Plus Printers
- All models
- QL 420 Plus Printers Only
- Operator Controls
- Keypad Control Panel
- LCD Control Panel
- Programmable LCD Settings
- Verify the Printer Is Working
- Printing a Configuration Label
- Connecting the Printer
- Cable Communication
- IR Communications
- Wireless Communications with Bluetooth™
- Bluetooth Networking Overview
- WLAN Overview
- Setting Up the Software
- Radio Regulatory Information
- Zebra Bluetooth Radio QL+ZBR3
- Zebra Bluetooth Radio 2.0 QL+ZBR4
- WLAN Module Using 802.11b CF Radio (North America)
- WLAN Module Using 802.11b CF Radio (Asia & EU Countries)
- Zebra 802.11b WLAN Radio Module
- WLAN Module Using 802.11g Radio
- Compact Flash (802.11b) and Bluetooth Co-located Radio Modules
- Using the Accessories
- Belt Clip
- Kickstand
- Desk Stand
- Carrying Strap
- Preventive Maintenance
- Extending Battery Life
- General Cleaning Instructions
- QL 220 Plus Cleaning
- QL 320 Plus Cleaning
- QL 420 Plus Cleaning
- Troubleshooting
- Keypad Control Panel
- LCD Control Panel Indicators
- Troubleshooting Topics
- Troubleshooting Tests
- Printing a Configuration Label
- Communications Diagnostics
- Contacting Technical Support
- Specifications
- Printing Specifications
- Memory and Communications Specifications
- Label Specifications
- Font and Bar Code Specifications
- Communications Ports
- Physical, Environmental and Electrical Specifications
- QL Plus Series Accessories
- Appendix A
- Interface Cables
- RS232 Cables
- USB Cable
- More Interface Cables
- Appendix B
- Media Supplies
- Appendix C
- Maintenance Supplies
- Appendix D
- Product Support
- Appendix E
- Battery Disposal
- Product Disposal
- Appendix F
- Using zebra.com
- Index
- Patent Numbers

23
QL Plus Series User Guide
Operator Controls
QL Plus printers are available with one of two possible con-
trol panels. The keypad control panel is detailed below and in
Figure 10. The optional LCD control panel (Figure 11) allows
easy display and selection of many printer functions as de-
tailed on following pages.
Keypad Control Panel
The keypad control panel has three control buttons and two
multipurpose indicators.
• ThePower Button turns the printer on and off.
• TheFeed Button advances a length of media which is
determined by the type of media being used. Label me-
dia will be advanced to the next gap or bar sense mark-
er. Journal (plain) media will be advanced a length deter-
mined by the printer’s software.
• TheFunction (FTN) Button is controlled by a printer’s
specific application to support such functions as:
Print a battery level report.
Print the Local Area Network (LAN) status
Print a Short Range Radio Frequency (SRRF) status
Print a media supply report
The Green LED on the left side of the control panel indicates
the status of several printer features:
• Aslowlyblinkingsequenceindicatestheprinter’sbattery
needs charging.
• PrinterswithawirelessQuickLink module installed: a
quickly blinking sequence indicates the printer has not es-
tablished a link to either a Local Area Network or a com-
patible wireless equipped terminal.
• PrinterswithawirelessQuickLinkmoduleinstalled:A
steadily lit indicator shows that the printer has estab-
lished a wireless link, either to the LAN or to a compatible
terminal.
• Asteadilylitgreenindicatoronaprinterwithnowireless
option installed is a power-on indicator.
The Yellow LED on the right side of the control panel has
two indication conditions.
• ArapidlyblinkingyellowLEDandachimeindicatethatno
application has been loaded into the printer.
continued