Proprietary Statement This manual contains proprietary information of Zebra Technologies Corporation, iris intended solely for the information and use of parties operating and maintaining the equipment described herein. Such proprietary information may not be used, reproduced, or disclosed {o any other parties for any thee purpose without the expressed written permission of Zebra Technologies Corporation.
Introduction .. Unpacking and Inspection . Reporting Damage Getting Ready to Print Battery ...commonsense Installing the Battery Charging the Battery Loading the Media Installing the Media: Operator Controls . Standard Keypad.
Label Specifications Font/Bar Code Specifications Physical/Environmental/Electrical Specifications Communications Port . Agency Approvals. Accessories Appendix A... interface Cables Appendix 46 Media Supplies Appendix 47 Maintenance Supplies Appendix D oor rrr —sterns 48 Product Support index Patent Information...
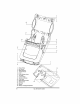
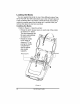
23 . Latch Release Lever . Control Panel . Quick Link Module L Print Head .
Introduction Thank you for choosing our Zebra QL 320 Mobile Printer. This rugged printer is sure to become a productive and efficient addition to your workplace thanks to its innovative design. Because it's made by Zebra Technologies Corporation, you're assured of world-class support for all of your bar code printers, software, and supplies. +» This user's guide gives you all the information you'll need to operate the QL 320 printer, » The QL 320 uses the CPL programming language.
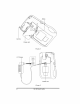
Getting Ready to Print Battery installing the Battery 1 NOTE: Batteries are shipped uncharged. Remove protective shrink. wrap and labels from new battery packs prior to use. 1. if the printer is so equipped, rotate the Belt Clip to allow access to the Battery compartment. 2. Insert the battery into the printer as shown in Figure 2, 3. Rock the Battery into the printer as shown until it locks in place.
Loading the Media You can operate this printer in one of two different modes: Tear Off or Peel-Off. Tear-Off mode allows you to tear off each label (or a strip of labels) after it is printed. In Peel-Off mode, the backing material is peeled away from the label as it is printed. After you remove this label, the next one is printed. installing the Media 1. Refer to Figure 4. Open the printer: * Rotate the latch release levers on each side of the printer as shown at “1” below.