OK ZEBRA QLn320 Zebra QLn320 Mobile Printer P1028026-001 November 2010
Table of Contents Proprietary Statements.............................................................................................4 Document Conventions............................................................................................6 Introduction to the QLn320™ Printer...................................................................7 Unpacking and Inspection................................................................ 7 Reporting Damage....................................................
Printing a Configuration Label.....................................................................48 Communications Diagnostics......................................................................48 Contacting Technical Support......................................................................49 Specifications............................................................................................................. 53 Printing Specifications ..........................................................
Proprietary Statements This manual contains proprietary information of Zebra Technologies Corporation. It is intended solely for the information and use of parties operating and maintaining the equipment described herein. Such proprietary information may not be used, reproduced, or disclosed to any other parties for any other purpose without the expressed written permission of Zebra Technologies Corporation.
subsidiary of Heidelberger Druckmaschinen AG. Futura® is a trademark of Bauer Types SA registered in the United States Patent and Trademark Office and may be registered in some jurisdictions. TrueType® is a trademark of Apple Computer, Inc. registered in the United States Patent and Trademark Office and may be registered in certain jurisdictions. All other product names are the property of their respective owners. © 1996–2009, QNX Software Systems GmbH & Co. KG. All rights reserved.
Document Conventions The following conventions are used throughout this document to convey certain information: Cautions, Important, and Note Caution • Warns you of the potential for electrostatic discharge. Caution • Warns you of a potential electric shock situation. Caution • Warns you of a situation where excessive heat could cause a burn Caution • Advises you that failure to take or avoid a specific action could result in physical harm to you.
Introduction to the QLn320™ Printer Thank you for choosing our Zebra® QLn320™ Mobile Printer. You will find this rugged printer will become a productive and efficient addition to your workplace thanks to its innovative design. Zebra Technologies is the leader in industrial printers with world-class support for all of your bar code printers, software, and supplies. This user’s guide gives you the information you will need to operate the QLn320 printer.
QLn320 Technology The QLn320 uses several technologies made popular in other Zebra Mobile Printer product lines. Smart Battery The QLn320 battery pack is a high capacity, smart Lithium Ion battery that contains electronics which allow the printer to monitor its operating parameters. Among these are the number of charge cycles it has undergone and its date of manufacture.
Printing Technology The QLn320 uses the Direct Thermal method to print human readible text, graphics and barcodes. It incorporates a sophisticated print engine for optimal printing under all operational conditions. Direct Thermal Direct thermal printing uses heat to cause a chemical reaction on specially treated media. This reaction creates a dark mark wherever a heated element on the printhead comes in contact with the media. Since the printing elements are arranged very densely at 203 d.p.i.
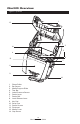
QLn320 Overview Figure 1: QLn320 1 13 2 3 14 5 4 6 12 7 8 11 9 10 1 2. 3. 4. 5. 6. 7. 8. 9. 10. 11. 12. 13. 14.
17 15 16 18 19 15. Belt Clip 16. Battery 17. USB/ RS-232 Comm Ports 18. MAC Address Label 19. Docking Contacts 20..
Getting Ready to Print Battery Installing the Battery Important • Batteries are shipped partially charged. Remove protective shrink-wrap and labels from new battery packs prior to use. 1. Locate the battery compartment on the bottom of the printer. 2. Insert the battery into the printer as shown in Figure 2. (It is not possible to insert the pack in an incorrect orientation.) 3. Rock the battery into the compartment as shown until it locks in place.
Smart Charger-2 (SC2) Single Battery Charger The Smart Charger-2 (SC2) is a charging system for use with the 2-cell lithium-ion smart batteries used in the QLn320 printer. The goal of the SC2 is to fully charge a QLn320 battery in an average time of three (3) hours. Charging Status Indicators The SC2 uses a LED indicator to indicate the charge state in either Green, Yellow, or Amber as detailed below.
Figure 3: Single Charger (SC2) Smart Battery Charge Status LED Indicator Health Status LED Indicator Figure 4: SC2 Dimensions Dimension information to be provided.
Model UCLI72-4 Quad Charger The UCLI72-4 Quad Charger is designed to charge up to four QLn320 battery packs simultaneously. Batteries must be removed from the printer to be charged in the Quad Charger. 1. Ensure that the charger has been installed properly per the Quad Charger instruction manual. Ensure that the power indicator on the front panel is on. 2. Remove any protective shrink-wrap and labels from all battery packs prior to use.
Quad Charger Cycle Times : Battery Status QLn320 Battery 80% Charged 1.5 Hrs. Battery Fully Charged 3 Hrs. Note • These times are for completely discharged batteries. Battery packs which are only partially discharged will take less time to reach their charged state. Batteries which have reached 80% of their charge capacity may be used, however, it is recommended that you allow the batteries to reach a full charge to maintain maximum battery life.
Charger Safety Do not place any charger in locations where liquids or metallic objects may be dropped into the charging bays. Use care when installing the UCLI72-4 Quad Charger so that you do not block the ventilating slots on the top and bottom covers. Ensure that the charger is plugged into a power source which will not accidently be turned off if you will be charging batteries overnight. Figure 5: Quad Charger 1. Slide Battery Pack into Charger bay. Power Supply 2. Rock Battery Pack into place.
QLn-EC Ethernet Cradle The Ethernet Cradle (EC) is an expansion base intended for use with the QLn320 printer, as well as the QLn220 printer. There is a four bay cradle (QLn-EC4) or a single bay option (QLn-EC) as shown on pages 19 and 20. It provides charging power to the docked printer as well as providing a standard 10/100Mb/S Ethernet port for communication to the printer.
Figure 6: Ethernet Cradle (Four Bay) Docking Bay Ethernet Status Indicator Release Button Power Status Indicator Figure 7: QLn-EC4 Dimensions Dimension information to be provided.
Figure 8: Ethernet Cradler (Single Bay) Power Status Indicator Release Button Ethernet Status Indicator Figure 9: QLn-EC Dimensions Dimension information to be provided.
AC Power Adapter (included in kit p/n P1031365-024) Figure 10: Charging the Battery Pack with the AC Power Adapter) Qln320 AC Adapter AC Power Cord (varies with location) DC Input • Open the protective cover on the QLn320 printer to expose the DC input charger jack. • Connect the appropriate AC power cord for your location to the adapter and then plug the power cord into an AC receptacle. • Plug the barrel plug from the P1029871 AC adapter into the charger jack on the printer.
Loading the Media in the QLn320 You can operate QLn320 printers in one of two different modes: Tear-Off or Peel-Off. Tear-Off mode allows you to tear off each label (or a strip of labels) after it is printed. In Peel-Off mode, the backing material is peeled away from the label as it is printed. After you remove this label, the next one is printed. 1. Open the printer. • Press down on the latch release lever on the side of the printer as shown at “1” in Figure 11 below.
2. Load the media: • Grasp the media supports where shown in Figure 12 and pull them apart. Insert the roll of media between them, and let the media supports close. Ensure that the media pulls off the core in the direction shown below. The supports will adjust themselves to the width of the media, and the media should be able to spin freely on the supports. Figure 12: Loading Media Media Roll Note direction media pulls off the roll. Grasp Media Supports where shown and pull apart. 3.
Loading Media in Peel-off Mode • If you plan to use the printer in the peel-off mode, peel a few labels off of the media and load the media as previously described. • Push the peeler lever forward to release the peeler bail into the “up” position as shown at “3” and “4” in Figure 13. • Close the media cover to lock the peeler bail in place. The media will feed between the peeler bail and platen. Figure 13: Activating Peeler Bar Peeler Bail Pull up and flip down if using media in the peeloff mode.
Operator Controls The QLn320 printer comes equipped with a keypad control panel and LCD graphical user interface. The standard control panel is illustrated in Figure 14 and 15 on pages 26 and 27. The LCD interface allows easy display and selection of many printer functions as detailed on following pages. Standard Control Panel The standard control panel has multiple control buttons and two multipurpose indicators. • The Power Button turns the printer on and off.
Figure 14: Standard Control Panel LED Charge Indicator Solid Yellow: Charging Solid Amber: Fault Solid Green: Fully charged Feed Button Power Button Press to advance the media one blank label or a software determined length of journal media. Press to turn unit on. Press again to turn unit off.
LCD Control Panel The 240x128 pixel LCD control panel allows the user to view the status of the QLn320 printer and have access to various printer alerts and messages. It also has multi-directional keys which allow navigation and selection of menu options affecting printer functions. These keys allow scrolling through the various options and settings. The “OK” button allows selection of the option or function displayed on the screen.
Status Bar Icons Indicates Bluetooth connection status. The icon will blink to show that the printer is receiving label data via Bluetooth, and is solid when link is established. This icon appears only on printers with the Bluetooth wireless option installed. Indicates that the printer is connected to a radio network via 802.11 protocols. The antenna icon will blink with no parentheses when looking for an access point.
The Error icon will be displayed and blink if an error condition exists. The icon will not be displayed if no printer error exists. Since there are separate icons for Media Out and Head Latch Open, these two alerts do not apply to the Error icon. The Battery Charge Level icon indicates the reported state of charge from the battery pack. In a non-charging state, four (4) bars indicates the battery level is greater than 80%.
Main Menu Screen The user can select options on the Main Menu screen by pressing the soft key located beneath the Menu option on the navigation bar (see Fig. 16). The Main Menu screen displays graphical options including Communication, Display, Media, Battery, and Help. Figure 16: Main Menu Screen The user can scroll between icons using the four-way arrow buttons.