Rhein Tech Laboratories, Inc. 360 Herndon Parkway Suite 1400 Herndon, VA 20170 http://www.rheintech.com Appendix K: Client: Model #: Standards: FCC ID: Report #: Zebra Technologies Corp. Cameo-ZBR3 FCC 15.247 & RSS-210 I28MD-BTC2TY5 2006028 Manual Please refer to the following pages.
User Guide Part # UMAN-CM2-3-002 Rev.
Contents Proprietary Statement .................................................................. iv Document Conventions ................................................................ vi Introduction ................................................................................ O-8 Controls ....................................................................................... O-9 Keypad Functions .....................................................................................................
Proprietary Statement This manual contains proprietary information of Zebra Technologies Corporation. It is intended solely for the information and use of parties operating and maintaining the equipment described herein. Such proprietary information may not be used, reproduced, or disclosed to any other parties for any other purpose without the expressed written permission of Zebra Technologies Corporation.
AndyTM , CG PalacioTM, CG Century SchoolbookTM, CG TriumvirateTM, CG TimesTM, Monotype Kai TM, Monotype MinchoTM and Monotype SungTM are trademarks of Monotype Imaging, Inc. and may be registered in some jurisdictions. HY Gothic Hangul TM is a trademark of Hanyang Systems, Inc. AngsanaTM is a trademark of Unity Progress Company (UPC) Limited.
Document Conventions The following conventions are used throughout this document to convey certain information: If you are viewing this guide online, click the underlined text to jump to a related Web site. Click on italic text (not underlined) to jump to that location in this manual.. Cautions, Important, and Note Caution • Warns you of the potential for electrostatic discharge. Caution • Warns you of a potential electric shock situation.
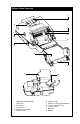
Cameo Series Overview 1 9 2 3 8 4 7 6 5 11 1. Magnetic Stripe Reader (MSR) Slot 2. Printhead 3. Gap Sensor 4. Media Edge Guide 5. Platen Roller 10 6. 7. 8. 9. 10. 11.
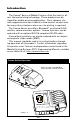
Introduction The Cameo® Series of Mobile Printers utilize the latest in direct thermal printing technology. These products are designed for mobile printing applications. Their compact size and rugged construction is ideally suited to print receipts and for many other situations where on-site printing is required. The Cameo Series also offers Bluetooth® or infrared (IrDA) wireless communications options. Cameo 3 printers can be ordered with an optional 802.11b compliant WLAN radio.
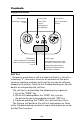
Controls Keypad Functions On Switch: Momentary action turns on unit Power Light: Feed Switch: Indicates unit is turned on Advances media when held down. Flashing light indicates low battery IR Window: Status Light: Must be aligned with corresponding window on host for IR communications to occur. Steady light indicates printer is either out of media, or media cover is open. Flashing during data transmission between host and printer indicates normal wireless operation.
Batteries and Charging Conditioning Battery Packs Important • Cameo batteries must be cycled several times before maximum capacity is realized. Note • A battery is ”cycled” by fully charging it, then fully discharging it through normal use. Chargers Listed below are the specifications for the Cameo series chargers: Model UCN72-4: Model UCN72-4 is designed to charge up to four batteries simultaneously. Battery packs may be charged separately or while plugged into the printer.
Removing and Replacing Cameo 2 Battery Packs To remove the battery pack from the Cameo 2: 1. Push the battery release button on the bottom of the printer towards the media compartment. 2. Rotate the belt clip as shown while, 3. Allowing the battery pack to slide out. Battery Packs are replaced by the following procedure: 1. Rotate the Belt Clip to clear the battery 2. Align the battery pack to the bottom of the printer. The side of the battery with the contacts will face into the well for the battery. 3.
Removing and Replacing Cameo 3 Battery Packs To remove the battery pack from the Cameo 3: Slide the Battery Latch button in the direction shown in the top illustration below, and slide the battery out. To replace the battery, insert the end with the contacts into the battery well and slide the battery into the printer until in clicks into place. Always dispose of battery packs properly. Refer to Appendix D for more information on battery pack disposal.
Installation of Media The following details media installation: Cameo Media Installation Adjust edge guide to desired position and snap into place. Media must spin freely. Feed media in this direction Edge Guide Media must fit between the edge guide and the printer frame as shown. Squeeze finger grips here on both sides to open cover Cameo 2 is illustrated. Loading procedure is identical for all Cameo Series printers 1. Turn unit off. 2.
printer body that will allow the media roll to spin freely yet prevent it from wandering from side to side so much that print quality is affected. Important • The media roll must sit between the right hand surface of the edge guide and the printer frame as shown in the illustration. 4. Drop a new roll of paper into the compartment. Media should feed from the top of the roll and the roll should fit between the edge guide and the right hand wall. The inner core of the media roll should be Ø.
Magnetic Stripe Reader The optional magnetic stripe reader (MSR) is used as follows: 1. A flashing status light indicates the printer is available to scan. Place the card into the reader slot as shown. The magnetic stripe must face the top of the printer, and into the body of the printer as shown in Detail “A” below. 2. Slide the card through the slot. The card will be read if slid in either direction. Depending on the application software, the receiving terminal will sound a beep on a successful scan. 3.
Maintenance Cameo printers will provide years of reliable service provided a few simple guidelines are followed. The printer should be cleaned approximately every two weeks, or more often depending on usage and the type of media being employed. Components of the printer that require periodic maintenance are the printhead, print roller (platen), and the media sensor. When cleaning, please use only isopropyl alcohol, the same type included in the Cleaning Kit.
Printhead Media Sensor Platen NOTE: Do not use alcohol on the surface of linerless platens! Cleaning the Cameo 2 Printhead Media Sensor Platen NOTE: Do not use alcohol on the surface of linerless platens! Cleaning the Cameo 3 O-17 Cameo 2/3 Series User Guide
printer and/or alcohol and cotton swabs. Linerless Media Printers Printers using linerless media require more frequent cleaning. Linerless media deposits adhesive which must be removed for optimum performance. Linerless printers can be identified by a platen which is not black, or by reading the unit’s fifteen digit Product Configuration Code (PCC) label on the back of the printer. PCC digit “8” will be “B”, “”D”, “F”, or “H” for linerless printers.
Troubleshooting Self Test: Perform the self test as described in the Controls section. The unit should print a line of interlocking “x” characters to insure all elements of the printhead are working, print out the version of software loaded in the printer and then print two reports. The first report indicates model, ROM version, serial number, baud rate, etc. The second report contains application information. If no second report appears, there is no application loaded.
Reduced battery charge life: • Recondition (cycle) battery. • Damaged battery-replace. Refer to Appendix D for information on proper disposal of batteries. • Check battery date code: if one to two years old, short charge life may be due to normal aging. Status light flashing and beeper chimes: • No application: reload program. Status light flashing • If using SRRF communications: normal indication while data is being received.
Communicating with the Printer The printer must establish communications with a host terminal which sends the data to be printed. Communications occur in three basic ways: • By a cable between the printer and its host terminal • Infrared (usually by means of the industry standard IrDA protocol) Units with the IrDA option can be identified by the “IR” logo on the unit’s keypad. IR Communications Window The IrDA logo or the Bluetooth logo will appear here if those options are installed.
the text “Wireless Network Printer” on the product identification label. Cable Communications All Cameo printers can communicate by cable; the specific cable supplied with your printer will vary with the host terminal. The 8- pin circular connector on your communications cable plugs into the serial communications port on the side of the Cameo printer. (Refer to the Specifications Section of this manual for communications port pin assignments.
Bluetooth Networking Overview In order to exchange data, two Bluetooth enabled devices must establish a connection. Bluetooth software is always running in the background, ready to respond to connection requests. One device (known as the master or the client) must request a connection with another. The second device (the slave or the server) then accepts or rejects the connection. A Bluetooth enabled QL 320 will normally act as a slave, but in theory any Bluetooth device can be either a master or a slave.
Radio Regulatory Information Bluetooth Radio for Cameo 2 and Cameo 3 The following section only applies when the Bluetooth ZBR3 Module is installed in the Cameo 2 or Cameo 3 printers. Cameo 2 printers with the Bluetooth radio have an FCC ID: I28MD-BTC2TY2. Cameo 3 printers with the Bluetooth Radio have an FCC ID: I28MD-BTC2TY5. Note that only one of the radio options can be installed in the printer at one time.
Zebra Value Radio, 802.11b for Cameo 3 The following section only applies when the Zebra Value Radio, 802.11b (with FCC ID: I28MD-ZLAN11B) is installed in a Cameo 3 printer. The FCC ID number is on the serial number label on the back of the printer and can be read with the module installed. Note that only one of the radio options can be installed in the printer at one time and the antenna used for these transmitters must not be co-located or must not operate in conjunction with any other antenna.
Europe – EU Declaration of Conformity This device complies with the essential requirements of the R&TTE Directive 1999/5/EC. The following test methods have been applied in order to prove presumption of compliance with the R&TTE Directive 1999/5/EC: • EN 60950: 2000 Safety of Information Technology Equipment • EN 300 328-2 V1.2.1 (2001-12) Technical requirements for spread-spectrum radio equipment • EN 301 489-17 V1.2.1 (2002-08) EMC requirements for spread-spectrum radio equipment. This device is a 2.
Printer Specifications Physical Weight* Cameo 2 Cameo 3 1.15 lbs. (.5 kg) 1.4 lbs. (.64 kg) (CM3) 1.6 lbs (.73 kg) (CM3w/ MSR) * Weight is with battery, no media loaded Environmental Operating temperature: Storage temperature: Relative humidity: 5° to 122°F (-15° to 50°C) -13° to 158°F (-25° to 70°C) 10%-90% non-condensing Cameo electronics automatically compensate for head temperature when printing. Protection circuitry prevents damage due to excessive printhead temperatures.
Cameo 2 Physical Dimensions 2.6”65.8 (66mm mm) 3.4” (86.1 86.1 mm) mm 6.6” (168 mm) 7.3” (185.9 mm) 3.7”94.7 (94mm mm) 185.9 mm 167.
Cameo 3 Physical Dimensions 66.0(66 mm mm) 2.6” 3.4” (86 86.1mm) mm 6.2” (158 mm 6.8” (171 mm) 4.6” 117.6 (117mmmm) 171.4 mm 159.4 mm CAMEO 3 Cameo 3 2.6” 66.0 (66 mm mm) 3.4” 86.1 mm (86 mm) 8.2” (208 mm) 117.6 mm 4.6” (117 mm) 204.
Communications Port Pin Number Pin Name Signal Type Signal Description 1 2 3 4 RXD TXD CTS RTS input output input output 5 6 7 GND NC DSR input 8 DTR output Receive Data Transmit Data Clear To Send from host Request To Send set high when printer is ready to accept command/ data Ground No Connect Data Set Ready: Low to high transition turns printer on, High to low transition turns printer off (if enabled) Data Terminal Ready high when printer is on (set at battery voltage for “S” option) 2 5
Media Specifications Cameo 2 Max. Print Width Max. Roll O.D. Core Diameter Cameo 3 1.9” (48.3 mm) 2.83” (71.9 mm) 2.25” [57 mm] .75” [19 mm] min. Media Width Settings (all dimensions ±.05” [±1.3 mm] Cameo 2 0.72 [18.2 mm] 0.85 [21.6 mm] 0.97 [24.6 mm] 1.10 [27.9 mm] 1.22 [31.0 mm] 1.35 [34.3 mm] 1.47 [37.3 mm] 1.60 [40.64 mm] 1.72 [43.7 mm] 1.85 [47.0 mm] 1.97 [50.0 mm] 2.13 [54.1 mm]1 Cameo 3 1.47 [37.3 mm] 1.60 [40.64 mm] 1.72 [43.7 mm] 1.85 [47.0 mm] 1.97 [50.0 mm] 2.10 [53.3 mm] 2.22 [56.4 mm] 2.
• Programmable inactivity shut-off • Out of paper/open cover error LED indicator • Power On/Off from terminal or built-in keypad Accessories and Options • • • • • • • • • • • Single battery pack fast charger/conditioner Four battery pack fast charger/conditioner Vehicle Charger Extra NiMH battery pack Variety of interface cables IrDA Option Bluetooth wireless interface option Integrated Magnetic Stripe Reader (MSR) option 802.
Appendix A Interface Cables Download Cables, for use with a personal computer: • Part Number BL11757-000 8-Pin DIN to 9-Pin DB PC Cable • Also available as a coiled cable as: Part Number BL15063-1. Pin 9 PC Signals (TXD) (RXD) (RTS) Pin 1 (CTS) (GND) DB-9 Pin (DTR) Female Plug (DSR) (to P.C.
RJ45 RJ45 Cradle Cradle PIM Optical PIM Optical 8’ /Coiled 8’ /Coiled 9’ /Coiled 9’ /Coiled 6’ /Coiled 6’ / Coiled BL12093-1 /6100 Series BL12093-2 BL15483-1 BL15482-1 CC11371-3 CC11371-4 DB25 male 9 Pin DB Fem.
TELXON 960 960SL Adapter for BL11122-1 960 (BL11122-1) & 960SL (CC13711-1) 960 860 & 912 TEKLOGIC 7030 ILR 7025 ILR SYMBOL (CONT.
Appendix B Media Supplies To insure maximum printer life and consistent print quality and performance for your individual application, it is recommended that only media produced by Zebra be used. These advantages include: • Consistent quality and reliability of media products. • Large range of stocked and standard formats. • In-house custom format design service. • Large production capacity which services the needs of many large and small media consumers including major retail chains world wide.
Appendix D Product Support When calling with a specific problem regarding your printer, please have the following information on hand: • Model number/type (e.g. Cameo 2) • Unit serial number • Product Configuration Code (PCC) Product Configuration Code (PCC) Serial Number Label For product support, contact Zebra Technologies at: www.zebra.com Zebra Technologies Latin American Sales Office 9800 NW 41ST Street Suite 220 Doral, Florida 33178 USA Phone: +1.305.558.8470 Fax: +1.305.558.
Appendix E Battery Disposal The EPA certified RBRC® Battery Recycling Seal on the Nickel-Metal Hydride (Ni-MH) battery supplied with your printer indicates Zebra Technologies Corporation is voluntarily participating in an industry program to collect and recycle these batteries at the end of their useful life, when taken out of service in the United States or Canada.
Patent Information This product and/or its use may be covered by one or more of the following US patents and corresponding international patents worldwide D275,286 5,047,617 5,103,461 5,372,439 5,373,148 5,570,123 5,578,810 6,068,415 6,095,704 5,113,445 5,378,882 5,589,680 6,109,801 5,140,144 5,132,709 5,396,053 5,396,055 5,612,531 5,642,666 6,123,471 6,147,767 5,142,550 5,399,846 5,657,066 6,151,037 5,149,950 5,157,687 5,408,081 5,410,139 5,768,991 5,790,162 6,201,255 B1 6,231,253 B1