
User's Manual


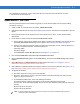


Table Of Contents
- Patents
- Warranty
- Revision History
- Table of Contents
- About This Guide
- Quick Start
- Getting Started
- Installation and Communication
- Administrator Console
- Setup Examples
- Troubleshooting
- Technical Specifications
- Firmware Upgrade Procedures
- Java Upgrade Procedures
- Static IP Configuration

Firmware Upgrade Procedures B - 5
Update Method 2, Direct Connect Over the Ethernet Port
Use this method to update a reader that is not on a LAN.
1. Use the serial Administrator Console to disable DHCP on the reader, and configure it for a static IP address
(192.168.1.3).
2. Configure the host computer to reside on the same subnet as the reader:
a. Open Network Connections and locate the connection to use to connect to the reader.
b. Open the TCP/IP Connection Properties window. Modify this to use a static IP address on the same subnet
as the reader (192.168.1.5). Click OK.
Figure B-1
TCP/IP Connection Properties Screen
3. Connect the Cat5 crossover cable from the host computer to the reader.
4. On the reader, access the web-based Administrator Console:
a. Open a browser and type http://192.168.1.3 (or the IP address of the reader to upgrade, if it is not the
default address above). The
Reader Administrator Console login screen appears. See Connect to the
Reader on page 4-3.
b. Enter the user name and password. If this is the first time accessing the console, a prompt appears for a
user name and password update. The default settings are:
Username:
admin
Password: change
The Console Main Menu appears. See Figure 4-14 on page 4-12.
5. From the Console Main Menu select Scan Control. The Reader Scan Control screen appears.
6. Click the Enable/Disable Polling button to set to Disable Polling. The button reads Enable Polling if polling is
disabled.
7. Select Maintenance. The Reader Maintenance Console appears. See Figure 4-1 on page 4-2. [refers to
Maintenance chapter that was removed; remove step??]
8. Select Version. The Version Control window displays the current version information. See Figure 4-14 on page
4-22. [refers to Maintenance chapter that was removed; remove step??]