Chapter 7 Bluetooth Introduction Bluetooth-equipped devices can communicate without wires, using frequency-hopping spread spectrum (FHSS) radio frequency (RF) to transmit and receive data in the 2.4 GHz Industry Scientific and Medical (ISM) band (802.15.1). Bluetooth wireless technology is specifically designed for short-range (10 meters (30 feet)) communication and low power consumption. ES400s with Bluetooth capabilities can exchange information (e.g.
7-2 ES400 Mobile Computer User Guide Security The current Bluetooth specification defines security at the link level. Application-level security is not specified. This allows application developers to define security mechanisms tailored to their specific need. Link-level security occurs between devices, not users, while application-level security can be implemented on a per-user basis.
Bluetooth 7-3 Bluetooth Configuration The following services are supported: • OBEX Object Push Services • Hands-Free Audio Gateway Services • Serial Port Services • Personal Area Networking Services • PBAP Services • Dial-Up Networking Services • HID Client Services • A2DP/AVRCP Services • File Transfer profile • General Audio/Video Distribution Profile • SIM Access Profile • Headset Profile • Generic Object Exchange Profile • Service Discovery Access profile • Generic Access Profile.
7-4 ES400 Mobile Computer User Guide NOTE If there is an active Bluetooth connection between the ES400 and another Bluetooth device and there is no data activity, the ES400 will timeout. However, if the user presses the Power button on the ES400, the ES400 will suspend (except when on a call) and upon receiving data from a remote Bluetooth device, the ES400 will wake from suspend mode. For example, headset redial or Bluetooth scanner sending data to the ES400.
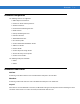
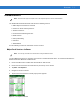
Bluetooth 2. Un-check the Turn On Bluetooth checkbox. 3. Tap OK. 7-5 Discovering Bluetooth Device(s) The ES400 can receive information from discovered devices without bonding. However, once bonded, the ES400 and a bonded device exchange information automatically when you turn the Bluetooth radio on. See Bonding with Discovered Device(s) on page 7-34 for more information. To find Bluetooth devices in the area: 1. Ensure that Bluetooth is enabled on both devices. 2.
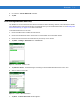
7-6 ES400 Mobile Computer User Guide NOTE If Smart-pairing is configured and the device is requesting one of the pre-defined PINs, the Enter Passcode window does not appear. Figure 7-4 Enter Passcode 8. Enter the Passcode on the other device. The device is added to the Bluetooth list. Figure 7-5 Bluetooth Connection Confirmation You are prompted to enter a passcode. If the device has a specific passcode, enter it in the Passcode field and tap Next.
Bluetooth 7-7 Available Services NOTE Some devices might not require a PIN. This depends upon the device’s authentication. The ES400 with Microsoft Bluetooth stack offers the following services: • OBEX Object Push Services via Beam • Hands-Free Audio Gateway Services • Serial Port Services • Personal Area Networking Services • PBAP Services • Dial-up Networking • HID Client • A2DP/AVRCP. See the following sections for information on these services.
7-8 ES400 Mobile Computer User Guide 6. Select Beam File. The ES400 searches for Bluetooth devices in the area. 7. Tap Tap to send next to the Bluetooth device to send the file to. The ES400 communicates with the device and send the file. When completed, Tap to send changes to Done. Figure 7-7 Beam File Window To transfer a contact between the ES400 and another Bluetooth enabled device: 1. Ensure that Bluetooth is enabled and discoverable on both devices. 2.
Bluetooth 7-9 Internet Sharing Internet Sharing allows the user to connect a computer or laptop to the ES400 and use the ES400 as a modem to connect to an office network or ISP. To use ES400 as a modem using Bluetooth: 1. Ensure that the device is not connected to the computer or laptop. 2. On the ES400, ensure that the Phone is on and a data connection is configured. 3. Tap Start > Internet Sharing. 4. In the PC Connection list, select Bluetooth PAN. 5.
7 - 10 ES400 Mobile Computer User Guide 4. Tap New device. The ES400 searches for Bluetooth devices in the area. 5. Select the headset name and tap Next. The Passcode window appears. 6. Enter the headset’s passcode. 7. Tap Next. The ES400 connects to the headset. Refer to the headset user manual for instructions on communicating with a Bluetooth device. NOTE During an active connection, the ES400 cannot go into suspend mode when the Power Button is pressed. A message appears notifying the user.
Bluetooth 7 - 11 10. Tap Save. 11. Tap COM Ports tab. 12. Tap New Outgoing Port. The add device window appears. 13. Select the serial device in the list and then tap Next. 14. Select a COM port from the drop-down list. 15. Tap Finish. NOTE No connection is made at this point. An application must open the selected COM port to trigger Microsoft Bluetooth stack to open the connection.
7 - 12 ES400 Mobile Computer User Guide Figure 7-10 Computer Bluetooth Devices Window 6. On the COM Ports tab, click Add. 7. Select the Incoming (device initiates the connection) option, then click OK. Note the number of the COM port that was added. 8. Click OK. 9. Click Start > All Programs > Microsoft ActiveSync. 10. Click File > Connection Settings. Figure 7-11 ActiveSync Connection Settings 11.
Bluetooth 7 - 13 If an Authentication is required, the Enter Passcode screen appears, type an alphanumeric passkey (PIN code), then tap Next; enter the same passkey on the other device. The passkey is recommended for enhanced security. Your passkey must be between 1 to 16 alphanumeric characters. If you do not want to use a passkey, tap Next. 14. To disconnect the ActiveSync connection, tap the ActiveSync icon on the Today screen. 15. Tap Disconnect.
7 - 14 ES400 Mobile Computer User Guide Connect to a HID Device The ES400 can connect to an Human Interface Device (HID) device such as a Bluetooth keyboard or mouse: 1. Ensure that Bluetooth is enabled on both devices. 2. Ensure that the Bluetooth device to discover is in discoverable and connectable modes. 3. Ensure that the two devices are within 10 meters (32.8 feet) of one another. 4. Tap Start > Settings > Bluetooth icon > Devices tab. 5. Tap Add new device.
Bluetooth 7 - 15 5. Tap Connect. The ES400 connects to the stereo headset.
7 - 16 ES400 Mobile Computer User Guide
Chapter 8 Using GPS Navigation Introduction The ES400 includes Global Positioning System (GPS) technology using the SiRFstar III chipset. GPS technology is based on a worldwide system of GPS satellites orbiting the earth that continuously transmit digital radio signals. These radio signals contain data on the satellites’ locations and their exact clock time and are used to determine your location on the earth.
8-2 ES400 User Guide To access the GPS receiver from multiple programs simultaneously, the user can either use the Microsoft GPS API or change the GPS program port setting and access the GPS program port in the multiplexed way. Operation Acquiring satellite signals may take several seconds to a few minutes. It is best to be outside and have a clear, unobstructed view of the sky.
Chapter 9 Settings Introduction Personalizing Your ES400 Time and Date Regional Settings Locking the ES400 You can lock the ES400 by disabling key presses and screen tap or by requiring a password or finger swipe. There are two types of locking features available; the standard Microsoft lock and the Motorola lock. To select either the Microsoft lock or the Motorola lock: 1. Tap Start > System > Lock Switch. 2. Tap the Select Lock soft key. 3. Select either Moto lock or Microsoft lock. 4. Tap OK.
9-2 ES400 Mobile Computer User Guide Microsoft Locking Locking the ES400 turns off keyboard and touch screen functionality. This is helpful when the ES400 is turned on and you want to prevent accidental key presses. To lock the device, tap Start > Lock. Device Unlocked Icon Device Locked Icon Figure 9-1 Device Locked/Unlocked Icons To unlock the device and free it for use, tap Unlock. Figure 9-2 Unlock Device Window Tap Unlock on the Unlock window.
Settings 9-3 Figure 9-3 Password Window - Password Tab 2. Select Prompt if device unused for check box to enable password protection. 3. From the drop-down list, select a time value for the protection to take affect after non-use. 4. From the Password type: drop-down list, select either Simple PIN or Strong alphanumeric. 5. For a simple password, enter a four-digit password in the Password field. For a stronger password: a. Enter a seven character password in the Password: field.
9-4 ES400 Mobile Computer User Guide Figure 9-5 Lock Window 1. Slide the Lock butoon to the left or right. 2. Enter the password to un-lock the device. Figure 9-6 Enter Password Window 3. Tap the Unlock icon. Motorola Locking With the Motorola Lock you can use a password or fingerprint swipe to un-lock the device. Tap Start > Lock.
Settings 9-5 Figure 9-7 Motorola Lock Settings Window Pasword Locking 1. Tap Password type to toggle between Simple and Strong. 2. For a simple password: a. enter a four-digit password in the Password field. b. Re-enter the password in the Confirm: field. For a stronger password: 3. c. Enter a seven character password in the Password: field.
9-6 ES400 Mobile Computer User Guide 1. Tap Add fingerprint. Figure 9-9 Add Fingerprint Window 2. Select a finger and slide the fingerprint across the fingerprint reader in a downward motion starting at the bottom of the fingerprint. 3. When the fingerprint is read successfully, a green checkmark appears in the first box. 4. Repeat swiping your fingerprint three more times. 5. If a red X appears in the box, re-swipe your fingerprint. You can add up to 10 fingerprints.
Settings Figure 9-10 Motorola Lock Screen You can change what information appears on the screen. Tap Edit Lock Screen. Figure 9-11 Edit Lock Screen Window Select the item to display on the Lcok screen. A yellow target appears when the item is enabled. Tap OK when done. Audio Feedback To enable an audio sound to be heard upon a successful finger swipe: Tap Audio feedback.
9-8 ES400 Mobile Computer User Guide Vibrate
Settings 9-9 Backlight and Keylight Settings The Display brightness automatic/manual setting shall provide the ability to automatically detect the brightness in a specific environment. Tap Start > Settings > System > Backlight & Keylight icon. Figure 9-12 Backlight & Keylight - Battery Power Window Battery Power Tab Use the Battery Power tab to set the backlight and keylight settings when the ES400 is on battery power. Display Time-out Sets the time of inactivity before the screen backlight turns off.
9 - 10 ES400 Mobile Computer User Guide Figure 9-13 Backlight & Keylight - External Power Window Display Time-out Sets the time of inactivity before the screen backlight turns off. 1 Min., 3 Min., 5 Min., 10 Min., None (Default). Display On Set the display to turn on upon a key or screen touch. Display Brightness Sets the brightness of the display. Keylight Time-out Sets the time of inactivity before the screen keylight turns off. 1 Min., 3 Min., 5 Min., 10 Min., None, Follow Display (Default).
Settings 9 - 11 End Running programs Shortcuts Auto Answer Mode Setting Smart Dialing Accelerometer Provides the ability to customize the accelerometer behaviors when in a call or using the display. The Accelerometer application provides the ability to track the events and to show a shortcut in the Windows Mobile Classic home screen. The Accelerometer takes the existing IST application and provides finger friendly assistance and simplicity.
9 - 12 ES400 Mobile Computer User Guide Figure 9-14 Accelerometer - Display Window Suspend when face down Places the ES400 in suspend mode when it is placed face down. Wake when moved Wakes the ES400 from suspend mode when the device is moved. Screen Rotation Enable or disable screen rotation. The screen can be rotated between portrait and landscape modes automatically, depending on the physical orientation of the ES400.
Settings 9 - 13 Audio on face down Select between Silent, Vibrate or No change (default) In call face up Toggle between Speaker on and no effect (default) In call face down Toggle between Call Hold or No Effect (default) Programs Tab The user shall have the ability to set the device navigational motions.
9 - 14 ES400 Mobile Computer User Guide Figure 9-17 Accelerometer - Log Window Fall Count - Toggle between On and Off (default) About Tab The user shall have the ability to view accelerometer information. Figure 9-18 Accelerometer - About Window Icon shortcut - Toggle between On and Off (default) Sensor - Lists the sensor type. Firmware version - Lists the firmware version. Driver version - Lists the driver version. Sensor ID - Lists the sensor ID number.
Settings 9 - 15 Optical Mouse Settings Lock Switch LAN
9 - 16 ES400 Mobile Computer User Guide Master Reset The Master reset/clear application allows the user to restore the device back to default settings and remove personal information off of the device.
Settings 9 - 17 Touch Vibration Settings Folder Table 9-1 lists applications pre-installed on the ES400. Tap Start > Settings to open the Settings. Table 9-1 Setting Applications Icon Name Description Bluetooth Turn on Bluetooth, set the ES400 to visible mode and scan for other Bluetooth devices in the area. Lock Set a password for the ES400. Clock & Alarms Set the device clock to the date and time of your locale or to a visiting time zone when you’re traveling.
9 - 18 ES400 Mobile Computer User Guide Table 9-1 Setting Applications (Continued) Icon Name Personal Folder Description Contains personal applications. Microsoft My Phone Connections Folder Beam Set the ES400 to receive incoming IrDA beams. Domain Enroll Connections Set up one or more types of modem connections for your device, such as phone dial-up, GPRS, Bluetooth, and more, so that your device can connect to the Internet or a private local network.
Settings 9 - 19 Table 9-1 Setting Applications (Continued) Icon Name Description Personal Folder Buttons Assign a program to a button. Input Set options for each of the input methods. Holster Nav pad Phone Owner Information Enter personal information on the ES400. System Folder About View basic information such as the Windows Mobile® version and type of processor used on the ES400. Backlight Set the display backlight time-out and adjust brightness.
9 - 20 ES400 Mobile Computer User Guide Table 9-1 Setting Applications (Continued) Icon Name Certificates Description See information about certificates installed on the ES400. Cellular Network Options Customer Feedback Submit feedback on the Windows Mobile 6 software. Encryption Allow files on a storage card to be encrypted. Encrypted files are readable only on your device. Device information Error Reporting Enable or disable the device's error reporting function.
Settings 9 - 21 Table 9-1 Setting Applications (Continued) Icon Name Description Regional Settings Set the regional configuration to use, including the format for displaying numbers, currency, date, and time on the ES400. Screen Change the screen orientation, re-calibrate the screen, and change the screen text size. Remove Programs Remove programs that you installed on the ES400. Task Manager Stop running programs.
9 - 22 ES400 Mobile Computer User Guide
Chapter 10 Accessories Introduction Table 10-1 lists the accessories available for the ES400 Series Enterprise Smart Phone. Table 10-1 ES400 Accessories Accessory Part Number Description Cradles Single Slot USB Cradle Charges the ES400 main battery. Synchronizes the ES400 with a host computer through a USB connection. Vehicle Cradle Installs in a vehicle and charges the ES400 main battery. Chargers Auto Charge Cable Charges one ES400 in a vehicle.
10 - 2 ES400 User Guide Single Slot USB Cradle The Single Slot USB Cradle provides 5.4 VDC power for operating the ES400 and synchronizes information between the ES400 and a host computer. Communication and Charging the ES400 Battery To charge the ES400 battery and to communicate with a host computer: 1. Ensure that the cradle is connected to power and to a host computer. Figure 10-1 Cradle Setup The ES400’s Battery Status LED indicates the status of the battery charging in the ES400.
Accessories 10 - 3 Vehicle Holder WARNING! Some countries prohibit the mounting of any electronic device in any location on the vehicle dashboard. Be sure to check your local laws acceptable mounting areas before installing the auto mounting kit. Installation Reminders Figure 10-2 Vehicle Holder Mounting • Do not mount the vehicle holder where it will obscure the driver’s view of the road. • Do not mount the vehicle holder near the driver seat air bag deployment area.
10 - 4 ES400 User Guide Assembly 1. Insert the vehicle holder’s cradle plate to the holes on the back of the cradle. 2. Push the cradle down until both parts are engaged. Windshield Installation 1. Fix the suction cup mount to the selected area with the suction lever facing up. Suction Cup Mount Cradle Plate Cradle Figure 10-3 Windshield Installation 2. Flip the lever down to create a vacuum between the suction cup and the mounting surface. 3.
Accessories 10 - 5 NEED NEW DRAWINGS Figure 10-4 Insert ES400 into Vehicle Holder 5. Connect the auto charger cable to the ES400 and slide the two locking tabs up to secure the cable cup to the ES400. 6. Connect the other end to the cigarette lighter socket. The LED indicator on the right side of the touch screen lights up orange during charging.
10 - 6 ES400 User Guide Cables This section describes how to set up and use the cables. The cables are available with a variety of connection capabilities. The following communication/charge cables are available: • USB/Charge cable • Provide the ES400 with operating and charging power when used with the Motorola approved power supply. • Synchronize information between the ES400 and a host computer. With customized or third party software, it can also synchronize the ES400 with corporate databases.
Accessories 10 - 7 Vehicle Adapter Module NEED NEW DRAWINGS Figure 10-6 Auto Charge Cable Holster Use the holster to store the ES400 when not in use or when using a Bluetooth headset. Figure 10-7 Soft Holster Place the ES400 with the display toward the your body into the holster. The ES400 automatically goes into suspend mode (depending upon the holster setting application. Use the Holster settings window to control the behavior of the ES400 when it is placed in a holster.
10 - 8 ES400 User Guide Select one of the following options: • Schedule • Vibrate - When the ES400 is placed in the holster and a call or notification occurs, the ES400 vibrates. • Silent • Outdoor • Ambient • Normal Tap OK when done. ActiveSync To communicate with various host devices, install Microsoft ActiveSync (version 4.5 or higher) on the host computer. Use ActiveSync to synchronize information on the mobile computer with information on the host computer.
Accessories 10 - 9 • Controls when synchronization occurs by selecting a synchronization mode, e.g., set to synchronize continually while the mobile computer is connected to the host computer, or set to only synchronize on command. • Selects the types of information to synchronize and control how much data is synchronized. Installing ActiveSync To install ActiveSync on the host computer, download version 4.5 or higher from the Microsoft web site at http://www.microsoft.com.
10 - 10 ES400 User Guide Figure 10-9 ActiveSync Window NOTE 2. Assign each mobile computer a unique device name. Do not try to synchronize more than one mobile computer to the same name. In the ActiveSync window, select File > Connection Settings. The Connection Settings window appears. Figure 10-10 Connection Settings Window 3. Select Allow USB connections check box. 4. Select the Show status icon in Taskbar check box. 5. Select OK to save any changes made.
Accessories 10 - 11 Figure 10-11 Synchronization Setup Wizard Window 2. Click Next. Figure 10-12 Synchronization Directly With a Server Window 3. Select the check box to synchronize with a server running Microsoft Exchange if applicable. 4. Click Next.
10 - 12 ES400 User Guide Figure 10-13 Synchronization Option Window 5. Select the appropriate settings and click Next. Figure 10-14 Wizard Complete Window 6. Click Finish.
Accessories 10 - 13 During the first synchronization, information stored on the mobile computer is copied to the host computer. When the copy is complete and all data is synchronized, the mobile computer can be disconnect from the host computer. NOTE The first ActiveSync operation must be performed with a local, direct connection. Windows Mobile retains partnerships information after a cold boot.
10 - 14 ES400 User Guide
Chapter 11 Windows Mobile Operating System Introduction This chapter explains the buttons, status icons, and controls on the Windows Mobile 6.5 operating system. NOTE TAKE INFO FROM MC75A UG. Today Screen The Today screen displays important information, such as upcoming appointments and status indicators. Tap a section on the screen to open the associated program. Alternatively, tap Start > Today to display the Today screen.
11 - 2 ES400 User Guide Connectivity Notification Open the Start Menu WAN Signal Strength Adjust volume Battery Status Change the date and time, set up the alarm, and more Change the date and time Turn on or off radios Wireless Applications BTExplorer Command Bar Soft Keys Figure 11-1 Today Screen To customize the Today screen, tap Start > Settings > Today icon. Use the Appearance tab to customize the background and the Items tab to change the list and order of items that appear on the screen.
Using the MC55 11 - 3 lists programs that are listed in the Programs window. Settings lists control applications pre installed on the ES400. Tap Start > Settings to open the Settings window.
11 - 4 ES400 User Guide
Chapter 12 Maintenance & Troubleshooting Introduction This chapter includes instructions on cleaning and storing the ES400, and provides troubleshooting solutions for potential problems during ES400 operation. Maintaining the ES400 For trouble-free service, observe the following tips when using the ES400: • Do not scratch the screen of the ES400. When working with the ES400, use the supplied stylus or plastic-tipped pens intended for use with a touch-sensitive screen.
12 - 2 ES400 User Guide • A screen protector is applied to the ES400. Motorola recommends using this to minimize wear and tear. Screen protectors enhance the usability and durability of touch screen displays. Benefits include: • Protection from scratches and gouges • Durable writing and touch surface with tactile feel • Abrasion and chemical resistance • Glare reduction • Keeping the device’s screen looking new • Quick and easy installation.
Maintenance & Troubleshooting 12 - 3 • To charge the mobile device battery, the battery and charger temperatures must be between +32 ºF and +104 ºF (0 ºC and +40 ºC) • Do not use incompatible batteries and chargers. Use of an incompatible battery or charger may present a risk of fire, explosion, leakage, or other hazard. If you have any questions about the compatibility of a battery or a charger, contact Motorola Enterprise Mobility support.
12 - 4 ES400 User Guide • Isopropyl alcohol • Can of compressed air with a tube. Cleaning the ES400 Housing Using the alcohol wipes, wipe the housing including keys and in-between keys. Display The display can be wiped down with the alcohol wipes, but care should be taken not to allow any pooling of liquid around the edges of the display. Immediately dry the display with a soft, non-abrasive cloth to prevent streaking.
Maintenance & Troubleshooting 12 - 5 8. Inspect the area for any grease or dirt, repeat if required. 9. Replace the battery in the ES400. Cleaning Cradle Connectors To clean the connectors on a cradle: 1. Remove the DC power cable from the cradle. 2. Dip the cotton portion of the cotton tipped applicator in isopropyl alcohol. 3. Rub the cotton portion of the cotton tipped applicator along the pins of the connector(s).
12 - 6 ES400 User Guide Troubleshooting ES400 Table 12-1 Troubleshooting the ES400 Problem ES400 does not turn on. Cause Solution Battery not charged. Charge or replace the battery in the ES400. Battery not installed properly. Install the battery properly. See Installing the Battery on page 1-4. System crash. Perform a warm boot. If the ES400 still does not turn on, perform a cold boot. See Resetting the ES400 on page 2-19. Battery failed. Replace battery.
Maintenance & Troubleshooting 12 - 7 Table 12-1 Troubleshooting the ES400 (Continued) Problem ES400 shuts off. Cause Solution ES400 is inactive. The ES400 turns off after a period of inactivity. If the ES400 is running on battery power, set this period from 1 to 5 minutes, in one-minute intervals. If the ES400 is running on external power, set this period to 1, 2, 5, 10, 15, or 30 minutes. Check the Power window by selecting Start > Settings > System tab and tapping the Power icon.
12 - 8 ES400 User Guide Table 12-1 Troubleshooting the ES400 (Continued) Problem The ES400 does not decode with reading bar code. Cause Solution Scanning application is not loaded. Load a scanning application on the ES400. See your system administrator. Unreadable bar code. Ensure the symbol is not defaced. Distance between exit window and bar code is incorrect. Place the ES400 within proper scanning range. ES400 is not programmed for the bar code.
Maintenance & Troubleshooting 12 - 9 Single Bay USB Cradle Table 12-3 Troubleshooting the Single Bay USB Cradle Symptom ES400 battery is not charging. During data communication, no data transmits, or transmitted data was incomplete. Possible Cause Action ES400 was removed from cradle or cradle was unplugged from AC power too soon. Ensure cradle is receiving power. Ensure ES400 is seated correctly. Confirm main battery is charging under Start > Settings > System > Power.
12 - 10 ES400 User Guide Table 12-4 Troubleshooting the Vehicle Cradle Symptom ES400 battery is not recharging. Possible Cause Action ES400 was removed from the cradle too soon. Replace the ES400 in the cradle. The 4800 mAh battery fully charges in less than six hours. Battery is faulty. Replace the battery. No power to charger. Ensure that power is applied to the charger. The Battery Status LED flashes amber to indicate that the battery is charging. ES400 is not placed correctly in the cradle.
Appendix A Technical Specifications ES400 Technical Specifications The following tables summarize the Enterprise Smart Phone’s intended operating environment and technical hardware specifications. ES400 Table A-1 ES400 Technical Specifications Item Description Physical Characteristics Dimensions With 1X battery: Height: 12.85 cm (5.06 in.) Width: 6.04 cm (2.38 in.) Depth: 1.69 cm (0.67 in.) With 2X battery: Height: 12.85 cm (5.06 in.) Width: 6.04 cm (2.38 in.) Depth: 2.15 cm (0.85 in.
A-2 ES400 User Guide Table A-1 ES400 Technical Specifications (Continued) Item Description Network Connections High-speed USB client, full-speed USB host Notification Programmable LED, audio notifications and vibrator alerts. Keypad Options Alphanumeric; QWERTY, QWERTZ and AZERTY Audio VoWWAN; VoWLAN; TEAM Express compliant, rugged audio connector; high-quality speakerphone; headset (wired or Bluetooth) and handset and speaker phone modes.
Technical Specifications A-3 Table A-1 ES400 Technical Specifications (Continued) Item Description Operating Channels Chan 1-13 (2412-2472 MHz), Chan 14 (2484 MHz) Japan only; actual operating channels/frequencies depend on regulatory rules and certification agency WLAN Security TKIP, AES, WPA (Personal or Enterprise), WPA2 (Personal or Enterprise), 802.
A-4 ES400 User Guide Table A-1 ES400 Technical Specifications (Continued) Item Description RF Exposure USA: FCC Part 2, FCC OET Bulletin 65 Supplement C Canada: RSS-102 EU: EN 50360 Japan: ARIB STD T56 Australia: Radio communications Standard 2003 EMI/RFI USA: FCC Part 15, Class B Canada: ICES 003 Class B EU: EN55022 Class B, EN55024, EN 301 489-1, EN 301 489-7, EN 301 489-17, EN 301 489-19, EN 301 489-24, EN 60601-1-2, EN 50121-3-2, EN 50121-4 Australia: AS/NZS CISPR-22 Laser Safety IEC/Class 2/F
Technical Specifications ES400 Accessory Specifications Single Slot USB Cradle Table A-3 Single Slot USB Cradle Technical Specifications Feature Description Dimensions Height: TBS Width: TBS Depth: TBS Weight TBS Input Power 12 VDC Power Consumption TBS watts Interface USB Operating Temperature 0°C to 50°C (32°F to 122°F) Storage Temperature -40°C to 70°C (-40°F to 158°F) Charging Temperature 0°C to 40°C (32°F to 104°F) Humidity 5% to 95% non-condensing Drop 76.2 cm (30.0 in.
A-6 ES400 User Guide
Appendix B Keypads Introduction The ES400 offers three types of alphanumberic keypad configurations: • QWERTY • AZERTY • QWERTZ.
B-2 ES400 User Guide Alpha Primary Keypad The Alpha Primary keypad produces the 26-character alphabet (A-Z, both lowercase and uppercase), numbers (0-9), and assorted characters. The keypad is color-coded to indicate which modifier key to press to produce a particular character or action. The keypad default is lowercase alpha characters. See Table B-1 for key and button descriptions and Table B-3 on page B-6 for the keypad’s special functions.
Keypads B-3 Table B-1 Alpha Primary Keypad Descriptions Key Orange Key Action Accesses the secondary layer of characters and actions (shown on the keypad in orange). Press the Orange key once to activate this mode temporarily, followed by another key. This illuminates the LED and displays the following icon at the bottom of the screen, until a second key is pressed: Press the Orange key twice to lock this mode.
B-4 ES400 User Guide Table B-1 Alpha Primary Keypad Descriptions (Continued) Key Action SPACE Produces a space character. ESC Exits the current operation. TAB Move from one field to another.
Keypads Table B-2 Alpha Primary Keypad Input Modes (Continued) Key Normal Shift + Key Orange + Key S s S @ T t T / U u T ? V v V v W w W w X x X x Y y Y y Z z Z z - - _ - ‘ ‘ < ‘ . . > . ENTER Enter Enter Enter TAB Tab Tab Tab SPACE Space Space Space BKSP Backspace Backspace Backspace Note: An application can change the key functions. The keypad may not function exactly as described.
B-6 ES400 User Guide Special Character Key NOTE Special characters are only available on the alpha-numeric keypad configurations. To add special characters using the ES400 áü key, type the related character first, then press the Orange twice followed by the áü key. Continue pressing the áü key until the special character displays.
Keypads Table B-3 Special Characters (Continued) Key Special Characters Key _ ‘ ? : - Special Characters B-7
B-8 ES400 User Guide
Appendix C Using the Time Tracker Application Introduction
C-2 ES400 User Guide
Appendix D Using the Weather Application Introduction
D-2 ES400 User Guide
Glossary A API. An interface by means of which one software component communicates with or controls another. Usually used to refer to services provided by one software component to another, usually via software interrupts or function calls Aperture. The opening in an optical system defined by a lens or baffle that establishes the field of view. Application Programming Interface. See API. ANSI Terminal. A display terminal that follows commands in the ANSI standard terminal language.
Glossary - 2 ES400 Mobile Computer User Guide Bar Width. Thickness of a bar measured from the edge closest to the symbol start character to the trailing edge of the same bar. BIOS. Basic Input Output System. A collection of ROM-based code with a standard API used to interface with standard PC hardware. Bit. Binary digit. One bit is the basic unit of binary information. Generally, eight consecutive bits compose one byte of data. The pattern of 0 and 1 values within the byte determines its meaning.
Glossary - 3 Code 3 of 9 (Code 39). A versatile and widely used alphanumeric bar code symbology with a set of 43 character types, including all uppercase letters, numerals from 0 to 9 and 7 special characters (“-”, “.”, “/”, “+”, “%”, “$” and space). The code name is derived from the fact that 3 of 9 elements representing a character are wide, while the remaining 6 are narrow. Code 93.
Glossary - 4 ES400 Mobile Computer User Guide Discrete 2 of 5. A binary bar code symbology representing each character by a group of five bars, two of which are wide. The location of wide bars in the group determines which character is encoded; spaces are insignificant. Only numeric characters (0 to 9) and START/STOP characters may be encoded. DRAM. Dynamic random access memory. DTE. See Data Terminal Equipment. E EAN. European Article Number.
Glossary - 5 I IDE. Intelligent drive electronics. Refers to the solid-state hard drive type. IEC. International Electrotechnical Commission. This international agency regulates laser safety by specifying various laser operation classes based on power output during operation. IEC (825) Class 1. This is the lowest power IEC laser classification.
Glossary - 6 ES400 Mobile Computer User Guide K Key. A key is the specific code used by the algorithm to encrypt or decrypt the data. Also see, Encryption and Decrypting. L LASER. Light Amplification by Stimulated Emission of Radiation.The laser is an intense light source. Light from a laser is all the same frequency, unlike the output of an incandescent bulb. Laser light is typically coherent and has a high energy density. Laser Diode.
Glossary - 7 N Nominal. The exact (or ideal) intended value for a specified parameter. Tolerances are specified as positive and negative deviations from this value. Nominal Size. Standard size for a bar code symbol. Most UPC/EAN codes are used over a range of magnifications (e.g., from 0.80 to 2.00 of nominal). NVM. Non-Volatile Memory. O ODI. See Open Data-Link Interface. Open Data-Link Interface (ODI). Novell’s driver specification for an interface between network hardware and higher-level protocols.
Glossary - 8 ES400 Mobile Computer User Guide Print Contrast Signal (PCS). Measurement of the contrast (brightness difference) between the bars and spaces of a symbol. A minimum PCS value is needed for a bar code symbol to be scannable. PCS = (RL - RD) / RL, where RL is the reflectance factor of the background and RD the reflectance factor of the dark bars. Programming Mode. The state in which a scanner is configured for parameter values. See Scanning Mode. Q Quiet Zone.
Glossary - 9 SDK. Software Development Kit Self-Checking Code. A symbology that uses a checking algorithm to detect encoding errors within the characters of a bar code symbol. Shared Key. Shared Key authentication is an algorithm where both the AP and the MU share an authentication key. SHIP. Symbol Host Interface Program. SID. System Identification code. An identifier issued by the FCC for each market.
Glossary - 10 ES400 Mobile Computer User Guide T TCP/IP. (Transmission Control Protocol/Internet Protocol) A communications protocol used to internetwork dissimilar systems. This standard is the protocol of the Internet and has become the global standard for communications. TCP provides transport functions, which ensures that the total amount of bytes sent is received correctly at the other end. UDP is an alternate transport that does not guarantee delivery.
Glossary - 11 V Visible Laser Diode (VLD). A solid state device which produces visible laser light. W Warm Boot. A warm boot restarts the mobile computerEnterprise Smart Phone by closing all running programs. All data that is not saved to flash memory is lost.
Glossary - 12 ES400 Mobile Computer User Guide
Index A accessories cables . . . . . . . . . . . . . . . . . . . . . . . . . . . . . . . . 10-7 microSD . . . . . . . . . . . . . . . . . . . . . . . . . . . . . . . 1-2 SIM card . . . . . . . . . . . . . . . . . . . . . . . . . . . . . . . 1-3 single bay USB cradle . . . . . . . . . . . . . . . .10-1, 10-2 specifications . . . . . . . . . . . . . . . . . . . . . . . . . . . A-6 activation CDMA . . . . . . . . . . . . . . . . . . . . . . . . . . . . . . . . 3-31 Verizon CDMA . . . . . . . . . . . . . . . .
Index - 2 ES400 Mobile Computer User Guide icons . . . . . . . . . . . . . . . . . . . . . . . . . . . . . . . . . 11-2 communication . . . . . . . . . . . . . . . . . . . . . . . . . . . . 10-7 communication/charge cables . . . . . . . . . . . . . . . . . 10-7 conference call . . . . . . . . . . . . . . . . . . . . . . . . . . . . 3-11 configuration . . . . . . . . . . . . . . . . . . . . . . . . . . . . . . . . xiii Contacts . . . . . . . . . . . . . . . . . . . . . . . . . . . . . . . . . .
Index - 3 muting a call . . . . . . . . . . . . . . . . . . . . . . . . . . . . . . . 3-8 N navigation bar icons . . . . . . . . . . . . . . . . . . . . . . . . . . . . . . . . . . 2-4 network configuring GPRS WAN . . . . . . . . . . . . . . . . . . 3-21 notational conventions . . . . . . . . . . . . . . . . . . . . . . . . .xvi notes . . . . . . . . . . . . . . . . . . . . . . . . . . . . . . . . . . . . . 2-8 O operating environment . . . . . . . . . . . . . . . . . . . . . . . . A-1 operating system .
Index - 4 ES400 Mobile Computer User Guide T task tray icons . . . . . . . . . . . . . . . . . . . . . . . . . . . . . 11-2 tasks . . . . . . . . . . . . . . . . . . . . . . . . . . . . . . . . . . . . . 2-9 technical specifications . . . . . . . . . . . . . . . . . . . . . . . A-1 accessories . . . . . . . . . . . . . . . . . . . . . . . . . . . . . A-6 temperature . . . . . . . . . . . . . . . . . . . . . . . . . . . . . . . . A-2 charging . . . . . . . . . . . . . . . . . . . . . . . . . . . . . .
Motorola, Inc. One Motorola Plaza Holtsville, New York 11742, USA 1-800-927-9626 http://www.motorola.com/enterprisemobility MOTOROLA and the Stylized M Logo and Symbol and the Symbol logo are registered in the U.S. Patent and Trademark Office. All other product or service names are the property of their registered owners. © Motorola, Inc.