
User's Manual


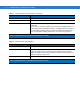
Table Of Contents
- Symbol DS6878 Product Reference Guide
- Patents
- Warranty
- Revision History
- Table of Contents
- About This Guide
- Getting Started
- Introduction
- Interfaces
- Unpacking the Digital Scanner and Cradle
- Parts
- Digital Scanner Cradle
- Replacing the Digital Scanner Battery
- Charging the Digital Scanner Battery
- Shutting Off the Digital Scanner Battery
- Reconditioning the Digital Scanner Battery
- Inserting the Digital Scanner in the Cradle
- Radio Communications
- Configuring the Digital Scanner
- Accessories
- Scanning
- Maintenance, Troubleshooting & Technical Specifications
- Radio Communications
- User Preferences & Miscellaneous Digital Scanner Options
- Introduction
- Scanning Sequence Examples
- Errors While Scanning
- User Preferences/Miscellaneous Option Parameter Defaults
- User Preferences
- Default Parameters
- Parameter Bar Code Scanning
- Beep After Good Decode
- Suppress Power Up Beeps
- Beeper Tone
- Beeper Volume
- Beeper Duration
- Beep on Insertion
- Batch Mode
- Low Power Mode
- Time Delay to Reduced Power Mode
- Timeout to Low Power Mode from Auto Aim
- Hand-Held Trigger Mode
- Picklist Mode
- Mobile Phone/Display Mode
- Continuous Bar Code Read
- Unique Bar Code Reporting
- Decode Session Timeout
- Timeout Between Decodes, Same Symbol
- Timeout Between Decodes, Different Symbols
- Fuzzy 1D Processing
- Hand-Held Decode Aiming Pattern
- Decoding Illumination
- Multicode Mode
- Multicode Expression
- Multicode Mode Concatenation
- Multicode Concatenation Symbology
- Multicode Troubleshooting
- Miscellaneous Scanner Parameters
- USB Interface
- RS-232 Interface
- Keyboard Wedge Interface

1 - 10 Symbol DS6878 Product Reference Guide
3. The digital scanner must perform two charge cycles to complete the battery reconditioning process
(discharge/charge/discharge/charge). See Table 1-1.
Battery Reconditioning LED Definitions
Inserting the Digital Scanner in the Cradle
Insert the digital scanner in the cradle so that the metal contacts on the bottom of the digital scanner handle touch
the contacts on the cradle. Push the handle lightly to ensure a proper connection, engaging the contacts in the
cradle and digital scanner. Ensure the desk/wall mount converter knob on the back of the cradle is in the correct
position for the horizontal or vertical mounting.
Horizontal Cradle Mount
When mounting the cradle horizontally, where no fastening is necessary:
1. Ensure the rubber feet are attached to the cradle. These feet provide traction and prevent surface damage.
2. Ensure the desk/wall mount converter knob is in the position shown in Figure 1-7.
Figure 1-7
Horizontal Mount - Inserting the Digital Scanner in the Cradle
Vertical Cradle Mount
When mounting the cradle vertically:
1. Ensure the rubber feet are attached to the cradle. These feet provide traction and prevent surface damage.
Table 1-1
Battery Reconditioning LED Definitions
Battery Reconditioning
Mode
LED Comments
Discharging Red Flash Time to discharge is approximately 2.5 hours.
Charging Green Flash Time to charge is approximately 2.5 hours with an
external power supply.
Reconditioning Complete Green - Solid (always on) The digital scanner enters a trickle charge until the
digital scanner is removed from the cradle.
Desk/Wall Mount
Converter Knob