
Install Instructions
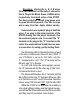
Table Of Contents

Directions: Unplug the L, G, & N wires
from their terminals on the motor’s connector
block. Plug in the Black, Green, & White wires,
respectively, from both sides of the X13PR.
For best protection, attach long green wire
to good electrical ground. Use ties to keep
wires away from fan. Apply sticker nearby .
Some motors use a plastic plug to hold the
wires. If so, plug in the male terminals of the
X13PR directly into the plug’s terminals. Use
the enclosed jumper wire to connect the “C”
terminal on the plug to the “C” terminal on the
motor. Use enclosed heat shrink tubes on pow-
er connectors for safety, gently heating them.
The Monitoring LED’s indicate the status of each
of the two possible power lines into the X13PR. If
your X13 Motor is set up for 120 Volts, only the
“L” terminal will be “hot”. The “N” terminal will be
Neutral, and “G” is Ground.
In a 240 Volt motor, the same applies, except
the “N” terminal will be the other leg of 240 Volts;
no Neutral terminal is used.
The Green LED Monitors the “L” terminal, and the
Red LED monitors the “N” terminal. When an LED
is lit, that line is a) HOT, and b) Protected. Note that
motors using 120 Volts will NOT light the Red LED.
While the X13PR is not warranted in its ability to
stop close lightning strikes and the highest surges,
you will find that the additional protection it provides
will often prevent premature motor failure.