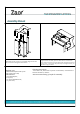
Miza 88
Thank you for choosing a piece of Zaor studio furniture, which will hopefully make your life easier, more ergonomic and improve the looks of your workspace. Before you can enjoy the comfort of your new acquisition you need to assemble it. We have tried to give you as much detail as needed and as little as possible. Should you run into any difficulty with this assembly you can get in touch with us via sales@zaorstudiofurniture.com to set up a Skype session or phone call.
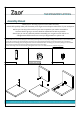
7 10 5 6 8 3b 4 3 2 9 Part Floor cross bar 1 Part n° 2 Back stabilising crossbar Part keyboard drawer module Part Desk top Part Rack bottom 3b 2 1 Part Dividers (2pcs) Part top bridge 3 Part Cable tray 4 Part Left side part 5 Part Right side part 8 7 6 9 10
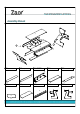
6 7 6 6 5 5 6 STEP 1 Lay part n° 5 flat on th ground, introduce system bolts and attach parts n° 6. Tighten with extenders (see page 2). Be careful to have the pre-mounted drawer rails on the inside of the dividers! 7 STEP 2 After introducing bolts, lower down top part n° 7 onto dividers n°6, and tighten with excenters to assemble first module.
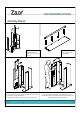
8 2 3b 5 1 6 7 4 3 STEP 5 STEP 6 Repeat the same as Join 3b with 3 using assembly kits 8 and 2. 3b 3 3 9 STEP 7 Lower down the keyboard module assembled in step 6and attach ; N.B. KEEP THE KEYBOARD MODULE VERTICAL AVOID FLUCTUATIONS After assembling the keyboard module, make sure it is kept in its vertical position, avoiding any oscillation until step 8 is completed.
10 2 5 1 7 4 3 STEP 9 STEP 8 Afterwards put bolts in part n 10 and carefully align all holes with bolts, lower down and tighten with excenters. Material used -Melaminated chipboard 18+25 mm solid wood (Oak or Ash; PACKING LIST 44 1 drawer from the top down. During this phase avoid jamming the drawer and never use force . You are done - Enjoy! When fully extracting the drawer, use the fold down legs to stabilise.