
User Manual

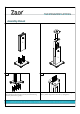

Step 3 Finish assembling the fixing the speaker plate
to part #using hex screws from underneathph
Step 4 put the IsoacousticsAon the top plateinto the
predisposed pods. Use the small counter screws on two of the
Aperta's vertical axles to adjust the angle of the Aperta if you need to
tilt the speakers.
4
2
Graph 3
3
aperta 200
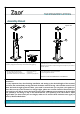
MATERIALS USED
-MDF and solid wood (ash or Oak)
- iron height adjustment mechanism
- Aperta made from aluminum and rubber
PACKING LIST
12hex screws30
- 4 wood parts
- 5 aluminum parts (Aperta)
4
INSTRUCTIONS FOR CLEANING
- use a humid cloth or special wood cleaner
- avoid using abrasive cleaners
PRODUCT CAN BE ASSEMBLED BY ONE PERSON
Attention !!!
It is very important that, after finishing installation and setting up the desired height of the Isostand,
you fasten the mechanismby turning the knob clockwise without forcing. This will take several turns.
When the knob sits tight against the base, your stand is secured. Now you can place your speaker or
other device on top of the Isostand. To change height, please turn counter-clockwise several full
turns until you are able to retract the knob from the hole: CAREFUL: Do not attempt to do this while
your speaker(s) are sitting on top of the stand! Remove your speaker(s) from the stand to adjust
height. When you have found your new height, make sure to turn the knob clockwise once again, to
fasten it, like described above.