CONTENTS Warning 3 Component List 4 Assembly Instructions 5 Initial Firing Instructions 17 Subsequent Start-up 18 Operating Tips 20 Maintenance & Cleaning 21 Troubleshooting 22 Digital Thermostat Control Wiring Diagram 23 Z Grills Support 24 3 Year Limited Warranty 25
SAVE THIS MANUAL FOR FUTURE REFERENCE
WARNINGS! is ra are 3
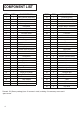
COMPONENT LIST ITEM QTY DESCRIPTION ITEM QTY DESCRIPTION 1 1 Grill Chamber Assembly 31 1 Hot Rod (Ignitor) 2 1 Thermal Baffle 32 1 Firepot Assembly 3 1 Hopper Bottom Assembly 33 1 Burner Box Assembly 4 5 1 1 Body Frame Heat Baffle 34 35 1 1 Hopper Burner Gasket Hopper Burner Assembly 6 1 Grease Drain Pan 36 1 Fan 7 1 Warming Rack 37 2 Bottom Pivot 8 1 Porcelain Grills 38 1 Left Door 9 1 Lid 39 1 Left Door Upper Pivot 10 2 Hinge Assembly 40 1 Left Pl
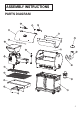
ASSEMBLY INSTRUCTIONS PARTS DIAGRAM 5
Hopper / Burner Assembly Body Frame Assembly 6
I. Assembling of Bottom Base 1. Turn the Platform (50) upside down so the lip is facing upward. 2. Insert the wheels (without brake) (48) in the screw holes. Tighten with wrench. Note: These wheels should be installed on the side with a lip. 3. Insert the wheel (with brake) (49) into the screw holes. Tighten with wrench. Note: These wheels should be installed on the side without a lip.
II. Mounting the Body Frame 1. Flip Platform (50) over so wheels are resting on the ground. 2. With the lip facing upward, secure Left Plate (40) to the Platform (50) with Bolt (52). 3. With the lip facing upward, secure Right Plate (45) to the Platform (50) with Bolts (52).
4. Secure Back Plate (44) to the Platform (50) with Bolt (52), connecting the Left Plate (40) and the Right Plate (45). 5. Attach the Beam (42) between Left Plate (40) and Right Plate (45) with Bolt (52). Note: The beam should face on the opposite of the back plate and the platform.
III. Assembling Of Hopper 1. Insert Hopper Assembly II (61) into Hopper Assembly I (3) so the bolt holes are aligned. 2. Insert the Bolts (60) through the holes in the Hopper. 3. Open the Hopper Lid and attach the Hexagon Kep Nuts (63) on the inside of the Hopper Assembly II. (61), then tighten it from inside. 63 4. Cover the hopper mouth while installing the handle. Screws may fall into the hopper mouth. Insert Hexagon Bolt (58) through Gasket (57) and lid (9) directly to the handle and tighten up.
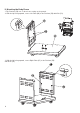
IV. Positioning the Chamber on the Body Frame Note: This step may lead to injury. We recommend that you have another person help with this set. Use caution with the Grill Chamber Assembly. 1. Uplift the Grill Chamber Assembly (1) on the Body Frame (4). 2. Make sure that the Grill Chamber Assembly (1) is between the left and right plate of the Body Frame (4). 3. Align the Chamber holes with the plate holes and secure with Bolts (52).
V. Mounting the Hopper to the Chamber 1. The Hopper has two Bolts with Gaskets attached on the side to be inserted into the Grill Chamber Assembly (1). Remove these components and set aside 2. Open the Grill Chamber Assembly (1) lid and then carefully insert the Hopper Bottom Cover (3) into open space where the Hopper is inserted into the Grill Chamber Assembly (1) 3. Reattach Bolts (58) and Gaskets (57) from step 1.
VI. Attaching the Chamber Door Handle Insert Hexagon Bolt (53) through Gasket (54) and Lid (9) directly to the handle and tighten up. VII. Attaching the Smoke Stack and Chimney Cap 1. Place Chimney Cap Assembly (14) over Smoke Stack Assembly (15) with screen facing towards Smoke Stack Assembly. 2. Twist Chimney Cap Assembly (14) into Smoke Stack Assembly (15) until secure 3.
VIII. Positioning the Door Handle 1. Align the holes in the Left Door (38) with the holes in a Handle (47) 2. Place a Gasket (54) on each Hexagon Bolt (53) 3. Screw in each hole 4. Tighten Hexagon Bolt (53) with a Wrench (59) to secure Handle to Left Door (38) 5. Repeat the previous step to assemble the Left Door (38) IX. Positioning the Door 1. Insert the Bottom Pivot (37) of the Right Door (46) with handle assembled into the small hole on Platform (50) 2.
X. Positioning the Heat Baffle 1. Position the Heat Baffle (5) with the notched legs facing downward over the brackets inside the walls of the Grill Chamber Assembly (1) 2. Slide Heat Baffle (5) into slots in Grill Chamber Assembly (1) and ensure everything is secure ALLGN WITH SLOTS AND INSERTTO HOLD IN PLACE XI.
XII. Positioning the Porcelain Grill 1. Place the Porcelain Grill (8) inside the cooking area in the Grill Chamber Assembly (1) 2. Place the Warming Rack (7) on the rack support with the lip facing toward the back of the Grill Chamber Assembly (1) XIII. Hang on the Grease Basket 1. Locate the Grease Drain Tube, which is on the right side of the chamber 2.
INITIAL FIRING INSTRUCTIONS Please read this manual carefully and follow it step by step before starting your Z Grills for the first time and each time the grill runs out of pellets. 1.Remove the Porcelain Grills, Grease Drain Pan and Heat Baffle from the interior of the grill. 2.Open the Pellet Hopper Lid, make sure there are no foreign objects in the Auger and Hopper. 3. With the Switch in the OFF(O) position, plug the power cord into 110 Volt AC grounded outlet. 4.
SUBSEQUENT START-UP Please take attention: If the grill fails to light or the fire in the Firepot goes out while cooking, it is vital to follow these steps when sufficient pellets are still in the Pellet Hopper. Failure to follow the steps may cause a hazardous “over-firing” of your grill due to an excess of unburned pellets in the Firepot. 1.Turn OFF the appliance and unplug the Power Cord. After the grill cools down, remove all food, the Porcelain Grills, Grease Drain Pan and the Heat Baffle. 2.
8. Turn on the grill and turn the Temperature Dial to any setting desired. With the lid closed, preheat the grill for 10 minutes before placing food. 2.Shutdown Cycle Auger turns off Fan continues to run for 5 minutes After finished cooking, turn the Temperature Dial to Shutdown Cycle position, the function of this setting to leave the Draft Induction Fan running for 10 minutes to burn redundant pellets in the fire pot.
OPERATING TIPS 1. Just like other barbecues, the actual temperature of this grill or the cooking times will be affected by external temperature, humidity, wind conditions, quality of pellets and so on. 2. It is better to shelter your grill from the wind, this will aid in temperature output, heat retention and heat recovery time when opening the grill lid. 3. Do not open the lid frequently, it will increase your cooking time. You can open the lid when you want the grill to cool down quickly. 4.
MAINTENANCE & CLEANING Your Z Grills also needs your maintenance. Make sure your grill is OFF and cold completely before performing any maintenance and cleaning. Grease: With long-term use, it caused the accumulation of grease on the Flue Lining, the Grease Drain Tube, the V-shaped Grease Drain and the Grease Drain Pan. Always be sure these grease catch area is clean and free of debris. You should check and clean these area periodically to reduce the risk of fire.
TROUBLESHOOTING CAUTION: Make sure the grill is completely cool and unplugged before you do any inspection, cleaning, maintenance or service work. Problem Grill does not work properly Potential Cause Solution Power Make sure the power cord is plugged in. Verify there is power at the electrical outlet. Fuse Remove the control, check the fuse on back. Replace the fuse if blown. Hot Rod If both of the Draft Inducer Fan and the Auger Driver Motor are operating, the Hot Rod needs to be replaced.
DIGTAL THERMOSTAT CONTROL WIRING DIAGRAM 23
Z GRILLS SUPPORT Thank you for shopping with us! If you have any question, feel free to contact us or your dealer. Z GRILLS INC. will offer the best technical and sales support in the industry. Please be prepared to provide the following information: Dealer's name, date of purchase Purchaser's name, phone number, address, Z Grills model number, serial number ,and part identification number from the COMPONENT LIST Please describe your problem accurately so that we can help you figure out.
Z GRILLS 3 YEARS LIMITED WARRANTY Z Grills Inc guarantees a 3 years warranty of our products from the date of purchase by the original owner against defects in all materials and workmanship. During the warranty period, Z Grills Inc will at its option repair or replace the defective parts. This limited warranty does not apply to paint, burn pot, grill cover or damage caused from corrosion. Z Grills shall not be liable for transportation charges, labor costs or export duties.