
User Guide


6 10-1-2013
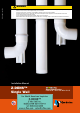
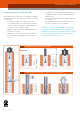
INSTALLATION OF THE COXDENS
®
PPS SYSTEM
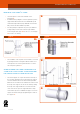
• Check the presence of the seals and their correct
placement; q
• Installation: before putting the sections together, the push in
spigot and the black seals have to be rubbed with special
Chloride free Pipe Lubricant (only obtainable at Cox Geelen
BV), so that a smooth installation is possible;
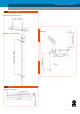
• A locking clamp is required at every vent joint. Slide the
locking clamp over the male-end of the pipe with the
hook facing the joint (Type w
a
for size 2”, 3”, 4” and Type
w
b
for size 5”, 6” and 8”);
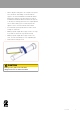
• The installation of the separate sections will be connected
by pushing the male-end together with the female-end
and snap the hook over the gasket bead to secure the
two vent parts together; e
ATTENTION: NEVER USE SCREWS OR ADHESIVES FOR
CONNECTIONS OF THIS SYSTEM. SYSTEM IS DESIGNED
FOR USE WITH CLAMPS AS STATED ABOVE ONLY!
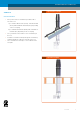
• The metal support can only be mounted on the body of
the vent pipe. Determine the location where the support
anchor bolt will mount into the wall or framing member.
Mount the anchor bolt into the wall at that location. Install
the body of the support onto the anchor bolt by rotating
the body of the support with the nut onto the threads
of the anchor bolt. Open the support bracket to wrap
around the body of the CoxDENS
®
vent pipe. Secure the
support around the vent pipe by tightening the 2 bolts of
the support. r
Installation Manual CoxDENS
®
PPs
Type B Type A
w
b
q
w
a
r
e