IEEE 802.11n Wireless LAN USB Adapter Model: XN-790 User’s Manual Version: 1.
Federal Communications Commission (FCC) Interference Statement This device, IEEE 802.11n Wireless LAN USB Adapter, complies with Part 15 of the FCC Rules. Operation is subject to the following two conditions: This device may not cause harmful interference. This device must accept any interference received; including interference that may cause undesired operation. This Equipment has been tested and found to comply with the limits for a Class B digital device, pursuant to Part 15 of the FCC rules.
Hereby, Company Name (申請或販售公司), declares that this device is in compliance with the essential requirements and other relevant provisions of the R&TTE Directive 1999/5/EC.
Technical Support The software version of the IEEE 802.11n Wireless LAN USB Adapter is displayed on the utility About window. Users could download the most recent software version from the supplier’s web site or refer to the selling contact for the latest software information. If you have difficulty solving the problem while installing or using the IEEE 802.11n Wireless LAN USB Adapter, please contact the supplier for support. About This Manual IEEE 802.
Table of Contents Technical Support ........................................................................................................................4 About This Manual .......................................................................................................................4 Table of Contents .........................................................................................................................5 Chapter 1.................................................................
Chapter 1 Preface This chapter introduces the IEEE 802.11n Wireless LAN USB Adapter and prepares you to use your wireless adapter. 1.1 About your IEEE 802.11n Wireless LAN USB Adapter The IEEE 802.11n Wireless LAN USB Adapter is a standard USB adapter that fits into any standard USB 2.0 and 1.1 slots in a notebook computer. Its IEEE 802.11n draft 2.0 compliant device that support 300Mbps rate gives equivalent Ethernet speed to access corporate network or the Internet in a wireless environment.
1.3 Applications The IEEE 802.11n Wireless LAN USB Adapter offers a fast, reliable, cost-effective solution for wireless client access to the network in applications like these: 9 Remote access to corporate network information E-mail, file transfer and terminal emulation. 9 Difficult-to-wire environments Historical or old buildings, asbestos installations, and open area where wiring is difficult to deploy.
1.4 Product Kit IEEE 802.11n Wireless LAN USB Adapter comes with the following items. Please go through each item below. If any of listed items appears to be damaged or missing, please contact your local dealer. z IEEE 802.11n Wireless LAN USB Adapter……………………… x 1 z USB Cable ………………………………………………………….. x 1 Software and Documentation CD …………………………...….... x 1 z 1.5 IEEE 802.11n Wireless LAN USB Adapter LED Indicators The IEEE 802.11n Wireless LAN USB Adapter has one LED indicators.
Chapter 2 Getting Started This chapter describes the instructions that guide you through the proper installation of your IEEE802.11n Wireless LAN USB Adapter for the Windows Vista/XP/2000 operating systems. 2.1 Installation Requirements Before installation, make sure you have computer with following: 9 A minimum of 5MB available hard disk space. 9 A minimum of 32 MB RAM 9 A computer equipped with USB slot, and socket services compliant with revision 1.1 or 2.0 of USB specification. 9 A CD-ROM drive.
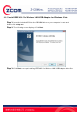
2.2.1 Install IEEE 802.11n Wireless LAN USB Adapter for Windows Vista Step 1: Insert the included CD into the CD-ROM driver on your computer. Locate and double-click setup.exe. Step 2: The following screen displays. Click Next. Step 3: Click Next to accept installing IEEE 802.11n Wireless LAN USB Adapter driver files.
Step 4: Click Next to accept the default file location or click Browse to select an alternate folder. Step 5: Select a program folder or type a new folder name and click Next.
Step 6: You may add a shortcut in the startup folder as desired and click Next. Step 7: The windows will appear the message about the windows can’t verify the publisher of this driver software compatibility with Windows Vista.
Step 8: Click on Finish to complete the installation. Step 9: Insert the IEEE802.11n Wireless LAN USB Adapter into the USB port on your notebook, and the Windows will auto-install the IEEE802.11n Wireless LAN USB Adapter driver and utility.
After the driver installed completed, the bellowing information will appear in the system tray. Click the icon, to conifgure the wireless LAN adapter via utility. To use the utility, please refer to Chapter 4.
2.2.2 Install IEEE 802.11n Wireless LAN USB Adapter for Windows XP/2000 Step 1: Insert the included CD into the CD-ROM driver on your computer. Locate and double-click setup.exe. Step 2: The following screen displays. Click Next. Step 3: Click Next to accept installing IEEE 802.11n Wireless LAN USB Adapter driver files.
Step 4: Click Next to accept the default file location or click Browse to select an alternate folder.
Step 5: Select a program folder or type a new folder name and click Next. Step 6: You may add a shortcut in the startup folder as desired and click Next. Step 7: Click on Finish to complete the installation.
Step 8: Locate an available USB port on the computer and insert the IEEE 802.11n Wireless LAN USB Adapter into the USB port. Step 9: After inserting USB Adapter into the USB port on your computer, Windows will auto-detect new hardware and will display a “Found New Hardware Wizard” window. Select “Install the software automatically (Recommended)” and press Next to install the driver.
Step 10: The windows will appear the message about the Network Control has not passed Windows Logo testing to verify its compatibility with Windows XP. Click on Continue Anyway button to continue installing. Step 11: The windows will find 802.11n Wireless LAN USB Adapter and start copying corresponding files into the system. Click on Next to continue.
Step 12: Click Finish to complete the installation.
After you install the driver and utility and insert your wireless USB adapter, the icon appears in the system tray. If the icon is blue and/or you see the following icon on your desktop, you’re already connected to a wireless network. Upon completion, clicking on the icon will open the configuration window. When you minimize the window, the system tray icon will be loaded in the System Tray again. The color behind the system tray icon indicates the link status. Refer to the following table for details.
Chapter 3 Wireless LAN Network This chapter provides background information on wireless LAN network. 3.1 Wireless LAN Overview This section describes applications of IEEE 802.11n Wireless LAN USB Adapter. 3.1.1 SSID The SSID is the unique ID used by Access Points and stations to identify a wireless Network. Wireless clients associating to any Access Point must have the same SSID. The default setting is ANY, which allows your IEEE 802.
3.2 Wireless LAN Security Overview Wireless LAN security is vital to your network to protect wireless communications against hacker entering your system and prevent unauthorized wireless station from accessing data transmitted over the network; the WLAN Utility offers a sophisticated security algorithm. Configure the wireless LAN security by clicking the check box next to Security Enable. A privacy Configuration window will appear. If you do not enable any wireless security on your IEEE 802.
3.2.1 Data Encryption with WEP WEP (Wired Equivalent Privacy) encryption scrambles all data packets transmitted between the wireless LAN adapter and the AP or other wireless station to keep network communications private. Both the wireless stations and the access points must use the same WEP key for data encryption and decryption. The IEEE 802.11n Wireless LAN USB Adapter allows you to configure up to four 64-bit, or 128-bit WEP keys and only one key is used as the default key at any one time.
wireless stations and encryption key management. Authentication can be done using an external RADIUS server. 3.2.2.1 EAP Authentication EAP (Extensible Authentication Protocol) is an authentication protocol which runs on the top of IEEE 802.1x transport mechanism in order to support multiple types of user authentication. By using EAP to interact with an EAP-compatible RADIUS server, an access point helps a wireless station and a RADIUS server perform authentication.
WPA-PSK: WPA offers a Personal mode of operation. In the Personal mode of operation, a pre-shared key is used for authentication. WPA-PSK allows you to gain access to a secured wireless network that the station and the access point use the same pre-shared key to authenticate. You must type a mixture of numbers and letters in the Pre-shared key section of this menu. You may input either 8-63 ASCII characters or 64 HEX characters. Choose WPA-PSK if needed from Authentication Mode.
WPA2: WPA2 provides a stronger encryption mechanism than WPA. WPA2 is the second generation of WPA security, providing personal and enterprise users with a high level of assurance that only authorized users can access to their wireless network. There is no difference between WPA and WPA2. The only difference is that WPA2 provides a stronger data encryption via the AES, contrast to WPA, which uses Temporal Key Integrity Protocol (TKIP). Choose WPA2 if needed from Authentication Mode.
WPA2-PSK: Like WPA, WPA2-Personal offers authentication via a pre-shared key. Pre-shared key is usually used for Personal authentication. Personal mode requires only an access point and client on the network. Similarly, you need to type a mixture of numbers and letters in the Pre-shared key section of this menu. You may input either 8-63 ASCII characters or 64 HEX characters. Choose WPA2-PSK if needed from Authentication Mode.
3.2.3.1 Encryption Mode WPA improves data encryption by using Temporal Key Integrity Protocol (TKIP), Message Integrity Check (MIC) and IEEE 802.1X. WPA2 use Advanced Encryption Standard (AES) in the Counter mode with Cipher block chaining Message authentication code Protocol (CCMP) to offer stronger encryption than TKIP. The encryption mechanism used for WPA(2) and WPA(2)-PSK are the same.
connect to a network. Other WPA2 authentication features that are different from WPA include key caching and pre-authentication. After you select the EAP type, you need to click Certification Tab to make advanced setting. The following describes configuration of each available EAP type. TLS: Clicking the Certification tab for TLS shows the following menu. TLS requires the entry of Certificate Information and Login Information for mutual authentication.
Figure 3.1 Figure 3.2 PEAP requires the use of Certificate Information and User Information. This utility will automatically identify Certificate Information and Login Information for users to configure PEAP easily. You only need to enter User Name and Password in the User information filed to authenticate (Figure 3.1). If you click the “Verify Server Certificate” check box, you are able to choose one of User Certificate from the drop-down menu.
TTLS: Clicking the Certification tab for TTLS shows the following menu. TTLS requires the mutual authentication between station and access points. You must present a User Name and Password in the User Information field that will be verified by TTLS-capable server. This mutual authentication ensures that only authorized users are allowed access to the network. 3.3 Authentication Type The IEEE 802.11b/g standard describes a simple authentication method between the wireless stations and AP.
Chapter 4 4.1 Use the Wireless LAN Utility The WLAN Utility enables you to make configuration changes and perform user-level diagnostics on your IEEE802.11n Wireless LAN USB Adapter in the Windows XP/2000 operating system environments. The WLAN Utility consists of window with 3 items for you to monitor and configure the IEEE802.11n Wireless LAN USB Adapter: Configuration, Site Survey and About. Configuration The Configuration item allows you to modify the configuration parameters for the IEEE802.
profile. With a profile activated, each time you start the wireless LAN adapter, it automatically scans for the specific SSID and joins that network with the pre-defined wireless security settings. To create the profile, go to the Profile field, type a profile name and set the corresponding parameters. If one of the profiles is no longer used, you may remove it by clicking the Delete button. After changing parameters, save the profile and click the Apply button to take effect.
Wireless Mode The wireless Mode supports three options 802.11B, 802.11B/G, and 802.11B/G/N. Power Saving Mode The Power Save option is designed to conserve battery life of you computer. When Power Save is enabled, your IEEE 802.11n Wireless LAN USB Adapter will go into sleep mode to minimize power consumption. Note: When power saving mode is enabled, the Access Points you use need to support power saving as well so that the communication can be established.
the wireless network. If your IEEE 802.11n Wireless LAN USB Adapter often transmits large files in the wireless network, you can enable the Fragmentation Threshold by clicking the Enable button and the mechanism will split the packet. The default value is Disable. Status: The Status field on the Configuration menu provides the following information. State: When operating in Infrastructure mode, this field shows the MAC address of the Access Point with which the IEEE 802.
You can click the Rescan button to force the radio to rescan all available channels. If your link quality or signal strength is poor, rescanning can be used to push the radio off a weak Access Point and search for a better link with another Access Point. Site Survey: Use the Site Survey screen to scan for and connect to a wireless network automatically. By clicking the Rescan button, the AP Browser can display Access Points around the working environment.
Chapter 5 Management with Wireless Zero Configuration This chapter shows you how to manager your IEEE 802.11n Wireless LAN USB Adapter using the Windows Vista and Windows XP wireless zero configuration tool. 5.1 Windows XP Wireless Zero Configuration Step 1: Make sure the Use Windows to configure my wireless network settings check box is selected in the Wireless Network Connection Properties.
Step 3: In the Wireless Network Connection Status screen, click View Wireless Networks to open the Wireless Network Connection screen. Step 4: Click Refresh network list to reload and search for available wireless devices within transmission range. Select a wireless network in the list and click Connect to join the selected wireless network.
5.2 Windows Vista WLAN AutoConfig Step 1: Click the network icon for wireless connections in the system tray to open the Wireless Network Connection Status screen. Step 2: Select the Connect to a network to open the Connect to the network screen. Step 3: Select a wireless network in the list and click Connect to join the selected wireless network.
If the wireless security is activated for the selected wireless network, the related fields must be set to the same security setting as the associated AP. Step 4: Click Connect to connect the wireless network.
Limited Warranty This Warranty constitutes the sole and exclusive remedy of any buyer or reseller’s equipment and the sole and exclusive liability of the supplier in connection with the products and is in lieu of all other warranties, express, implied or statutory, including, but not limited to, any implied warranty of merchantability of fitness for a particular use and all other obligations or liabilities of the supplier.
This warranty is contingent upon proper use in the application for which the products are intended and does not cover products which have been modified without the reseller’s approval or which have been subjected to unusual physical or electrical demands or damaged in any way. S ervice C entre: C OMPANY NAME : ZC OMAX TE C HNOLOGIE S , INC . ADDR E S S : 13850 C E R R ITOS C OR POR ATE DR .
Please complete the information below and include it along with your products. Name: Title: Company: Telephone: Fax: Email: City/State/Zip code: Country: Product Name: Serial Number: MAC Address: Invoice Date: Product Description: If you have any further questions, please contact your local authorized reseller for support.