3-4 Set up Wireless LAN PC Card for Windows 98/ ME Step 1: After inserting the 11Mbps Wireless LAN PC Card into the PCMCIA slot on your notebook, Windows will auto-detect new hardware and will display an “Add New Hardware Wizard” window. Click Next to continue. Step 2: Select “Search for the best driver for your device (Recommended)” and click Next.
Step 3: Insert the Product CD-ROM into the CD-ROM drive. Select the “CD-ROM drive” check box and click on Next to install the driver. Step 4: The Windows will find “IEEE 802.11 Wireless LAN/PC Card”. Click Next to continue.
Step 5: Once the [Please insert the disk labeled ‘Windows 98 Second Edition CD-ROM/ME CD-ROM”, and then click OK] window appears, inset enter the path corresponding to the appropriate drives and click OK. Usually these files can be found at C:Windows or C:Windows\system. Step 6: Click Finish to complete the software installation. Step 7: Restart the computer.
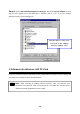
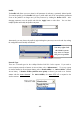
Step 8: Open Control Panel/System/Device Manager, and check Network Adapters to see if any error icon appears next to the IEEE 802.11 Wireless LAN PC Card. If no, your 11Mbps Wireless LAN PC Card is working well.
You are advised to always disable the PC Card prior to removing the card from the PC Card slot. This will allow the Windows operating system to: n n n Log off from the network server. Disable the 11Mbps Wireless LAN PC Card driver. Disconnect power to the PC Card slot (which will extend battery life for mobile computers) To stop using the 11Mbps Wireless LAN PC Card, do the following steps: 1. Click once on the PC Card icon on the right side of the Windows task bar. 2. Select the option “Stop IEEE 802.
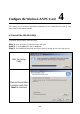
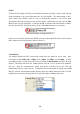
Configure the Wireless LAN PC Card 4 This chapter gives you assistance with detailed configuration for the 11Mbps Wireless LAN PC Card under Windows XP/2000/NT/98/ME. 4-1 Install the WLAN Utility To install the WLAN Utility, follow these steps: Step 1: Insert the Product CD-ROM or floppy disk again. Step 2: Go to the utility folder and run setup.exe. Step 3: The InstallShield Wizard will show up and guide you through the rest of the setup process.
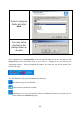
Select a program folder and click Next You may add a shortcut in the startup folder as desired Upon completion, go to Program Files and run the WLAN Utility and its icon will appear in the System Tray in the bottom right corner of your task bar. Clicking on the icon will open the configuration window. When you minimize the window, the system tray icon will be loaded in the System Tray again. The color behind the system tray icon indicates the link status: Blue indicates a good or excellent link.
4-2 Use the WLAN Utility The WLAN Utility enables you to make configuration changes and perform user-level diagnostics on your 11Mbps Wireless LAN PC Card in the Windows XP/2000/NT/98/ME operating system environments. The WLAN Utility consists of window with 5 items for you to monitor and configure the 11Mbps Wireless LAN PC Card: Configuration, Link Test, AP Browser, Site Survey and About.
Profile The Profile field allows you to set values for all parameters by selecting a previously defined profile. To create the profile, go to the Profile field, type a profile name and set the corresponding parameters. If one of the profiles is no longer used, you may remove it by clicking the Delete button. After changing parameters, save the profile and click the Apply button to take effect. You can have multiple profiles and modify the profile at any time.
ESSID The ESS ID is the unique ID used by Access Points and stations to identify a wireless LAN. Wireless clients associating to any Access Point must have the same ESSID. The default setting is ANY, which allows your Wireless LAN PC Card to automatically associate to any Access Point (Infrastructure mode) in the vicinity of your wireless adapter. Alternatively, you may check the ESS ID check box to specify the ESS ID. It will then attempt to associate with Access Points or stations with the same ESS ID.
WEP To prevent unauthorized wireless stations from accessing data transmitted over the network, the WLAN Utility offers highly secure data encryption, known as WEP, making your data transmission over air more secure. To activate the WEP Encryption, check the WEP Enabled check box. An Encryption window will then appear. The instructions are as follows: Ø Pull down the Encryption (WEP) menu and select either 64bit or 128bit encryption method. Ø Specify the encryption keys.
Create Encryption Keys Manually You can also create encryption keys manually by clicking the Create Keys Manually check box. For 64bit encryption you may choose: n Alphanumeric: 5 characters (case sensitive) ranging from “a-z”, “A-Z” and “0-9” (e.g. MyKey) n Hexadecimal: 10 hexadecimal digits in the range of “A-F”, “a-f” and “0-9” (e.g. 11AA22BB33) For 128bit encryption you may choose: n Alphanumeric: 13 characters (case sensitive) ranging from “a-z”, “A-Z” and “0-9” (e.g.
Advance The WLAN Utility also offers the advanced configuration for user to set the 11Mbps Wireless LAN PC Card under certain network environment. These advanced options include Power Management, RTS/CTS and Fragmentation Threshold. To enable the advanced configuration, go to the Configuration tab and click the Advance button. Power Management The Power Save option is designed to conserve battery life of you computer.
Thus, the RTS Threshold mechanism provides a solution to prevent data collisions. When you enable RTS Threshold on a suspect “hidden station”, this station and its Access Point will use a Request to Send/Clear to Send protocol (RTS/CTS). The station will send an RTS to the Access Point, informing that it is going to transmit the data. Upon receipt, the Access Point will respond with a CTS message to all station within its range to notify all other stations to defer transmission.
Status: The Status field on the Configuration menu provides the following information. State: When operating in Infrastructure mode, this field shows the MAC address of the Access Point with which the Wireless LAN PCMCIA Card is communicating. When operating in Ad-Hoc mode, it shows the virtual MAC address used by computers participating in the Ad-Hoc network. Current Channel: Shows the channel on which the connection is made. Current Tx Rate: Shows the highest transmit rate of the current association.
Link Test: The Link Test tool helps you examine data transmission quality between your 11Mbps Wireless LAN PC Card and any workstation on the network. By entering IP address of 2 remote station, setting ping interval and packet size, you may know whether communication has been made successfully or not. Additionally, you may run the loopback test by clicking the Look back button to verify the communication quality between your wireless station and Access Point.
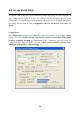
Site Survey: When the Site Survey screen is displayed, the channel quality of all 14 radio channels will be displayed. These channel quality measurements are shown on each gauge for the 14 radio channels. The blue bar indicated the channel quality is clear and good. The higher the blue bar is, the better quality you have (i.e., less interference). The yellow bar indicates the channel quality is fair and the red bar indicates the channel is busy or having severe interference.
Limited Warranty This Warranty constitutes the sole and exclusive remedy of any buyer or reseller’s equipment and the sole and exclusive liability of the supplier in connection with the products and is in lieu of all other warranties, express, implied or statutory, including, but not limited to, any implied warranty of merchantability of fitness for a particular use and all other obligations or liabilities of the supplier.
Please complete the information below and include it along with your products. Name: Title: Company: Telephone: Fax: Email: City/State/Zipcode: Country: Product Name: Serial Number: MAC Address: Invoice Date: Product Description: If you have any further questions, please contact your local authorized reseller for support.