802.
FCC Information This device complies with Part 15 of the FCC Rules. Operation is subject to the following two conditions: (1) this device may not cause harmful interference, and (2) this device must accept any interference received; including interference that may cause undesired operation. Federal Communications Commission (FCC) Statement This Equipment has been tested and found to comply with the limits for a Class B digital device, pursuant to Part 15 of the FCC rules.
Table of Content Chapter 1 Introduction....................................................................................................... 3 1-1 Features and Benefits .................................................................................................. 3 1-2 Applications ................................................................................................................ 4 Chapter 2 Hardware Installation.............................................................................
Chapter 1 Introduction The 802.11g SMB Wireless Access Point is 2.4GHz and up to 54Mbps wireless LAN access point. The 802.11g SMB Wireless Access Point can communicate with other mobile devices enabled for 802.11g standard-based wireless LAN connectivity. Using the card in conjunction with the 802.11g SMB Wireless Access Point, you can create a wireless network for sharing your broadband cable or DSL Internet access among multiple PCs in and around your home or office and enjoy amazing speed of 54Mbps.
1-2 Applications The 802.11g SMB Wireless Access Point offers a fast, reliable, high- speed, and high security solution for wireless clients access to the network in applications like these: 1. Remote access to corporate network information E- mail, file transfer and terminal emulation. 2. Difficult-to-wire environments Historical or old buildings, asbestos installations, and open area where wiring is difficult to deploy. 3.
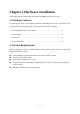
Chapter 2 Hardware Installation This chapter describes initial setup of the 802.11g SMB Wireless Access Point. 2-1 Package Contents The package you have received should contain the following items: If any of the above items are not included or damaged, please contact your local vendor for support. • 802.11g SMB Wireless Access Point… … … … … … … … … … ...… … … … … ..x1 • Power Adapter… … … … … … … … … … … … … … … … … … … … … … … … … x1 • Product CD… .
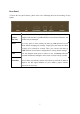
2-3 Mechanical Description Front Panel The front panel provides LED’s for device status. Refer to the following table for the meaning of each feature. LED PWR STATUS Description Off 802.11g SMB Wireless Access Point is off. On 802.11g SMB Wireless Access Point is in service. Off Indicates that leaving boot-code mode. On Indicates that entering boot-code mode. TEST LAN Off 1.Reset button is pressed around 3 seconds (slow blinking). 2. Reset button is pressed after 3 seconds (fast blinking). 3.
Rear Panel To know the rear panel features, please refer to the following table for the meaning of each feature. Power Socket (DC 12v) Connect the DV 12V/1.2A power supply. ONLY use the power adapter supplied with the 802.11g SMB Wireless Access Point. Otherwise, the product may be damaged. Reset It is very quick to reset (reboot) the 802.11g SMB Wireless Access Point without changing any settings. Simply press the button and keep pressing it for around 10 seconds. Then, you can reset the 802.
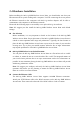
2-4 Hardware Installation Before installing the 802.11g SMB Wireless Access Point, you should make sure tha t your Ethernet network is up and working with a computer. You'll be connecting the access point to the Ethernet network so that computers with 802.11 g wireless adapters will be able to communicate with computers on the Ethernet network. Please take the fo llowing steps to successfully to set up the 802.11g Access Point. Note: We suggest you first install the 802.
n Connect the Power Cable Connect the power adapter to the power socket on the 802.11g SMB Wireless Access Point, and plug the other end of the power into an electrical outlet. Warning: We cannot assume the responsibility for the damage from using with the other power adapter supplier. n n Configure the wireless device settings To access the 802.11g SMB Wireless Access Point, wireless device needs to configure the 802.11b or 802.11g Wireless Adapter to use the 802.
Chapter 3 Configuring your Access Point with the Web-Based User Interface 3-1 Start-up and Log in In order to configure the Access Point, you must use your web browser and please do the following: 1. Type this Access Point’s address http://192.168.0.222 in the Location (for IE) or Address field and press Enter. 2. Enter the system name (the default setting is “admin”) and password (the default setting is “password”). 3. Click on the “Login now” button. 4. The main page will appear.
About The About screen describes the product information briefly. The product information includes Access Point Information, Current IP Settings, and Current Wireless Settings.
3-2 IP Setup WAN Setup The Access Point Name is used to give a name to your Access Point. This will enable you to manage your Access Point more easily if you have multiple Access Points on your network. Please choose the WAN Port. Ø None(Bridge-only): The Access Point is acting as a wireless bridge. Ø Ethernet and Wireless: The Access Point is acting as a wireless router. After selecting the correct WAN port, you need to give your access point WAN Port IP Address / AP’s IP Address.
Ø Obtain IP Automatically from DHCP Server: If you would like the Access Point to obtain the IP address from the DHCP server on your network automatically, click the check box next to “Obtain IP Automatically from DHCP Server”. Ø PPPoE: If you would like to use PPPoE, you need to enter: Server Name: Enter the server name of your ISP account. Username and Password: Enter the username and password of your ISP account.
LAN Setup The settings for LAN Setup of the Wireless Access Point can be viewed and changed here. After applying the settings, remember to reboot the Access Point to save your settings.
3-3 Wireless Setup Wireless LAN The Wireless LAN Setup page lets you make changes to the wireless network settings. From this window you can make changes to the wireless network name Country / Region, Operating Mode , SSID, Broadcast SSID, Wireless Mode , Channel/Frequency, Data Rate, and Output Power. Country / Region: Allow you to select country domain in case there is any chances that you would use wireless network in other countries.
Broadcast SSID: For security concern, you can choose not to broadcast your network’s SSID. To turn off the broadcast of the SSID, click “No” check box next to “Broadcast SSID”. And your Access Point will refuse the connection requests from whose are not aware the Network ID. But certainly the Access Point can be easily connected well when you realize the Network ID. The default setting is “Yes”. Wireless Mode: There are three different wireless modes to operate, “Auto (802.11g and 802.11b)”, “802.
Security Settings To prevent unauthorized wireless stations from accessing data transmitted over the network, the 802.11g SMB Wireless Access Point WEP Security Configuration window offers data encryption, known as WEP (Wired Equivalent Privacy), making your data transmission over air more secure and allows you to specify Encryption Key(s) if you enable encryption for the 802.11g SMB Wireless Access Point. For a step-by-step treatment of security configuration, please do the following: 1.
2. Select the Encryption Strength For 802.11g, you must have four Encryption Keys set, and all keys must have the same encryption strength. Your Access Point can operate in four different encryption strength, “none”, “64-bit”, “128-bit”, and “152-bit”. 3. Set up Security Encryption Keys There are two methods for creating WEP data encryption: l Using a Passphrase: Type in a passphrase and click “Generate Keys”. Passphrase can be a mixture of numbers and letters.
Access Control The Access Control allows you to restrict wireless access by MAC Address. This provides an additional layer of security. Follow these steps: 1. In 802.11g SMB Wireless Access Point’s left page, choose the Access Control option from the Wireless Setup. 2. If you want to enable filtering of computer by their MAC Address, click the check box next to “Turn Access Control on”. 3.
WDS Mode The feature lets you extend the range of your network without having to use cables to link the Access Point, meaning that you can link the Access Points wirelessly. Under WDS, your Access Points are still functioning as a regular Access Point, which can provide the link services to wireless clients. To use WDS by clicking the check box next to “Enable WDS Mode ”.
Configure a Wireless Point-to-Point Bridge To activate the Point-to-Point Bridge mode please do the following: 1. Configure WDS mode for both Access Point: Ø Configure both AP1 on LAN Segment A and AP2 on LAN Segment B in Point-to-Point Bridge mode. Ø AP1 must have AP2’s Mac address and enter it in the Remote MAC Address field. Ø AP2 must have AP1’s Mac address and enter it in the Remote MAC Address field.
Configure a Wireless Point to Multi-Point Bridge To activate the Point-to Multi-Point Bridge mode please do the following: 1. Configure WDS mode for each Access Point: Ø Configure AP1, AP2, and AP3 in Point-to Multi-Point Bridge mode. Ø Verify that AP1 on LAN Segment A with the Remote MAC Address of AP2 and AP3. Ø Verify that AP2 on LAN Segment B with the Remote MAC Address of AP1 and AP3. Ø Verify that AP3 on LAN Segment C with the Remote MAC Address of AP1 and AP2. 2.
Configure a Repeater with Wireless Client Association To activate the Repeater with Wireless Client Association, please do the following: 1. Configure WDS mode for each Access Point: Ø Configure AP1 on LAN Segment A in Repeater mode with the Remote MAC Address of AP2. Ø Configure AP2 on LAN Segment B in Repeater mode with the Remote MAC Address of AP1 and AP3. Ø Configure AP3 on LAN Segment C in Repeater mode with the Remote MAC Address of AP2. 2. The device under the repeater mode also can be an AP mode.
Wireless Parameters These parameters can be changed if needed, but the default advanced setting usually work well. It is recommended that you keep all these values in factory default. RTS Threshold: RTS Threshold is a mechanism implemented to prevent the “Hidden Node” problem. If the size of the packet transmitted is larger than the value you set, the RTS will be enabled. When the RTS is activated, the station and its Access Point will use a (RTS/CTS) mechanism for data transmission.
Space In Meter: This space in meter is used for extending ACK time-out destination. The setting range is 0-36000. Preamble Type: The preamble defines the length of the PLCP synchronization field for communication between the Access Point and Network Card. (Short. Preamble is more efficient but less compatibility) Select the appropriate preamble type and click the Apply button to set it.
3-5 Management Change Password Here allow you to change the Access Point’s password, do the following: 1. To change the current password, choose the “Change Password” option from the “Management” section in the 802.11g SMB Wireless Access Point’s left page. Key in the default password “default ” in the “Current Password” filed. 2. Changing password for the Access Point is as easy as typing the password into the New Password field. Then, type it again into the Retype New Field to confirm.
Upgrade Firmware The Upgrade Firmware menu will display the Upgrade Firmware window so that you could update the latest firmware on the 802.11g SMB Wireless Access Point. Please make sure that you have downloaded the latest and correct firmware from the product support website and store it in local drive before upgrading the firmware of the 802.11g SMB Wireless Access Point. To upgrade the latest firmware, complete the following: l Using browser to access (192.168.0.222) AP’s main page. 1.
Backup / Restore Settings The current system settings can be backup as a file onto the local hard drive by clicking “Backup”. The saved file can be loaded back on the Access Point by clicking “Browse”. When you have selected the settings file, click “Retrieve” to begin the process. Furthermore, you may click “Restore ” to factory default settings. Reboot AP The Reboot AP screen enables you to reboot your 802.11g Wireless Access Point.
3-6 AP Status Connections The station list page displays the association condition of AP includes ID, MAC Address, and Status. To display the Station List, follow these steps: 1. In 802.11g SMB Wireless Access Point’s left page, choose the Connection option from AP Status. 2. The Station List window will display. 3. By clicking the “Refresh” button, the AP Browser will reload and show the associated wireless stations that are currently part of its Basic Service Set (BBS).
Chapter 4 Troubleshooting Q1. Why can’t I connect to Internet? 1. Make sure that your DSL or Cable modem is running correctly. 2. The cable is connected properly form the WAN port of the access point to your DSL or Cable modem. 3. Make sure that the right WAN Setup is used in the web configuration. 4. Make sure that the username and password input in the WAN Setup is correct. Q2. Why can’t I access my 802.11g 1. Make sure that your AP is powered on. Wireless LAN AP? 2.
Q3. How can I reset my 802.11g 1. Follow these steps to perform a Factory Reset Wireless LAN AP to factory using the Reset button on the back of the 802.11g default? Wireless LAN AP. l With the unit on, press and hold the Reset button with a pen or paper clip. l Hold the reset button for about 10 seconds until the Status LED on the front panel blinks very quickly and then release. l Wait a few seconds for the AP to reboot using default settings. 2.
Q5. Why can’t I access the Wireless AP from a wireless network card? 1. Make sure that Mode, SSID, Channel and encryption settings are set the same on each wireless adapters. 2. Make sure that your computer is within range and free from any strong electrical devices that may cause interference. 3. Check your IP address to make sure that it is compatible with the Wireless AP. Q6. How do I know if my computer is connected to the Wireless AP? 1.
Limited Warranty This Warranty constitutes the sole and exclusive remedy of any buyer or reseller ’s equipment and the sole and exclusive liability of the supplier in connection with the products and is in lieu of all other warranties, express, implied or statutory, including, but not limited to, any implied warranty of merchantability of fitness for a particular use and all other obligations or liabilities of the supplier.
Please complete the information below and include it along with your products. Name: Title: Company: Telephone: Fax: Email: City/State/Zip code: Country: Product Name: Serial Number: MAC Address: Invoice Date: Product Description: If you have any further questions, please contact your local authorized reseller for support.