User Manual
Table of Contents Table of Contents ................................................................................................. 2 Hello from Coolpad .................................................................................................. 4 Getting started ......................................................................................................... 5 Device layout.......................................................................................................................
Adding a friend................................................................................................................................................ 20 Alarm .............................................................................................................................................................. 20 Activity ............................................................................................................................................................ 22 Settings ...
Hello from Coolpad Thank you for purchasing your Coolpad Dyno smartwatch! Please follow these simple but important instructions for optimal use of your new device. Application features and functions may vary among countries, regions or hardware specifications, and any third-party application malfunctions are the responsibility of those manufacturers. Exercise caution when editing User Registration Settings as this may cause functional or compatibility problems for which Coolpad will not be responsible.
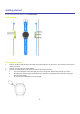
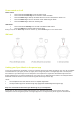
Getting started Get off to a running start with your new Coolpad Dyno! Device layout Charging the battery 1. 2. 3. Connect the Micro USB side of the data cable to the Micro USB port on your device. This is located on the top left side of your watch. Connect the USB end to the travel adapter. Connect the travel adapter to an electrical outlet to fully charge your watch. Use the travel adapter that comes with your device; using other adapters may damage your watch.
Power watch on & off Power button: Press and hold the Power key to turn the watch on/off. Press and hold the Power key for 10 seconds to restart the watch. Press the Power key to wake up the watch when the screen is dark, but the watch is on. Press the Power key to return to the home screen while using the watch. Press the Power key to silence an incoming call. SOS button: Press and hold the SOS key for 5 seconds to enable the SOS feature. Press the SOS key to go back while using the watch.
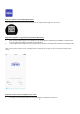
Step Two: Activate your Coolpad Dyno Watch. Insert the SIM card into the watch and turn the device on. A QR Code will appear on the screen. Step Three: Register as a guardian using the Dyno Watch app. 1. 2. Open the Dyno Watch app on your smartphone. Tap the method of registration you would like to continue with. You can register with either a Facebook or Gmail account. Link the app to your smartphone by entering your phone number. You will be asked to obtain a verification code.
2. 3. Use your smartphone to scan the QR code on the watch and tap Next. (Note: you can also enter the watch IMEI number, found in Settings > About watch to pair without scanning the QR code). Enter a name for the watch, select your relationship to the child and tap Done. Note: The first person that completes this process will become the Primary Administrator of the watch.
Using the Dyno Watch app The Dyno Watch app Watch Guardians use the Dyno Watch app to connect and communicate with the watch. Guardians and contacts The Primary Administrator can use the Dyno Watch app to register up to 5 additional phone numbers as Family/Guardians in the watch. Dyno Watch Guardians can call and message the Dyno Watch from their registered phone number through the app and receive calls from the watch.
Watch SOS button is activated Use the Dyno Watch app to manage contacts X Use the Dyno Watch app to set up geo-fences, manage restricted usage time, and assign activity reminders and tasks X To view the watch’s list of family member and friends, tap in the top left corner of the app home screen, and then tap Watch contacts. Adding contacts As the primary administrator, you can manage the watch’s contacts from the Dyno Watch app. To add a contact to the watch: 1. Tap 2. 3. Then tap Watch contacts.
1. Tap 2. 3. 4. Then tap Watch contacts. Tap the contact group you would like to remove a contact from (Family list or Friends list) Tap the contact you would like to delete, and then tap Delete at the bottom of the screen. in the top left corner of the app home screen. Add another Dyno Watch Each Guardian can have up to 10 Dyno Watches connected to their app. To add another watch: 1. Tap in the top left corner of the app home screen, 2.
Send a message from the Dyno Watch app Family/Guardians are only able to send emojis, and voice messages to the watch from the app. To message the watch, tap from the app home screen and choose who you would like to send the message to. Note: The group chat includes all the watch’s family members/guardians. Edit watch pre-loaded messages The Primary Administrator can manage pre-loaded messages from the app.
Note: Location information may be unavailable, inaccurate or incomplete depending on your watch’s surroundings. GPS location is dependent on the watch being able to receive signals from multiple satellites for triangulation. If the surrounding environment (i.e. buildings or trees) prevent the watch from getting a signal, it cannot determine and report its location. Previous tracks To view previous location history for the watch, tap the watch picture and then tap the green icon .
4. Whenever the User completes the task, tap to turn the star gold. The User will receive a notification on their watch that the Primary Administrator acknowledged that they completed a task. 5. After all the stars are gold (the series of tasks is complete), you and the User will receive a notification.
Activity reminders The Primary Administrator can set up activity notifications for the watch from the Dyno Watch app. The watch will receive a notification when it is time for the activity. 1. 2. 3. From the home screen, tap in the top right corner, and then tap Activity reminder. Tap to create a new activity reminder and then tap which type of reminder you would like to create (Wake up, Bedtime, Birthday or Custom). Enter the time, date and frequency you would like the reminder to occur, then tap Save.
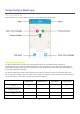
Watch settings From the app, you can see and control several of the watch’s settings. Tap in the top left corner of the app home screen. Here you can quickly see the watch’s signal, battery life, and current number of steps at the top of the screen. Tap then tap Watch settings. You will be able to see the following: Restricted usage: Tap to manage restricted usage time. Receive push message: Tap switch to On to receive notifications. Electronic fence: Tap to manage geo-fences.
Message center Power on/off record: See the power on/off history of the watch. Call history: View the watch’s call history. New friends: View recently added friends on the watch.
Using the Dyno Watch Explore what the Dyno Watch can do and practice making and receiving calls. Basic layout Change the watch face The watch face can be set to either digital or analog. To switch the watch face, swipe down from the top of the screen and swipe left or right to switch between watch faces. Tap which one you would like to choose. Phone Making a call 1. Slide left from the home screen and tap either Family or Friends. 2. Tap the name of the contact you would like to call. 3. Tap to call.
To answer an incoming call, tap . Ending a call To end a call, tap . Messaging 1. Slide left from the home screen and tap Friends or Family. 2. Tap the name of the contact you would like to message. 3. Tap and hold 4. Touch to send voice message. to send an emoji.
5. Swipe from the bottom of the screen to the top of the screen to view pre-loaded messages. Tap the message to select. Adding a friend A User with a Dyno Watch can add a friend who also has a Dyno Watch via Bluetooth. The Users need to be near each other for the watches to connect. 1. From the home screen, swipe left until you reach the Add friend screen. 2. While in proximity of each other, have both Users tap the green Add friend button. 3. You will be notified that the friend was successfully added.
2. Tap to create a new alarm. If there are already alarms set in the watch, tap 3. Enter the time you would like to set the alarm for. Tap to cancel, or tap 4. Enter the frequency that you would like the alarm to go off. Tap Delete an alarm 1. From the home screen, slide right and tap Alarm. 2. Tap the alarm you want to delete. 3. Tap to delete the alarm. 21 to add a new one. to save and move on. to cancel, or tap to save the alarm.
Activity Step count 1. Slide right from the home screen and tap My Activity. 2. Tap to view the current day’s step count. Calendar 1. Slide right from the home screen and tap My Activity. 2. Tap to enter the calendar screen and view reminders. You can tap the forward and backward arrows to view different dates. Tasks 1. Slide right from the home screen and tap My Activity. 2. Tap to view tasks. 3. If there is a task, it will display the task and star(s) earned.
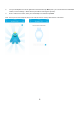
4. When you complete a task and receive a star, the watch will send a notification. Settings Volume 1. Slide right from the home screen and tap Settings. 2. 3. Select to view volume adjustment settings. Tap screen to adjust volume. There are four volume levels. The louder the volume, the larger the yellow circle. Brightness 1. Slide right from the home screen and tap Settings. 2. 3. Select to view brightness adjustment settings. Tap screen to adjust brightness. There are three brightness levels.
Language 1. Slide right from the home screen and tap Settings. 2. 3. Tap to view language settings. Choose desired language (English, Spanish or Chinese). Ringtone 1. Slide right from the home screen and tap Settings. 2. 3. Tap to access ringtones. Choose which ringtone you would like for when the watch has an incoming call. About watch 1. Slide right from the home screen and tap Settings. 2. Tap to see the QR code, IMEI, and SN number of watch. System update 1.
At the end of the My family contact list, there is a contact titled User or the Primary Administrator. When this contact is selected, it will ask the User to confirm that he or she wants to call 911. To confirm, the User must tap Emergency. This cannot be changed or edited by the to continue the call. After a call to 911 is made, the watch will be able to receive a call from any number for 10 minutes.
Your Dyno Watch comes with two different color watch bands. The watch bands are standard 22mm. The bands connect to the watch with a spring bar, which passes through the loop hole in the band and fits into indents in the watch. Removing the band To remove the band, you need to remove the spring bar. To do this, you can use a spring bar tool, something similar, or your hands. Insert the tool in between the band and where it connects to the watch and press the bar in (away from the watch).
Stay Connected & Get Updates Get updates, user guides and more information about your Coolpad Dyno Watch at www.coolpad.us.
Specs & hardware Specifications Dimensions 47.2mm*14.65mm Antenna Built-in SIM card Nano SIM Network Mode GSM, UMTS and LTE Screen Parameters Type Screen Size Resolution TFT 1.22 inches 240*204 Accessories Battery Battery Type Lithium Ion Polymer Rechargeable Battery Rated Capacity 605mAh Nominal Voltage 3.85 V Note: The battery capacity is subject to update and change.
Declaration of hazardous substances Toxic or hazardous substances or elements Parts Name Plumbum (Pb) Mercury (Hg) Cadmium (Cd) Chromium VI (Cr(VI)) Polybrominated Biphenyls (PBB) Polybrominated Diphenyl Ethers (PBDE) PCB Board & Accessories ○ ○ ○ ○ ○ ○ Plastics ○ ○ ○ ○ ○ ○ Metals ○ ○ ○ ○ ○ ○ Battery ○ ○ ○ ○ ○ ○ Other ○ ○ ○ ○ ○ ○ ○: indicates that the content of the toxic or hazardous substance in all homogeneous materials is within the limit of the SJ/T11363-2006 st
Health/Safety/Warranty Guide Important Health Information and Safety Precautions When using this product, the safety precautions below must be taken to avoid possible legal liabilities and damages. Retain and follow all product safety and operating instructions. Observe all warnings in the product operating instructions. To reduce the risk of bodily injury, electric shock, fire and damage to the equipment, closely observe all of the following precautions.
Safety Precautions for Direct Sunlight Store this product away from excessive moisture and extreme temperatures. Do not leave the product or its battery inside a vehicle or in places where the temperature may exceed 60°C (140°F), such as on a car dashboard, window sill, or behind glass that is exposed to direct sunlight or strong ultraviolet light for extended periods of time. This may damage the product, overheat the battery, or pose a risk to the vehicle.
Battery Information and Precautions To assure product safety, there shall be precautions below. Danger! - Use dedicated chargers and follow the specified conditions when charging the device. - Use the device only with the specified equipment. - Do not put or store device together with metal articles such as necklaces, hairpins, coins, or screws. - Do not short circuit the (+) and (-) terminals with metal conductors. - Do not place product in a device with the (+) and (-) in a reverse way.
3. 4. 5. 6. 7. 8. 9. The Travel Charger shall be used for I.T. equipment only. For indoor use only. Cleaning – Unplug this from the wall outlet before cleaning. Do not use liquid cleaners or aerosol cleaners to clean; use only a dry cloth. Water and moisture – Do not use this product under moist environment. Self-servicing – Attempting to service this product on your own, or opening or removing device covers may result in exposure to dangerous voltage or other hazards.
Commission on Non-Ionizing Radiation Protection. Those standards were based on comprehensive and periodic evaluations of the relevant scientific literature. For example, over 120 scientists, engineers, and physicians from universities, government health agencies, and industry reviewed the available body of research to develop the ANSI Standard (C95.1). The design of your wireless device complies with the FCC guidelines (and those standards).
deployment area. If in-vehicle wireless equipment is improperly installed and the air bag inflates, serious injury could result since air bags inflate with great force. Safety Information Please read and observe the following information for safe and proper use of your wireless device and to prevent damage. Also, keep the user guide in an accessible place after reading it for ease in locating it for future reference. Violation of the instructions may cause minor or serious damage to the device. 1. 2. 3.
6. 7. 8. Do not paint your device. Device data, including contact information, ringtones, text messages, pictures, etc., may be inadvertently deleted due to careless use, device repair, or software upgrades. Please back up your important contact numbers and all other vital data. Note: Neither the manufacturer nor any person or entity associated therewith is liable for any damages whatsoever due to loss of any or all data stored on any of your devices.
The U.S. Food and Drug Administration’s (FDA) Center for Devices and Radiological Health Consumer Update on Wireless Devices: 1. What is the FDA's role concerning the safety of wireless devices? Under the law, the FDA does not review the safety of radiation-emitting consumer products such as wireless devices before they can be sold, as it does with new drugs or medical devices.
These studies investigated possible associations between the use of wireless devices and primary brain cancer (glioma, meningioma, acoustic neuroma, other brain tumors, and salivary gland tumors), leukemia, or other types of cancer. None of the studies demonstrated the existence of any harmful health effects from wireless device RF exposures.
8. How can I find out how much Radio Frequency energy exposure I can get by using my wireless device? All wireless devices sold in the United States must comply with Federal Communications Commission (FCC) guidelines that limit Radio Frequency (RF) energy exposures. The FCC established these guidelines in consultation with the FDA and the other federal health and safety agencies. The FCC limit for RF exposure from wireless devices is set at a Specific Absorption Rate (SAR) of 1.6 watts per kilogram (1.
World Health Organization (WHO) International EMF Project (http://www.who.int/emf) Health Protection Agency (http://www.hpa.org.uk/) Consumer Information on SAR This wireless device meets the Government’s Requirements for Exposure to Radio Waves. Your wireless device is a radio transmitter and receiver. It is designed and manufactured not to exceed the emission limits for exposure to radiofrequency (RF) energy set by the Federal Communications Commission (FCC) of the U.S. Government.
works, exploit, or distribute in any manner or medium any content or services displayed through this device. “THIRD PARTY CONTENT AND SERVICES ARE PROVIDED “AS IS.” NEITHER COOLPAD NOR ANY AFFILIATE THEREOF (COLLECTIVELY, "COOLPAD") WARRANT IN ANY MANNER CONTENT OR SERVICES SO PROVIDED, EITHER EXPRESSLY OR IMPLIEDLY, FOR ANY PURPOSE. COOLPAD EXPRESSLY DISCLAIMS ANY IMPLIED WARRANTIES, INCLUDING BUT NOT LIMITED TO, WARRANTIES OF MERCHANTABILITY OR FITNESS FOR A PARTICULAR PURPOSE AND NON-INFERINGEMENT.
Trademarks and Copyrights Copyright © 2017 Coolpad Technologies Inc. All Rights Reserved. Coolpad and the Coolpad logo are registered trademarks of Yulong Computer Telecommunication Scientific (Shenzhen) Co., Ltd. Google and Android are trademarks of Google Inc. Other trademarks and trade names are the property of their respective owners. All rights are reserved. Reproduction, transfer, distribution of the contents herein in any manner without the prior written permission of Coolpad Technologies, Inc.
Standard Limited Warranty (This standard Limited Warranty supersedes and replaces for all purposes the Standard Limited Warranty that appears in the enclosed documentation, if any). COOLPAD TECHNOLOGIES, INC.
from the Product's sale, condition or performance. Notwithstanding the foregoing, neither this warranty nor provision of any Product shall, in and of itself, provide for in persona jurisdiction over any of COOLPAD's employees, contractors, agents, and/or other representatives, or over its affiliated entities.