Mobile Internet Device S7 User’s Manual This guide may be changed for product improvement without prior notice.
Thanks for purchasing viliv. Please read the precautions throughly before using the product.
Copyright Yukyung Technologies Corp. has the copyright for this guide. Contents of this manual may not be copied or produced in any form or means without prior authorization from Yukyung Technologies Corp. ©2009 Yukyung Technologies Corp. All rights reserved. Certification 7KLV GHYLFH KDV DFTXLUHG (0& FHUWL¿FDWLRQ IRU KRPH XVH &ODVV % and is designed not only for use in residential area but anywhere.
Contents Safety Precautions for Use................................................. 4 Names of Parts................................................................... 7 %DVLF &RPSRQHQWV ..........................................................................7 Front View .......................................................................................8 Keyboard .........................................................................................9 /HIW 5LJKW 9LHZ ................................
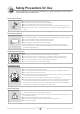
Mob ile I n Device net ter S7 Safety Precautions for Use The precautions below are provided to prevent bodily injury or property damage by using this product correctly. Please observe the precautions. Precautions on Power 'R QRW WRXFK WKH SRZHU DGDSWHU ZLWK ZHW KDQGV Plug the power cord into an outlet with grounded jack. %H VXUH WKH SOXJ JRHV LQ DOO WKH ZD\ DQG LV QRW ORRVH 'R QRW XVH \RXU GHYLFH LI LW LV GDPDJHG LQFOXGLQJ DQ H[SRVHG RU SHHOHG SRZHU FRUG If lightning occurs nearby or if
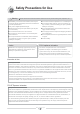
Mob ile I n Device net ter S7 Safety Precautions for Use Warning 3OHDVH REVHUYH WKH LQVWUXFWLRQV EHORZ )DLOXUH WR GR PD\ FDXVH KHDWLQJ ¿UH H[SORVLRQ HWF If the battery can be seen to be swollen, there may be imminent danger. Immediately contact the manufacturer or sales representative. 2QO\ XVH DQ HOLJLEOH VSHFL¿HG FKDUJHU .HHS WKH GHYLFH DZD\ IURP RSHQ ÀDPHV 'R QRW SXW LW LQ D PLFURZDYH 'R QRW OHDYH WKH GHYLFH LQ D FDU LQ VXPPHU 'R QRW VWRUH RU XVH WKH GHYLFH LQ D KRW DQG ZHW SOD
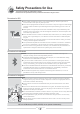
Mob ile I n Device net ter S7 Safety Precautions for Use The device functions vary depending on model. 5HDG WKH UHOHYDQW SUHFDXWLRQV IRU WKH SURYLGHG IXQFWLRQ EHIRUH XVLQJ WKH GHYLFH 3UHFDXWLRQV IRU *36 When initially operating this device, it is recommended you warm it up for over 15 minutes under a clear open sky and open area. If the vehicle equipped with this device is not used for 7 days or longer, the data storage UHFKDUJHU LQVLGH WKH *36 PD\ EH GLVFKDUJHG DQG UHTXLUH ZDUPLQJ XS WLPH RI RYHU
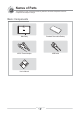
Mob ile I n Device net ter S7 Names of Parts The appearance of the components below may differ from the actual components and some components are subject to change. %DVLF &RPSRQHQWV 0DLQ %RG\ 6WDQGDUG 5HPRYDEOH %DWWHU\ $& '& 3RZHU $GDSWHU 86% &DEOH User’s Manual MID 7 English
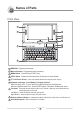
Mob ile I n Device net ter S7 Names of Parts Front View :(%&$0 Equipped with webcam. Built-in Speakers Equipped with stereo speakers. 0(18 %XWWRQ 5XQV :LQGRZV 67$57 PHQX PIVOT Button 5RWDWHV WKH :LQGRZV VFUHHQ GHJUHHV FRXQWHUFORFNZLVH 7)7 /&' 7RXFK 6FUHHQ Users can operate the device using the touch screen. Operation Lndicators 3RZHU %DWWHU\ &KDUJLQJ /QGLFDWRU Hard Disk Drive LED Turns on when the system accesses the hard disk drive.
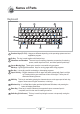
Mob ile I n Device net ter S7 Names of Parts Keyboard Function Keys (F1~F12) Usages are different depending on the operating system used and application program. Fn Key This key is used together with function keys. &KDUDFWHUV DQG 1XPEHUV There are keys for entering characters, a space key for entering space, number keys from 0 to 9, and other special symbol keys. &XUVRU 0RYLQJ .H\V These are to move the cursor while using programs.
Mob ile I n Device net ter S7 Names of Parts /HIW 5LJKW 9LHZ D-SUB ,W LV XVHG WR FRQQHFW DQ H[WHUQDO VFUHHQ VXFK DV PRQLWRU RU SURMHFWRU 0XOWL , 2 3RUW ,W LV XVHG IRU FRQQHFWLQJ H[WHUQDO YLGHR RXWSXW FRPSRQHQW FRPSRVLWH V YLGHR DQG H[SDQVLRQ SDFN 0LFURSKRQH 3RUW For connecting a microphone. Earphone Port For connecting earphone. 3RZHU $GDSWHU 3RUW For connecting power adapter or charging the battery.
Mob ile I n Device net ter S7 Names of Parts Rear View 7KH ¿JXUH EHORZ VKRZV WKH UHDU VLGH RI WKH PDLQ ERG\ ZLWKRXW WKH EDWWHU\ 5HIHU WR 3DJH IRU 6HSDUDWLQJ $WWDFKLQJ EDWWHU\ 6HSDUDWLQJ $WWDFKLQJ %DWWHU\ Push the battery downward to separate the battery, as shown LQ WKH ¿JXUH DERYH %DWWHU\ &KDUJLQJ 3RUW Connection part of battery terminal.
Mob ile I n Device net ter S7 ,QVWDOODWLRQ DQG &DEOH &RQQHFWLRQ &RQQHFWLQJ (DUSKRQH DQG 0LFURSKRQH Connect earphone and microphone to the ports located on the left of the device. Notice :KHQ FRQQHFWLQJ H[WHUQDO VSHDNHUV EH VXUH WR FRQQHFW WKH VWDQGDUG SL VWHUHR FDEOH RI WKH speakers to the earphone jack.
Mob ile I n Device net ter S7 ,QVWDOODWLRQ DQG &DEOH &RQQHFWLRQ 3RZHU &RQQHFWLRQ &KDUJLQJ $GDSWRU The charger is connected to the power adapter terminal on the left side of the station. Notice %DWWHU\ FKDUJLQJ VWDWXV LQGLFDWRU :KLOH FKDUJLQJ XVLQJ $& DGDSWHU ) 5HG FKDUJLQJ %OXH IXOO\ FKDUJH MID 13 English
Mob ile I n Device net ter S7 ,QVWDOODWLRQ DQG &DEOH &RQQHFWLRQ 86% 'DWD /LQN &RQQHFWLRQ $ 86% FDEOH LV FRQQHFWHG WR WKH 86% 'DWD /LQN SRUW RQ WKH ULJKW VLGH RI WKH VWDWLRQ 86% &RQQHFWLRQ 7KLV LV XVHG IRU WKH FRQQHFWLRQ RI H[WHUQDO GHYLFHV VXFK DV GLJLWDO FDPHUD H[WHUQDO +'' HWF MID 14 English
Mob ile I n Device net ter S7 ,QVWDOODWLRQ DQG &DEOH &RQQHFWLRQ 5RWDWLQJ /&' 6FUHHQ /&' VFUHHQ FDQ EH URWDWHG IRU WKH FRQYHQLHQFH RI WKH XVHU ,W FDQ EH URWDWHG XS WR GHJUHHV in a clockwise direction. Notice 7DNH FDUH QRW WR XVH H[FHVVLYH IRUFH WR URWDWH WKH VFUHHQ PRUH WKDQ WKH DOORZHG GHJUHHV RWKHUZLVH it may result in a malfunction.
Mob ile I n Device net ter S7 6HSDUDWLQJ Â $WWDFKLQJ %DWWHU\ Separating Battery Press the battery separation/lock button on the right of the device in the direction shown in the ¿JXUH EHORZ 5HPRYH WKH EDWWHU\ Notice Separate the charger after turning the power of the station off. If not, you may receive an electric shock by a short circuit in the battery power part. $WWDFKLQJ %DWWHU\ Align the battery in the groove and press it down until a clicking sound is heard.
Mob ile I n Device net ter S7 Basic Operation 7XUQLQJ WKH 3RZHU 2Q 2II Turning the power on Move the power button on the right up while the device is off to turn on the power. Z 7KH /&' VFUHHQ WXUQV RQ DQG WKH PDLQ VFUHHQ LV displayed. Turning the power off Use the “Shutdown” menu in the Start Menu to turn off the device while Windows is running.
Mob ile I n Device net ter S7 Basic Operation 8VLQJ 0(18 )XQFWLRQ 0(18 To run Start Menu of Windows. Using PIVOT Function Users can change the orientation of the screen to horizontal or vertical for a convenient working environment. PIVOT 3UHVV WKH 3,927 EXWWRQ RQ WKH ULJKW RI WKH PRQLWRU while the device is on. Z Pressing the key will rotate the screen by 90 degrees counterclockwise each time. Z This function is effective only when Windows is booted up and running.
Mob ile I n Device net ter S7 Basic Operation 6HW 8S IRU YLOOY 0DQDJHU YLOLY 0DQDJHU LV H[HFXWHG E\ GRXEOH WRXFKLQJ YLOLY0DQDJHU RQ WKH VFUHHQ 1 1 :LUHOHVV /$1 3RZHU Turn on/off self-powered wireless LAN function. 2 &DPHUD 3RZHU Turn on/off self-powered Camera function. 3 0RGHP 3RZHU Turn on/off self-powered Modem function. 4 Windows Booting Option 2)) $OZD\V VWDUW ZLWK 2)) VWDWXV 2. Last Status: Start with the last status. 21 $OZD\V VWDUW ZLWK 21 VWDWXV 5 %ULJKWQHVV RI /&' Adjus
Mob ile I n Device net ter S7 Using for the First Time Using for the First Time For each Windows installation process, the installation time may vary depending on the process. Please wait until the installation is complete. Along with the start of Microsoft Windows XP Home, the preparation screen for starting :LQGRZV DSSHDUV DV LQ WKH IROORZLQJ ¿JXUH The Windows start screen for setting up computer appears. Click next to continue.
Mob ile I n Device net ter S7 Using for the First Time The screen related to automatic update appears. After the selection, click next. The screen to assign the computer name appears. If you want to assign the computer name later, you can assign in computer control SDQHO ĺ V\VWHP UHJLVWUDWLRQ LQIRUPDWLRQ ĺ FRPSXWHU QDPH 7KH VFUHHQ DVNLQJ ³'R \RX ZDQW WR UHJLVWHU on the internet?” appears. After selecting Yes or No, click next.
Mob ile I n Device net ter S7 5HFRYHU\ 6ROXWLRQ $0, 5HVFXH *XLGH $V DQ LPDJH EDVHG 26 UHFRYHU\ VROXWLRQ LW UHFRYHUV WR WKH LQLWLDO VWDWXV RI VKLSPHQW IURP IDFWRU\ ZKHQ +'' RI XVHU FDQQRW EH ERRWHG IURP 26 RU LW KDV SUREOHPV :D\ WR 8VH 5HFRYHU\ 6ROXWLRQ $0, 5HVFXH ([HFXWLRQ RI 5HFRYHU\ 6ROXWLRQ $0, 5HVFXH ,I YLOLY ORJR DSSHDUV ZKHQ ERRWLQJ WKH V\VWHP %,26 3267 SUHVV WKH ) NH\ WLPHV Z $V WKH ORJR GLVDSSHDUV 3UH %RRW 0HQX ZLQGRZ DSSHDUV 3UH %RRW 0HQX :KHQ VHOHFWLQJ 1RUPDO %RRW ER
Mob ile I n Device net ter S7 6SHFL¿FDWLRQV 7KH VSHFL¿FDWLRQV EHORZ PD\ EH FKDQJHG IRU HQKDQFHPHQW RI SURGXFW SHUIRUPDQFH ZLWKRXW SULRU notice. *HQHUDO 6SHFL¿FDWLRQV Product Name S7 &38 &KLSVHW Intel® AtomTM = *+] 6&+ 86 : /&' W\SH :69*$ [ 7RXFK SDQHO 5$0 *% Storage +'' *% 66' *% /$1 IEEE 802.
Mob ile I n Device net ter S7 0HPR MID 24 English
Rev. 1.