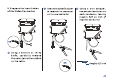
3. Prepare for installation | €) Sea wire cutter/stripper | 8 Using a wire stripper, of the Valve Controller to remove the connector | remove the insulation on on the new controller. each conductor, leaving : roughly half an inch of exposed conductor €8 Using a scissors or utility knife, carefully remove the outer jacket/insulation on the cable.
4. Prepare for installation of the Manipulator €F Use wire cutter/stripper to remove the interconnection existing manipulator Using a wire stripper or utility knife, carefully remove the outer tintinnabulation on the cable.
5. Connect the Manipulator to the Controller €8 Using a wire nut, twist the black wire with text marked “24AWG" (positive) wire from the controller together with the positive {red, typically} wire on the manipulator {wires may be white and black, with white positive and black negative} €3 Using wire nut, twist the black with half white {negative} wire from the controller together with negative (black, typically) wire on the manipulator €) Nontransparent exposed wire conductors (copperplate.
D-6. Instructions for installing the X3 Valve Controller for use with an existing Motorized Valve (Non-smart, 2-wire, 12VDC only} 1. These Tools may be Required Wire Cutter/Stripper Utility Knife Scissors Wire Nuts Electrical Tape /Connectors {2} 1. Yourexistingmotorized valve must he 2-wire, 12 VDC, non-smart, and functional Li] 2 Wire nuts [twist-on connectors) are the recommended wire splicing method.
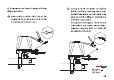
3. Prepare for installation | €) Sea wire cutter/stripper | 8 Using a wire stripper, of the Valve Controller to remove the connector | remove the insulation on on the new controller. each conductor, leaving : roughly half an inch of exposed conductor €8 Using a scissors or utility knife, carefully remove the outer jacket/insulation on the cable.
4. Prepare for installation of the €} Using a wire stripper or utility Motorized Valve knife, carefully remove the outer . . jacket/insulation on the cable.
5. Connect the Motorized Valve to the Controller €8 Using a wire nut, twist the black wire with text marked “24AWG" (positive) wire from the controller together with the positive (red, typically) wire on the motorized valve {wires may be white and black, with white positive and black negative} €3 Using wire nut, twist the black with half white {negative} wire from the controller together with negative (black, typically) wire on the motorized valve €) Nontransparent exposed wire conductors (copperplate.
D-7. Test the Controller and Manipulator/Motorized Valve/Bulldog Valve Robot D-7-1. Test the Controller and Manipulator/Bulldog Valve Robot (see illustration Next Page) # Test the controller several times by pressing the SET button and watching for the smooth closing/opening of the valve.
D-7-1.
D-8.
E. Using the Bobolink App E-1.
E-Z. Details page a. Device Type bh. Rename the Device ¢. Choose a Room for device d. Add/Remove from favorites e. Device History Valve opened or closed, logged with date & time f. Send Notification to you when the valve is left open for a set time g. Device Status: Open or closed Power on gain status is default set to Last State h. Device Time Top to sync with mobile i. Device Model i. Device EUl {unique) -, k. Device SN {unique} Fee : 5 1.
E-3. Automation (Set Up Rules For "If This Then Do That”) The most popular use for our X3 Valve Controller is to shut off water automatically in the event that a water leak has been detected. Generally, you have two options for this: 1. Configure an Automation in the app. Settings you make in the app will “tell” the valve controller to shut off the water is detected. In automation terms, this would be written out “IF a water leak is detected, THEN close the water valve.
oP: a a. Tap the “icon to add an automation br. Add an automation b-1 Edit name 02 Edit trigger BR Edit behavior [You nuts hive at least ong gradation device, or you cannot set u behavior} b-4 Edit when (Set a time range for the automation {always or during specific days 0¥ hires] b-5 Tap to save the settings Swipe Left . La ¢. Click to edit the automation i.
E-4. Timer 0 Millimeter run only once, You can set anew timer after the timer has already run or after you cancel it < Water Vigil § b. Edit the timer f-1 Enable "Turn On After” and {or} “Turn Off Aer” b-2 Set the timer duration in “Hours and Minutes” b-3 Tap to save the settings a.
E-5. Schedule yy 0 2 You may add as many schedules as you want In Automation settings. Automation settings are saved in ea < Wat ais d. Click to edit the schedule 1. Tap " bunion to enable or disable the En b. Tap the icon to add schedule a schedule 2. Swipe left to edit or to delete the schedule ¢. Add a schedule c-1 Set the preferred state “Turn On” and {or) “Turn Off” ¢-2 Set the schedule time ¢-3 Set the repeat frequency c-4 Tap to save the settings a.
E-6. Scene Go tithe “Smart” screen, and default is “Scene” screen a. Tap the icon to add scene Swipe Left naiver aes Vol Add a scene b-medicament b-2 Select an icon b-3 Add/remove from favorites b-4 Edit behavior {You mist hove at least one action device, or yau connote set u behoove} b-5 Tap to save the settings ¢. Click to edit the scene 1. Tap ™ G3 button to run the scene 2 FART 7 button ito edit the scene A.
E-7.
E-7-2. Alexei ® Open/close the valve by voice command as well as the associated app {For example, “Alexei, turn turnoff off the Water Valve” ® Turned overturned off status can be queried by voice command as well as the associated app (For example, “Alexei, what is the status of the Water Valve?” -“The Water Valve is turned on/turned off” ® The X3 Valve Controller can be used as an action device for Alexei routines with two options: turn turnoff off E-7-3.
F. About Yo link Control-DD Yo link Control-DD is our unique device-to-device control technology. Using Yo link Controlled, Yo link devices can be controlled without the Hub or an internet connection. {Use of Yo link Control-D2D is optional; you can use the Automation feature in the app OR use Yo link Control-DD, but Yo link Control-DD offers the benefit of operation without the Hub or internet connection} One device controls another, directly. A device that sends out commands is called the controller.