
Instruction Guide


visit us @ www.ardaappliances.com
pg 8
/^>EDKhEd,KK^
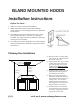
Front of Range/Cooktop
6” Aluminum Duct
Decorative
Chimney Duct
Front of Range/Cooktop
6” Aluminum Duct
Range Hood
&ŝdžŝŶŐƚŚĞĞĐŽƌĂƟǀĞŚŝŵŶĞLJƵĐƚ
1. Carefully separate the telescopic chimney duct pieces.
Ϯ͘ ƩĂĐŚƚŚĞŝŶŶĞƌƉŝĞĐĞŽĨƚŚĞĚĞĐŽƌĂƟǀĞĐŚŝŵŶĞLJƚŽƚŚĞ
top of the cage with screws provided.
ϯ͘^ůŝĚĞƚŚĞŽƵƚĞƌƉŝĞĐĞŽĨƚŚĞĚĞĐŽƌĂƟǀĞĐŚŝŵŶĞLJŽŶƚŽ
the cage over the inner chimney and temporarily hold in
place with two screws.
Installing the Range Hood
WůĞĂƐĞŶŽƚĞƚŚĂƚƚŽĂǀŽŝĚĚĂŵĂŐŝŶŐƚŚĞŚŽŽĚ͕
ŝŶƐƚĂůůĂƟŽŶƌĞƋƵŝƌĞƐƚŚƌĞĞƉĞŽƉůĞ͘
1. ZĞŵŽǀĞŐƌĞĂƐĞĮůƚĞƌƐĨƌŽŵƌĂŶŐĞŚŽŽĚ͘
2. tŝƚŚƚŚĞĂƐƐŝƐƚĂŶĐĞŽĨƚǁŽŽƚŚĞƌƉĞŽƉůĞůŝŌŝŶŐƚŚĞŚŽŽĚ͘
ĨƌŽŵďĞůŽǁ͕ƌĂŝƐĞƚŚĞƵŶŝƚƵŶƟůƚŚĞůŽǁĞƌĐĂŐĞƐŝƚƐŝŶƐŝĚĞ
the range hood lower cage. Be sure the unit is installed
with the controls facing front. Screw hood to cage.
3. ƩĂĐŚϲ͟ĂůƵŵŝŶƵŵĚƵĐƚƚŽƚŚĞŚŽŽĚĚƵĐƚĐŽŶŶĞĐƚŽƌ͘
Seal all seams.
4. Plug in the unit. Note: All electrical wiring must be done
ďLJĂƋƵĂůŝĮĞĚƉĞƌƐŽŶĂŶĚŝŶĂĐĐŽƌĚĂŶĐĞǁŝƚŚĂůůĂƉ-
plicable codes and standards. This range hood must be
properly grounded.
5. ZĞŵŽǀĞƚĞŵƉŽƌĂƌLJƐĐƌĞǁƐŚŽůĚŝŶŐƚŚĞůŽǁĞƌĚĞĐŽƌĂƟǀĞ
chimney piece in place.
6. &ƌŽŵŝŶƐŝĚĞƚŚĞŚŽŽĚ͕ƐĐƌĞǁƚŚĞůŽǁĞƌĐŚŝŵŶĞLJƚŽƚŚĞ
range hood.
7. ZĞͲŝŶƐƚĂůůƚŚĞŐƌĞĂƐĞĮůƚĞƌƐ͘